Multi-well Numerical Model
This module closely mirrors the single-well numerical model module, essentially adhering to the same fundamental principles. The primary distinction lies in its capacity to enable users to incorporate either a single well or multiple well within a single numerical model.
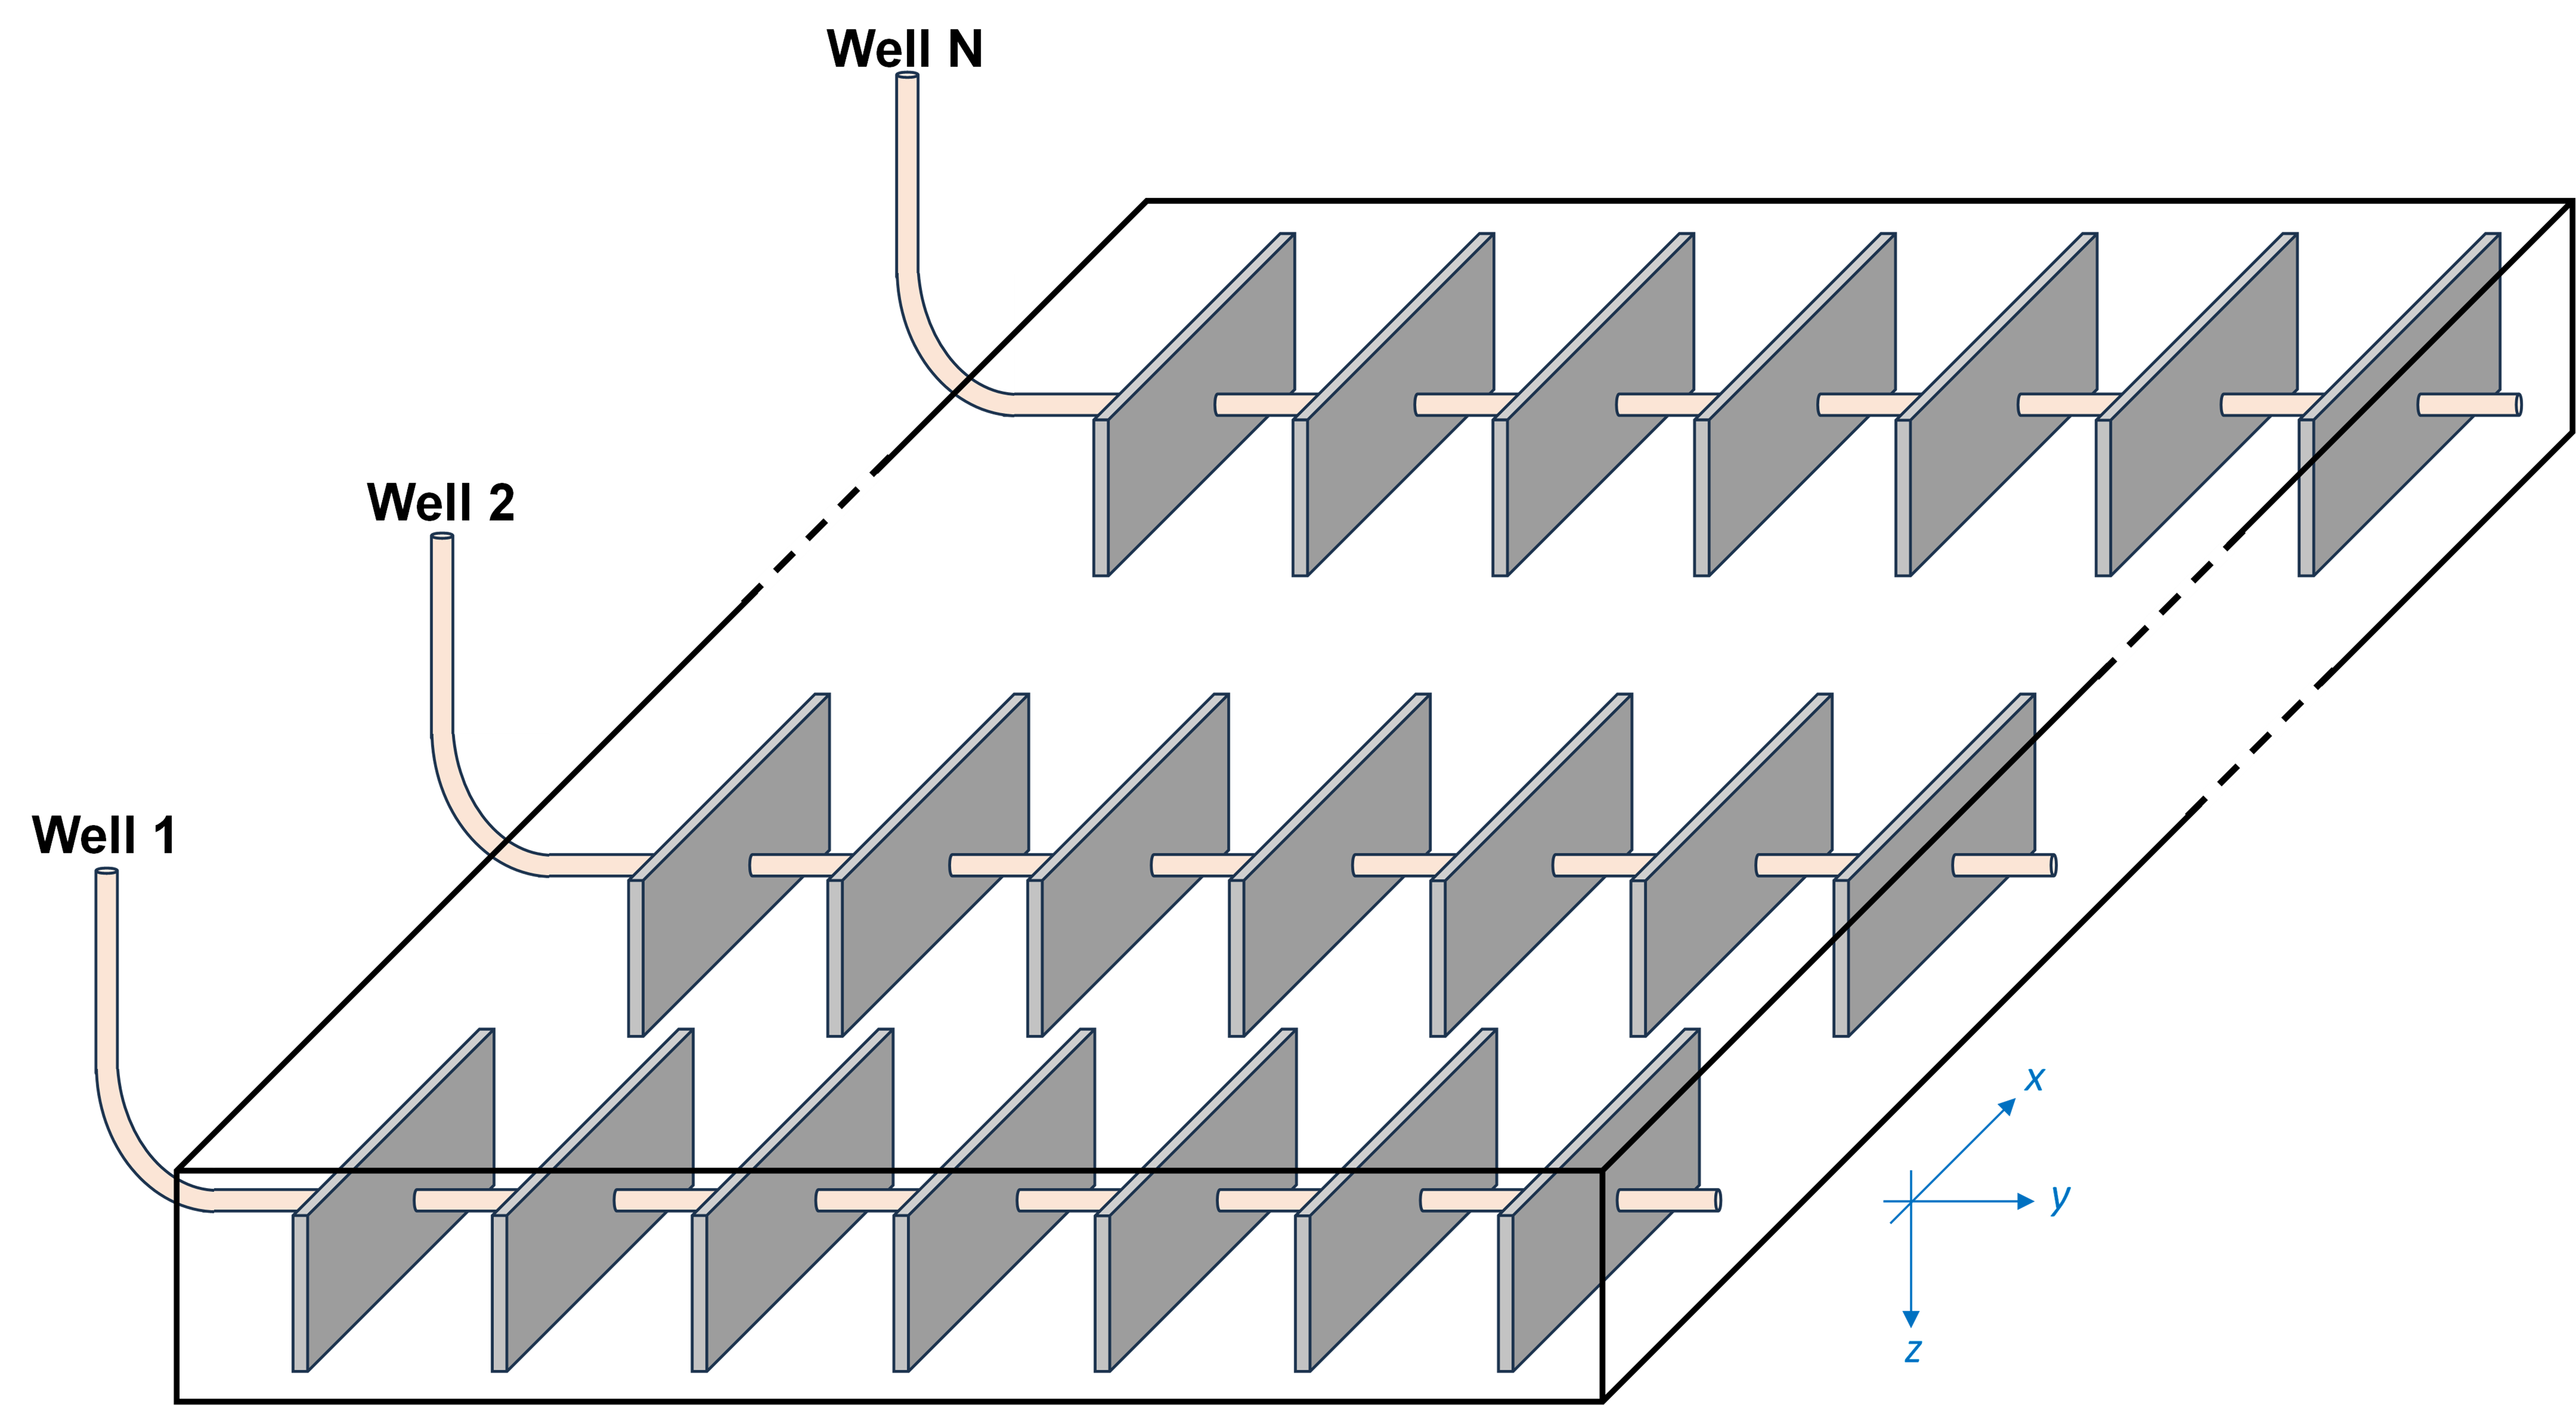
Fig. 1: Multi-well Model
1. Assumptions
1.1. Model Design
1.1.1. Symmetry element
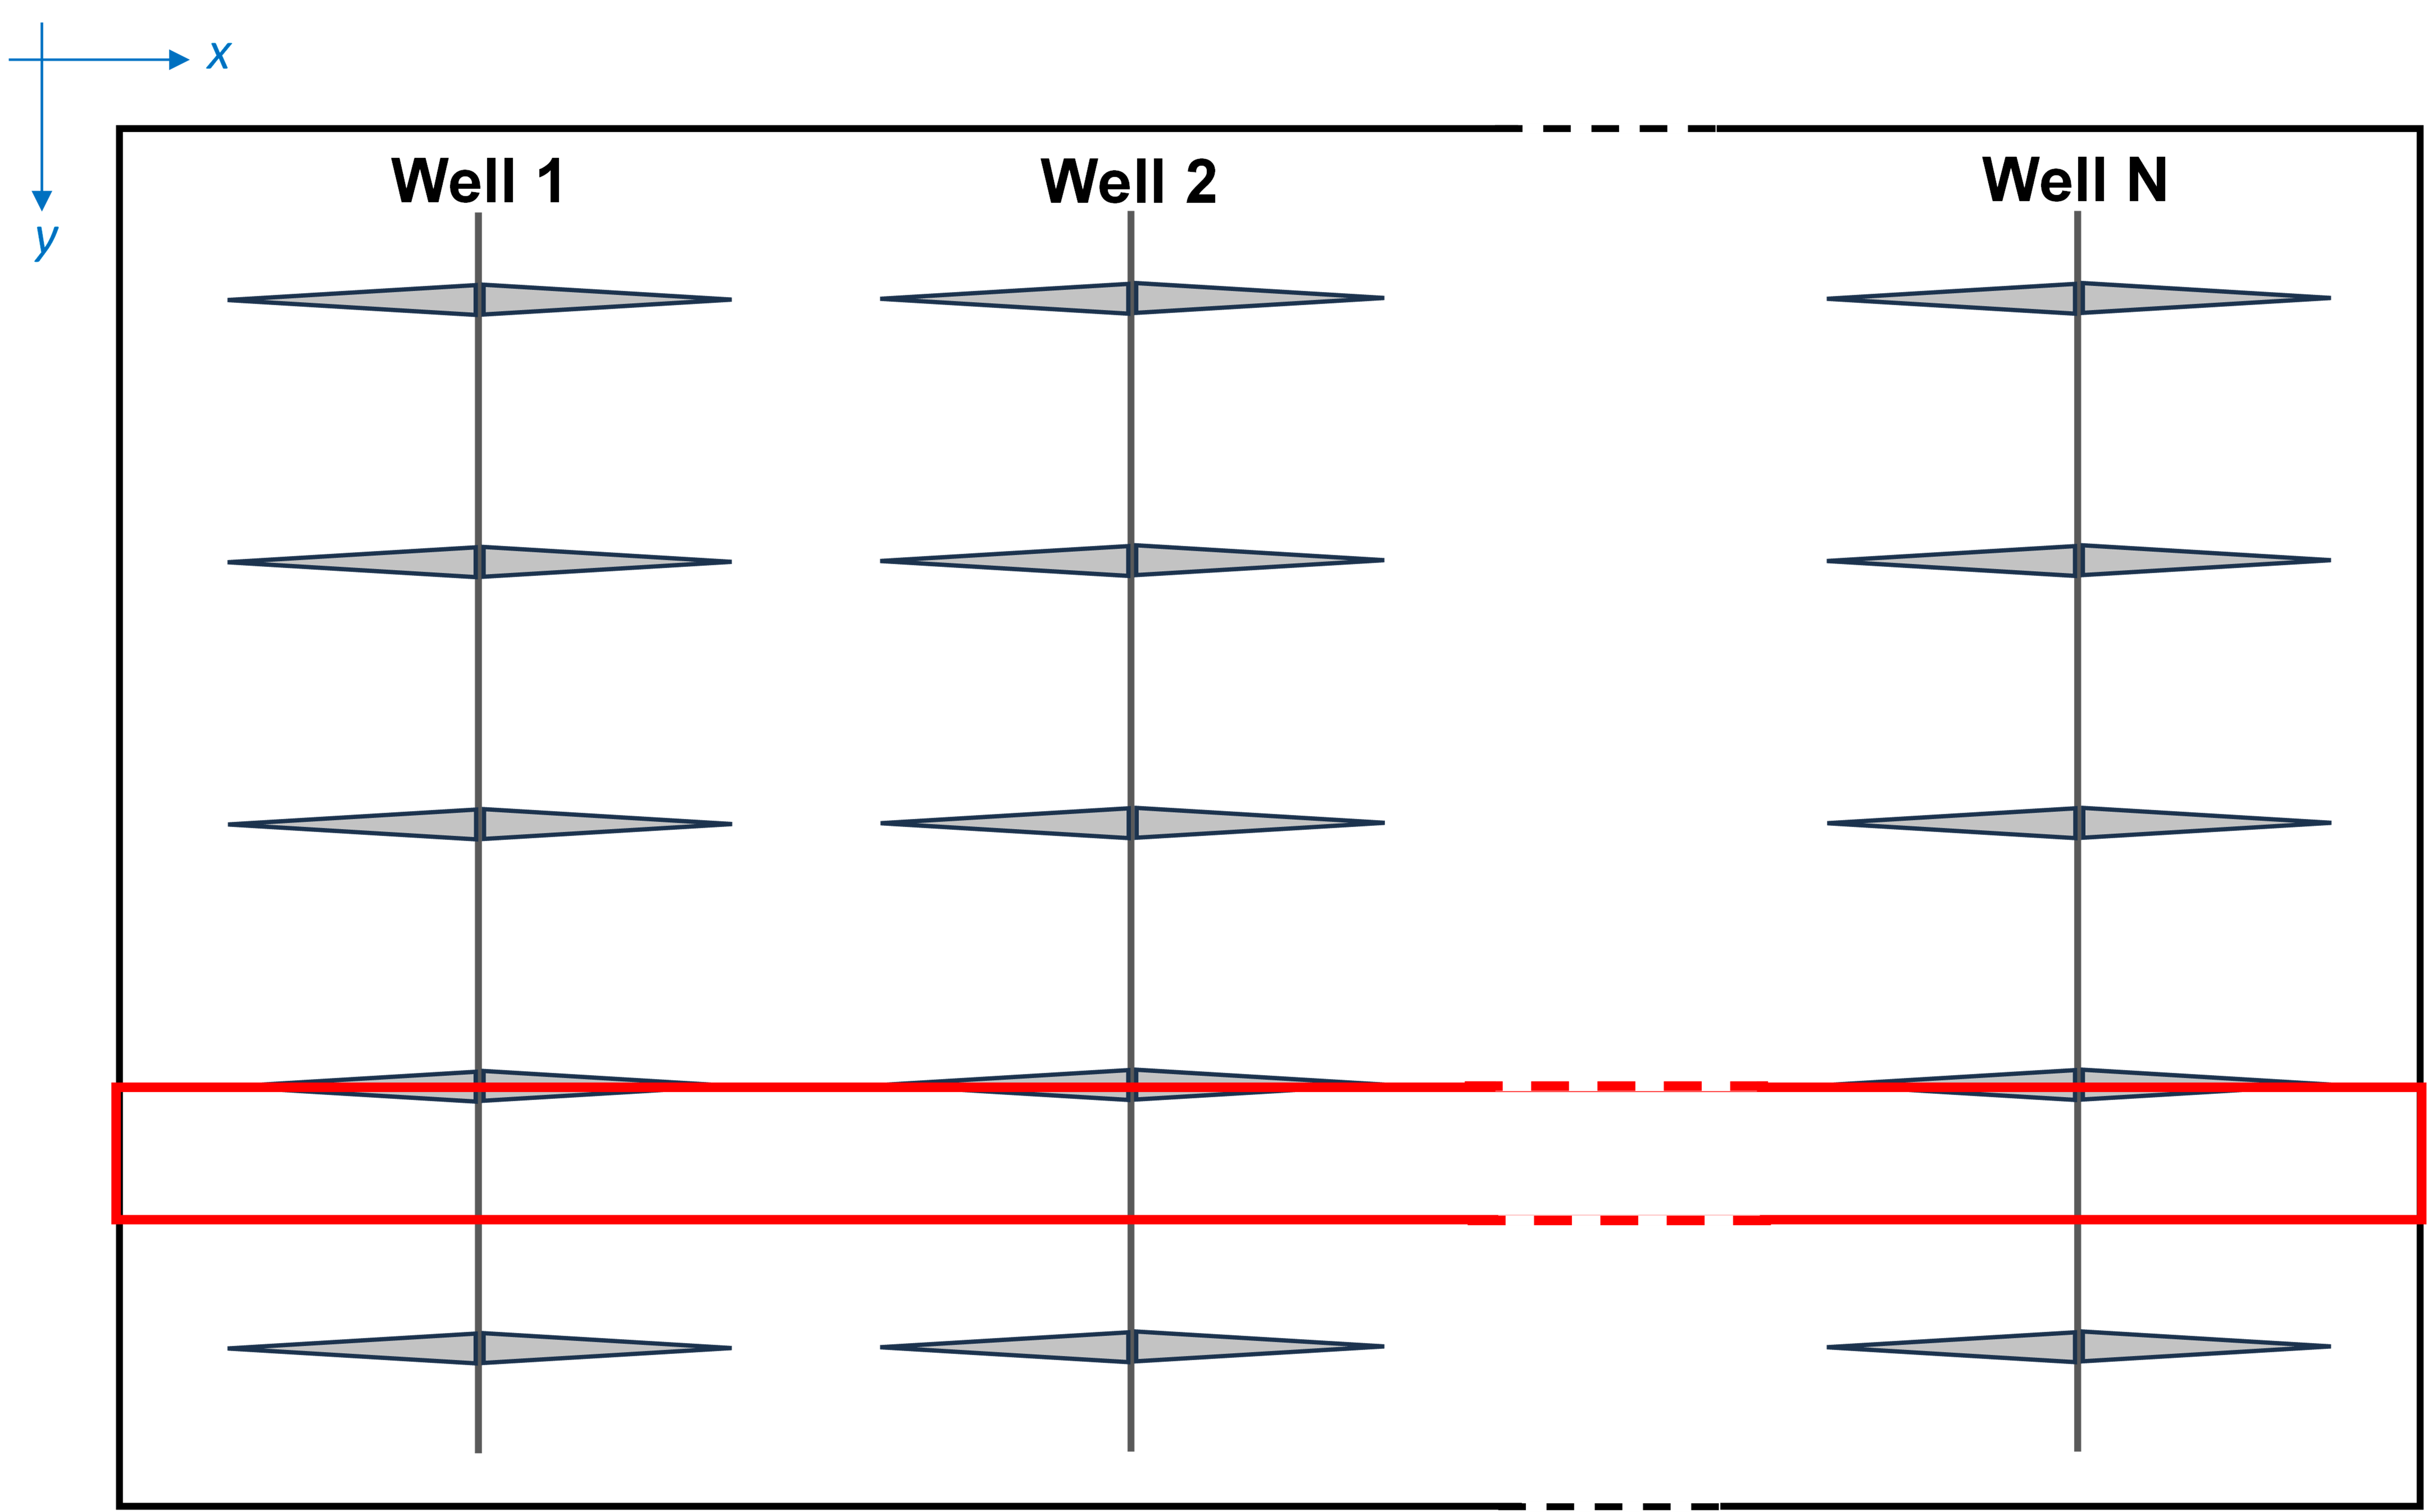
Fig. 2: Birds Eye View
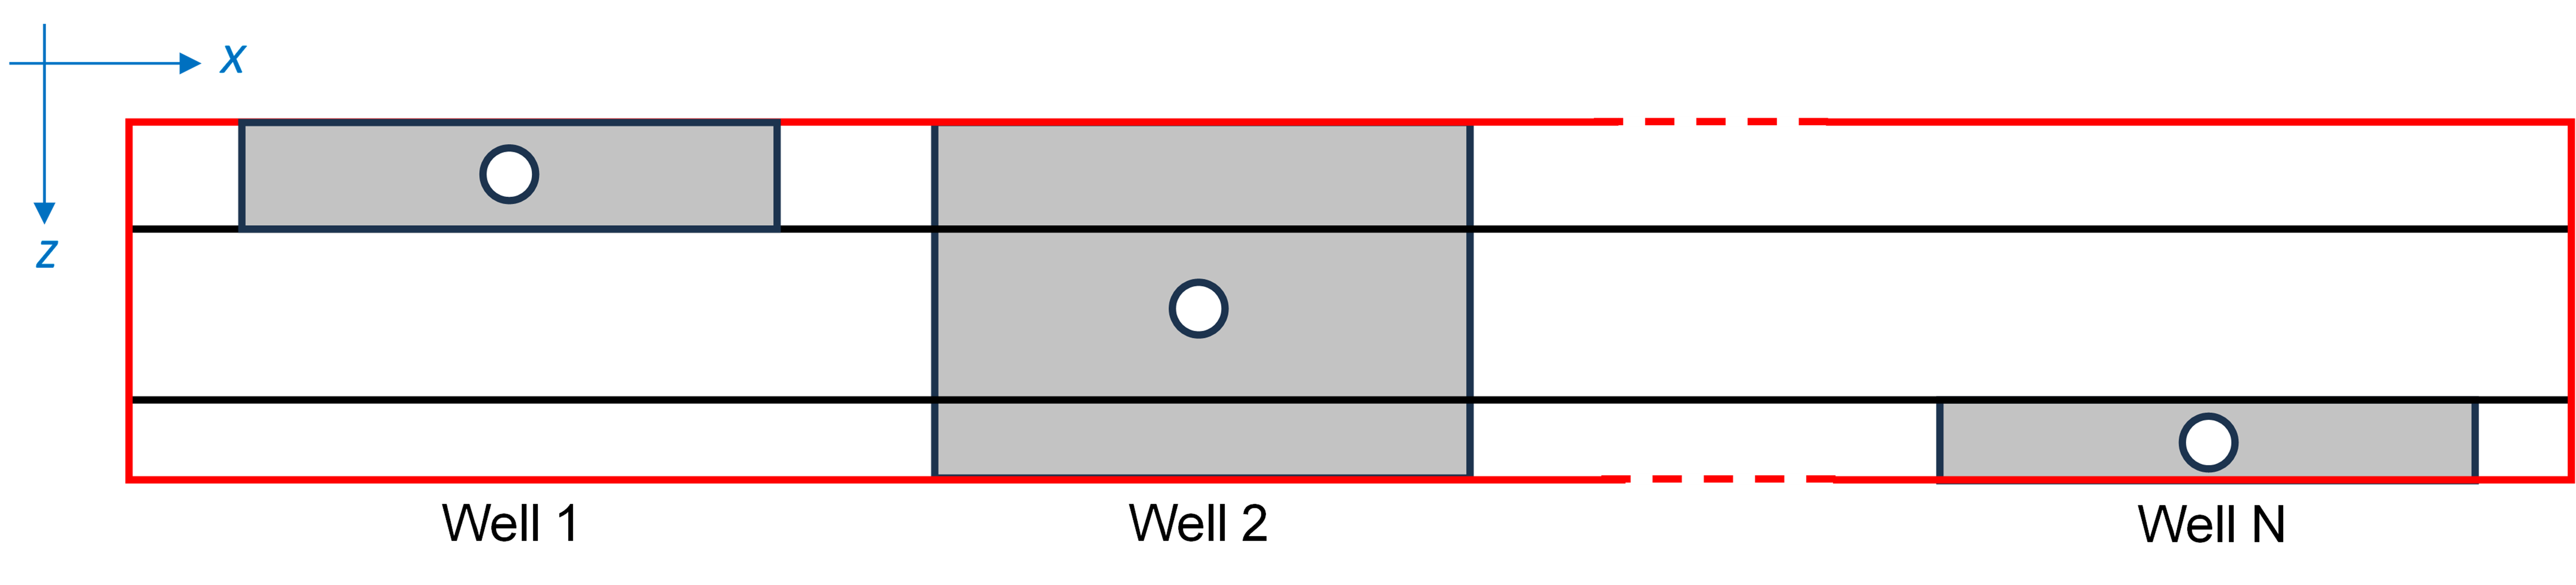
Fig. 3: Gun Barrel View
In accordance with the symmetry element approach, it is assumed that all wells within the model have the same number of fractures. This assumption makes it possible to model a half-fracture for all wells as illustrated in Fig. 2 and Fig. 3. The scaling factor will subsequently be employed to adjust the production performances as defined below
1.1.2. Fracture half-length
Each individual well can have different fracture half-lengths \(\left(x_f\right)\) and heights \(\left(h_f\right)\). The software allows user to have overlapping fractures in the same or different layer between adjacent wells as shown in Fig.4.
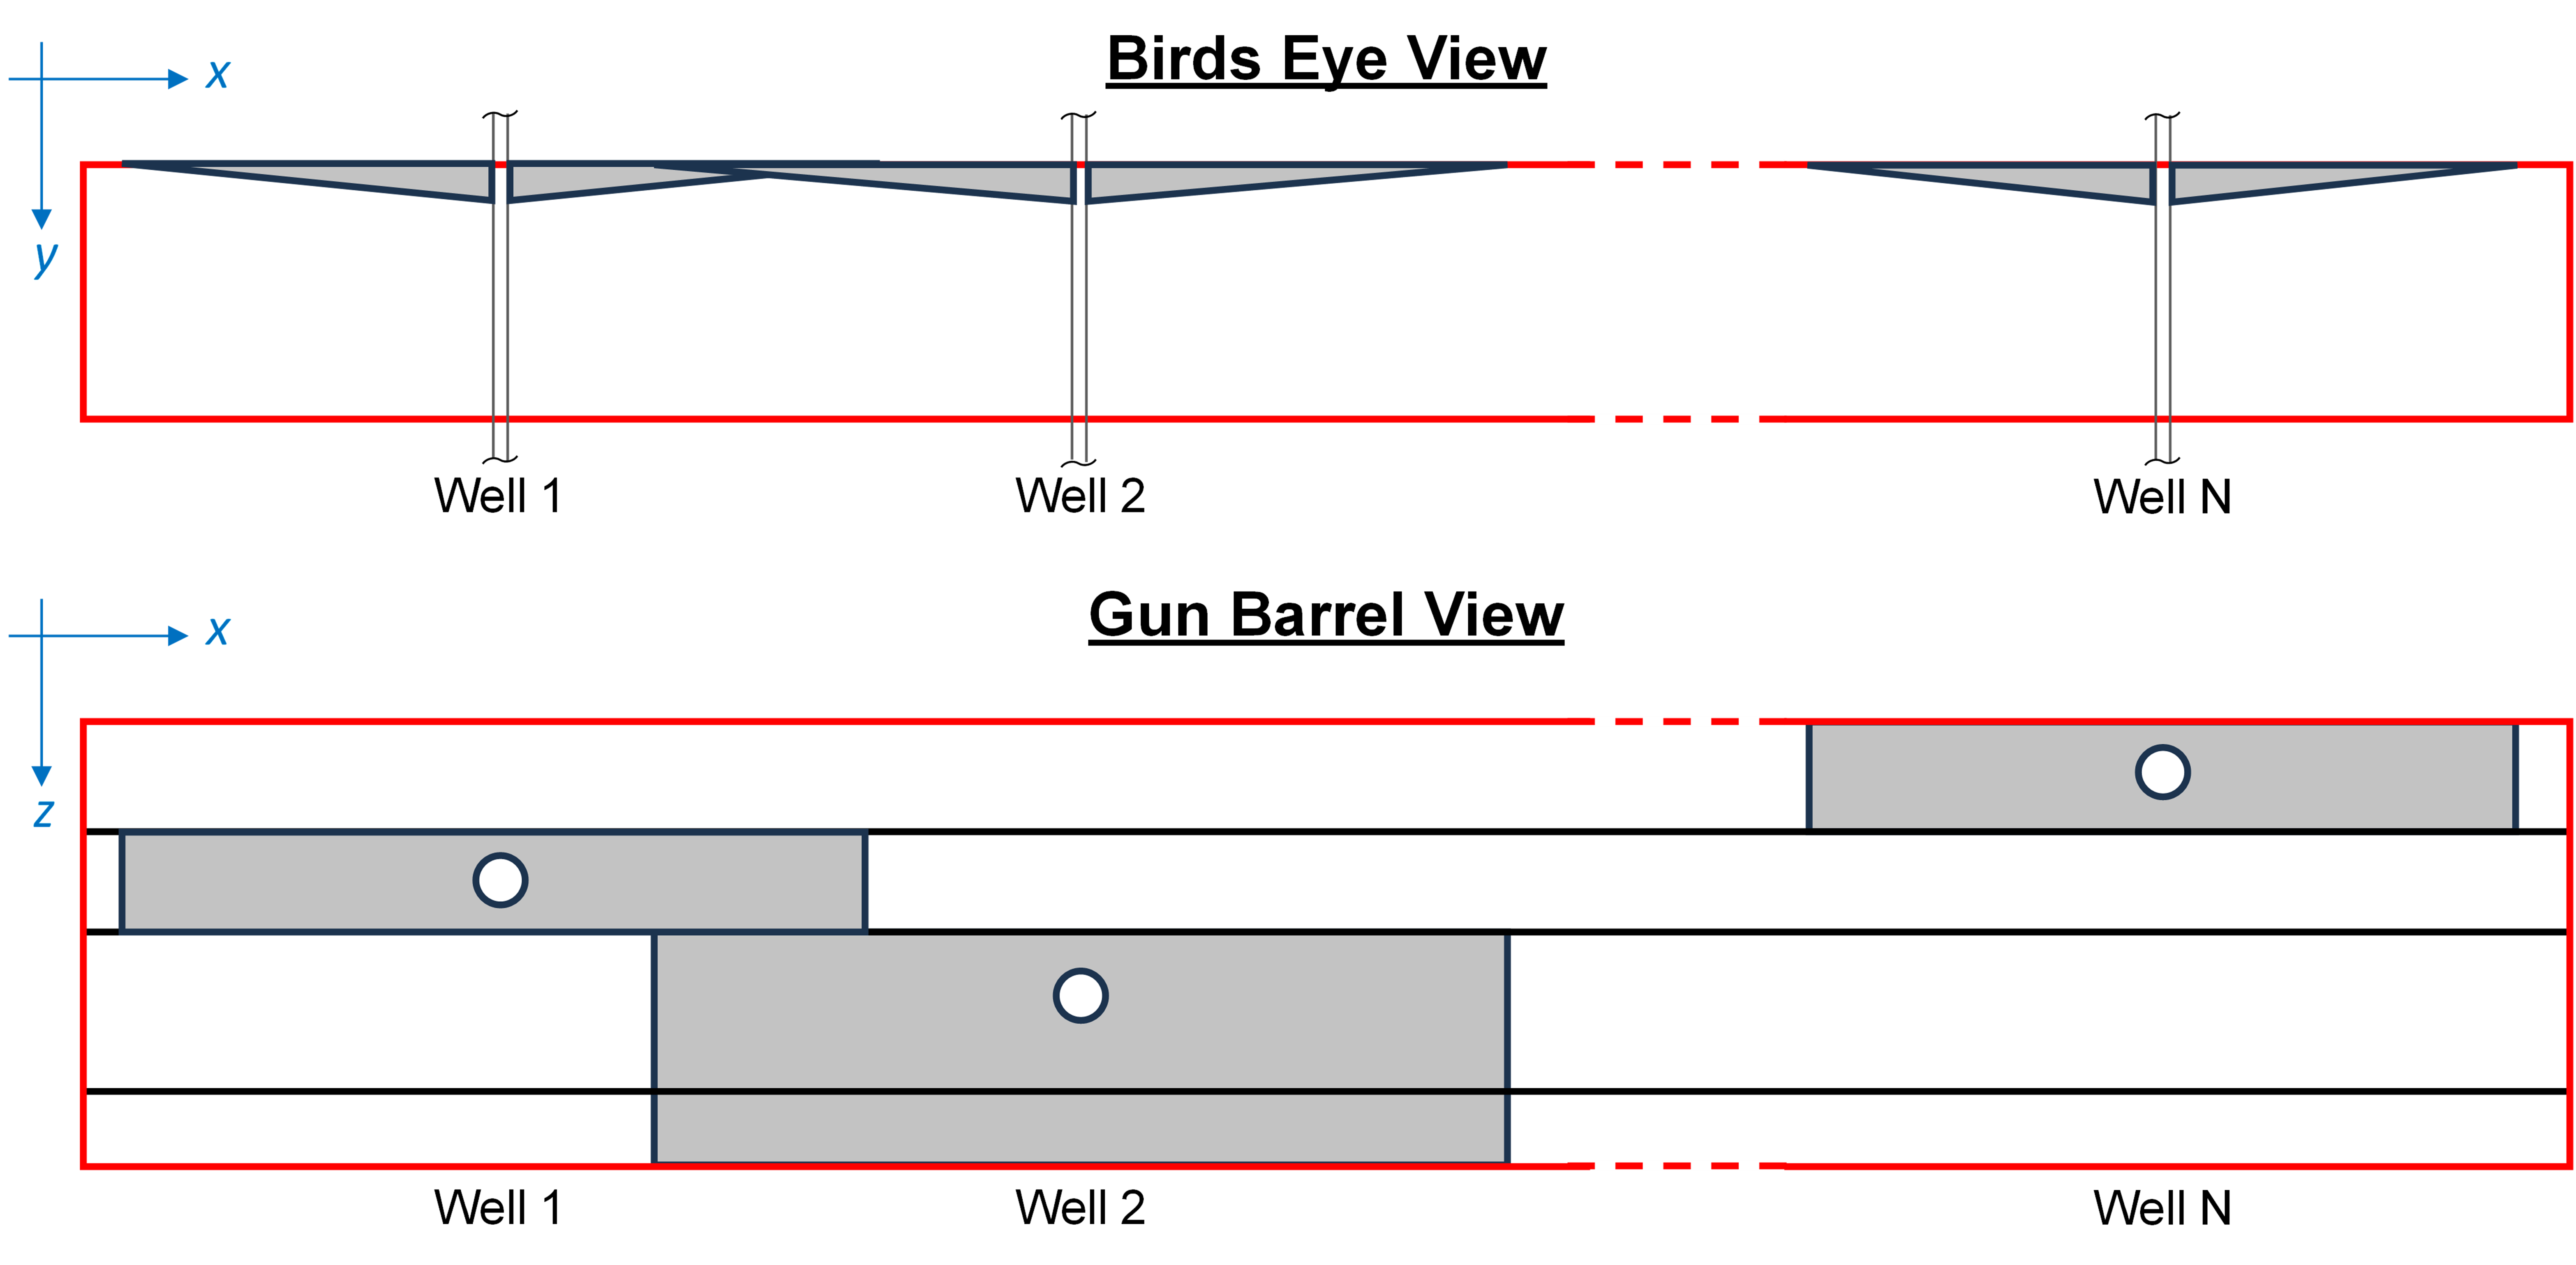
Fig. 4: Overlapping Fractures
1.1.3. Enhanced Fracture Region (EFR) Option
This option is not supported by the current version of multi-well numerical model.
1.1.4. Gridding
The numerical model utilizes logarithmic gridding for the matrix area between hydraulic fractures within the same well, i.e. along y-axis, while maintaining a uniform grid pattern along the x-axis, as visually depicted in Fig.5.
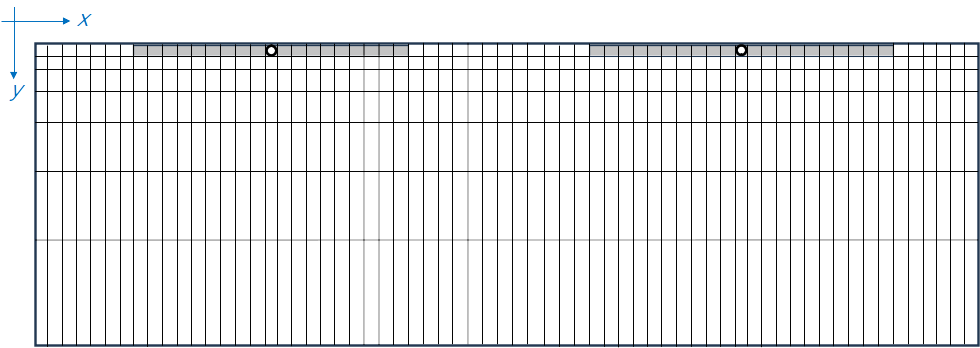
Fig. 5: Gridding of Numerical Model
The number of grid blocks is determined the same manner to that of the single-well numerical model. Here, users are provided with two levels of grid refinement: very low and low. Selecting Very Low option yields the shortest simulation run time but may potentially lose some detail in the simulation outcomes.
1.1.5. Transmissibility Multiplier Assignment for Overlapping Fracture Cells
In the presence of overlapping fractures—where multiple wells influence the same grid cells—transmissibility multipliers are assigned dynamically based on production timing. Rather than assigning fracture permeability directly to the grid, the simulation model uses transmissibility multipliers to adjust grid properties at the onset of each well's production. For each grid cell affected by fractures, the multiplier is calculated from the target transmissibility derived from user-defined fracture conductivity. If a cell is shared by more than one well, the multiplier corresponding to the most recent well to begin production is applied.
Example
If Well A begins producing on January 1st and Well B on March 20th, any overlapping fracture cells will first adopt the multipliers for Well A. When Well B starts production, those same overlapping cells are updated to reflect Well B’s fracture transmissibility instead. This ensures that the most current fracture system is represented in the reservoir model at all times.
1.1.6. LFP and OOIP calculation
The LFP is calculated for each well separately and the OOIP is calculated for the entire multi-well model as a whole, similar to the single well numerical models, like so -
where, in multi-well, multilayer models like this,
For LFP calculations:
Nf = Number of fractures, set to be the same for all wells.
xf = Individual well fracture half-length, as entered.
hf = Total height of all layers that the fracture extends into, from the layering in Reservoir Data input card.
k = For wells fractured into a single layer, the layer permeability as entered for that layer. For wells fractured into multiple layers, the height-averaged permeability is used for all the layers included in 'Fractured Layers' column.
Here's an example worksheet to demonstrate LFP calculations for different cases - single well, multi-well and multi-layer numerical models in whitson+.
For OOIP calculations:
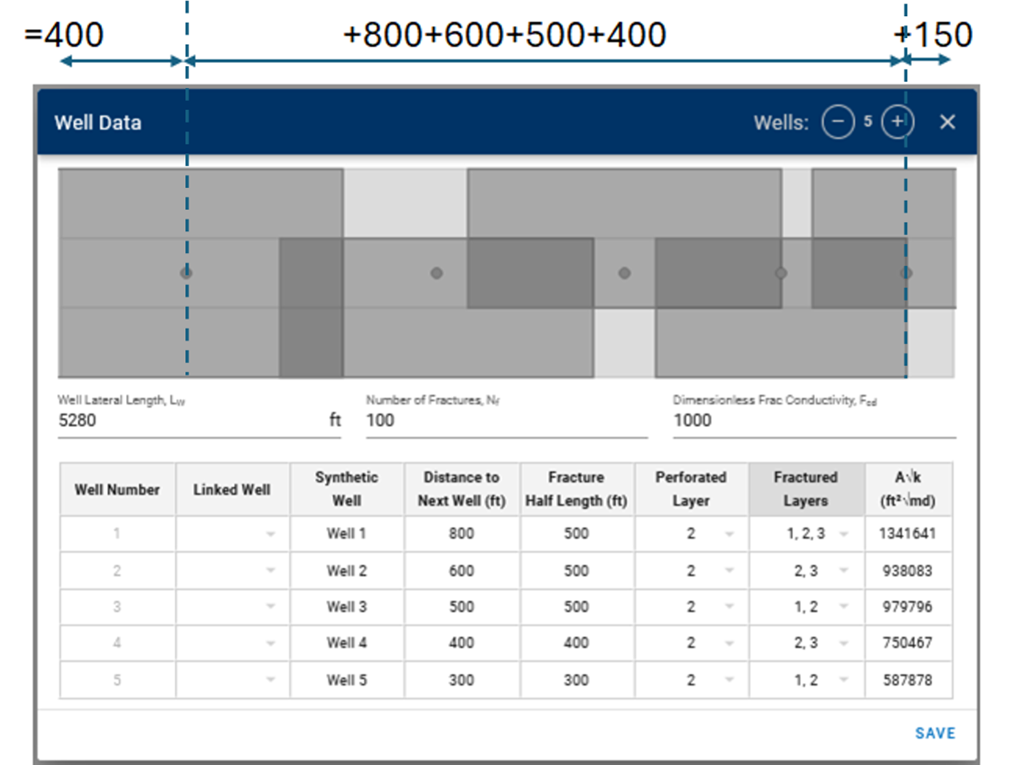
Fig. 6: Illustration of how the xe is calculated for multi-well numerical models
xe = cumulative sum of distances to next well + edge distances on either side as illustrated in this example above.
L = Lateral length, set to be the same for all wells.
hf = Total height of all layers, from the layering in Reservoir Data input card.
Φ = height averaged net porosity, from the layering in Reservoir Data input card.
Swi, Bti = from the selected well PVT in the Fluid Initialization card.
2. Input
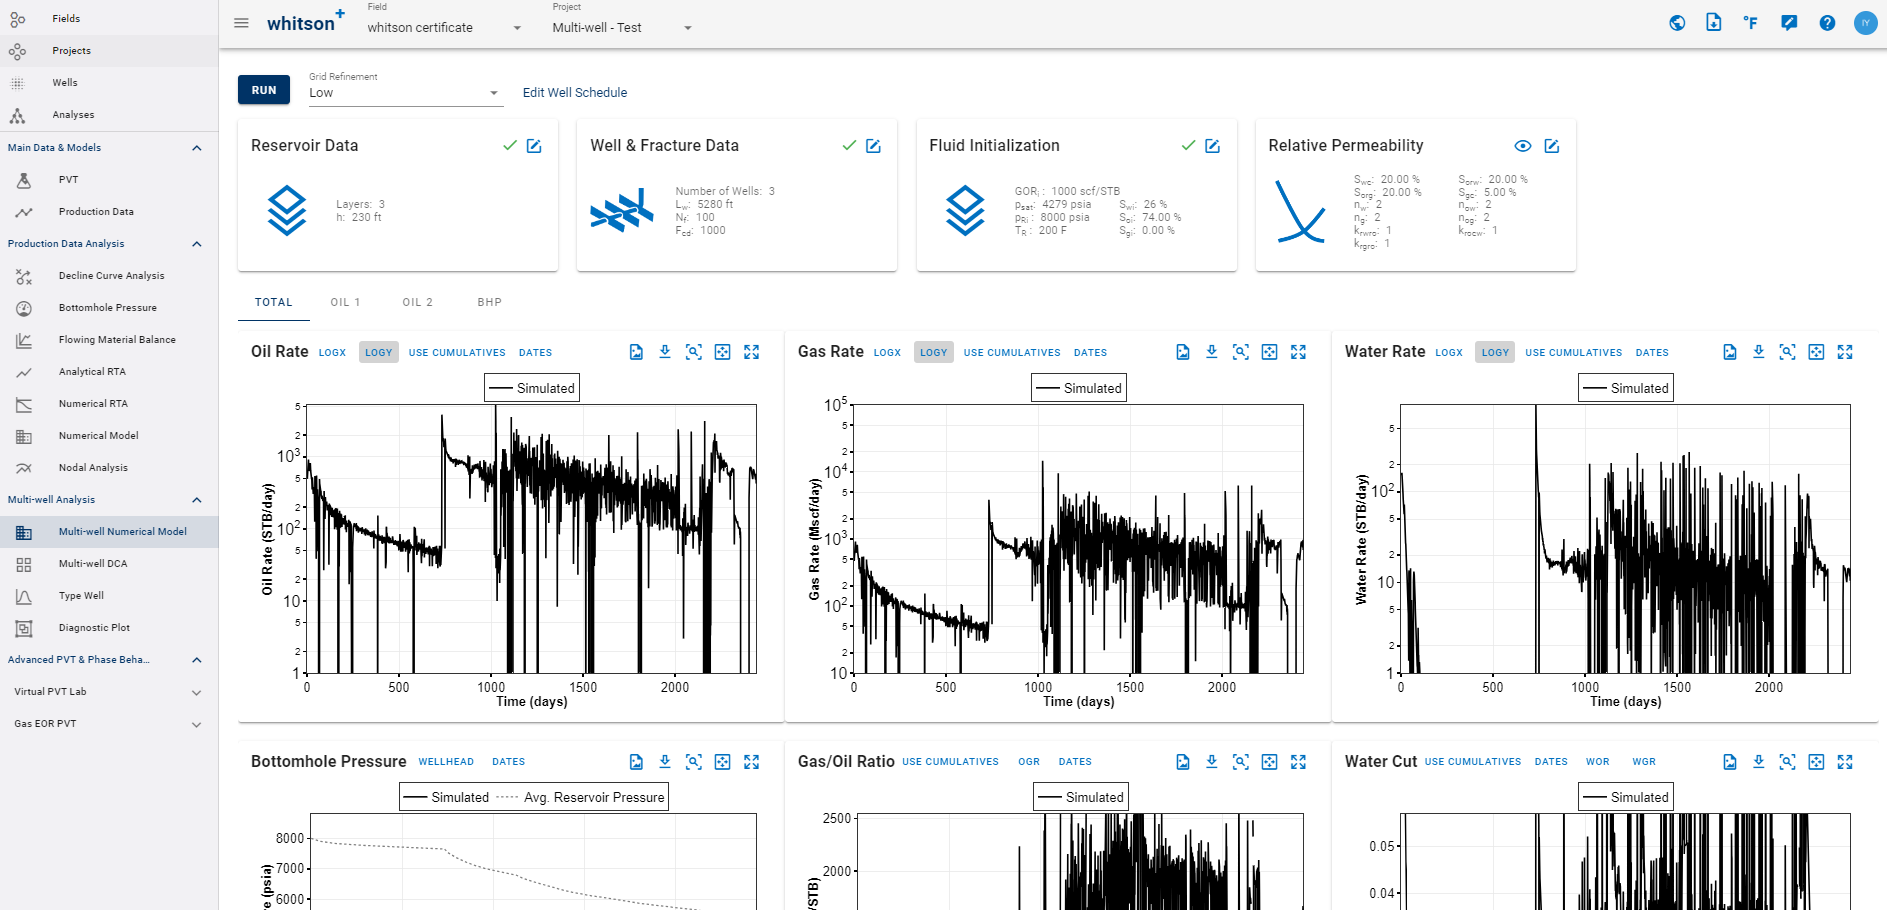
Fig. 7: Multi-well Numerical Model in whitson+
2.1. Reservoir Data
Reservoir height \(\left(h_f\right)\), matrix permeability \(\left(k_m\right)\), matrix porosity \(\left(\phi_m\right)\), rock compressibility \(\left(c_r\right)\), fracture \(\left(\gamma_f\right)\) and matrix gamma \(\left(\gamma_m\right)\) are entered through this data card. The model can be configured as a single- or multi-layer system as depicted in Fig. 7.
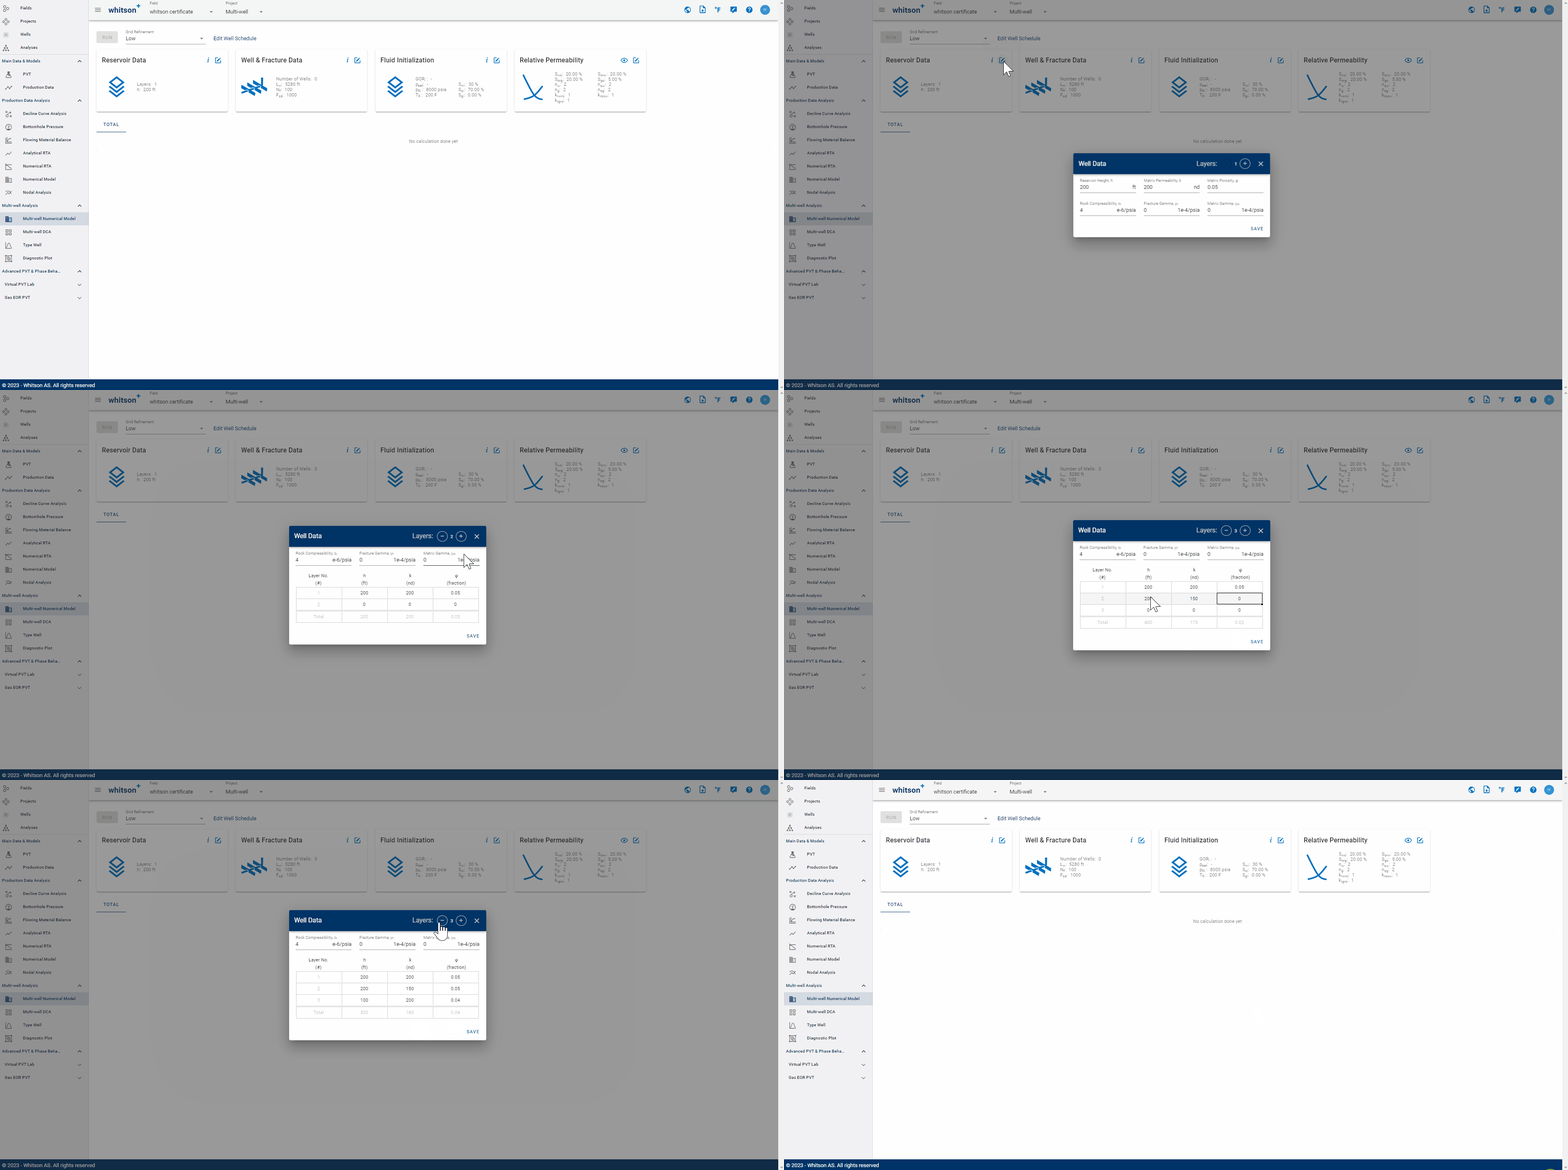
Fig. 8: Reservoir Data Input
2.2. Well & Fracture Data
This data card allows user to input all properties related to well and fractures. Well lateral length \(\left(L_w\right)\), number of fractures \(\left(N_f\right)\), and dimensionless fracture conductivity \(\left(F_{cd}\right)\) are properties applicable to all wells. Properties for each well includes:
- Linked Well: to honor historical data associated with a specific well within the project.
- Synthetic Well: to create a synthetic well. This designated well name serves a role for plotting and visualization purposes.
- Distance to Next Well (ft): well spacing between two individual wells.
- Fracture Half Length (ft): presumed to be uniform for both left and right \(x_f\).
- Perforated Layer: landed layer.
- Fractured Layers: may span across multiple layers.
- \(A\sqrt{k}\): automatically calculated by the software.
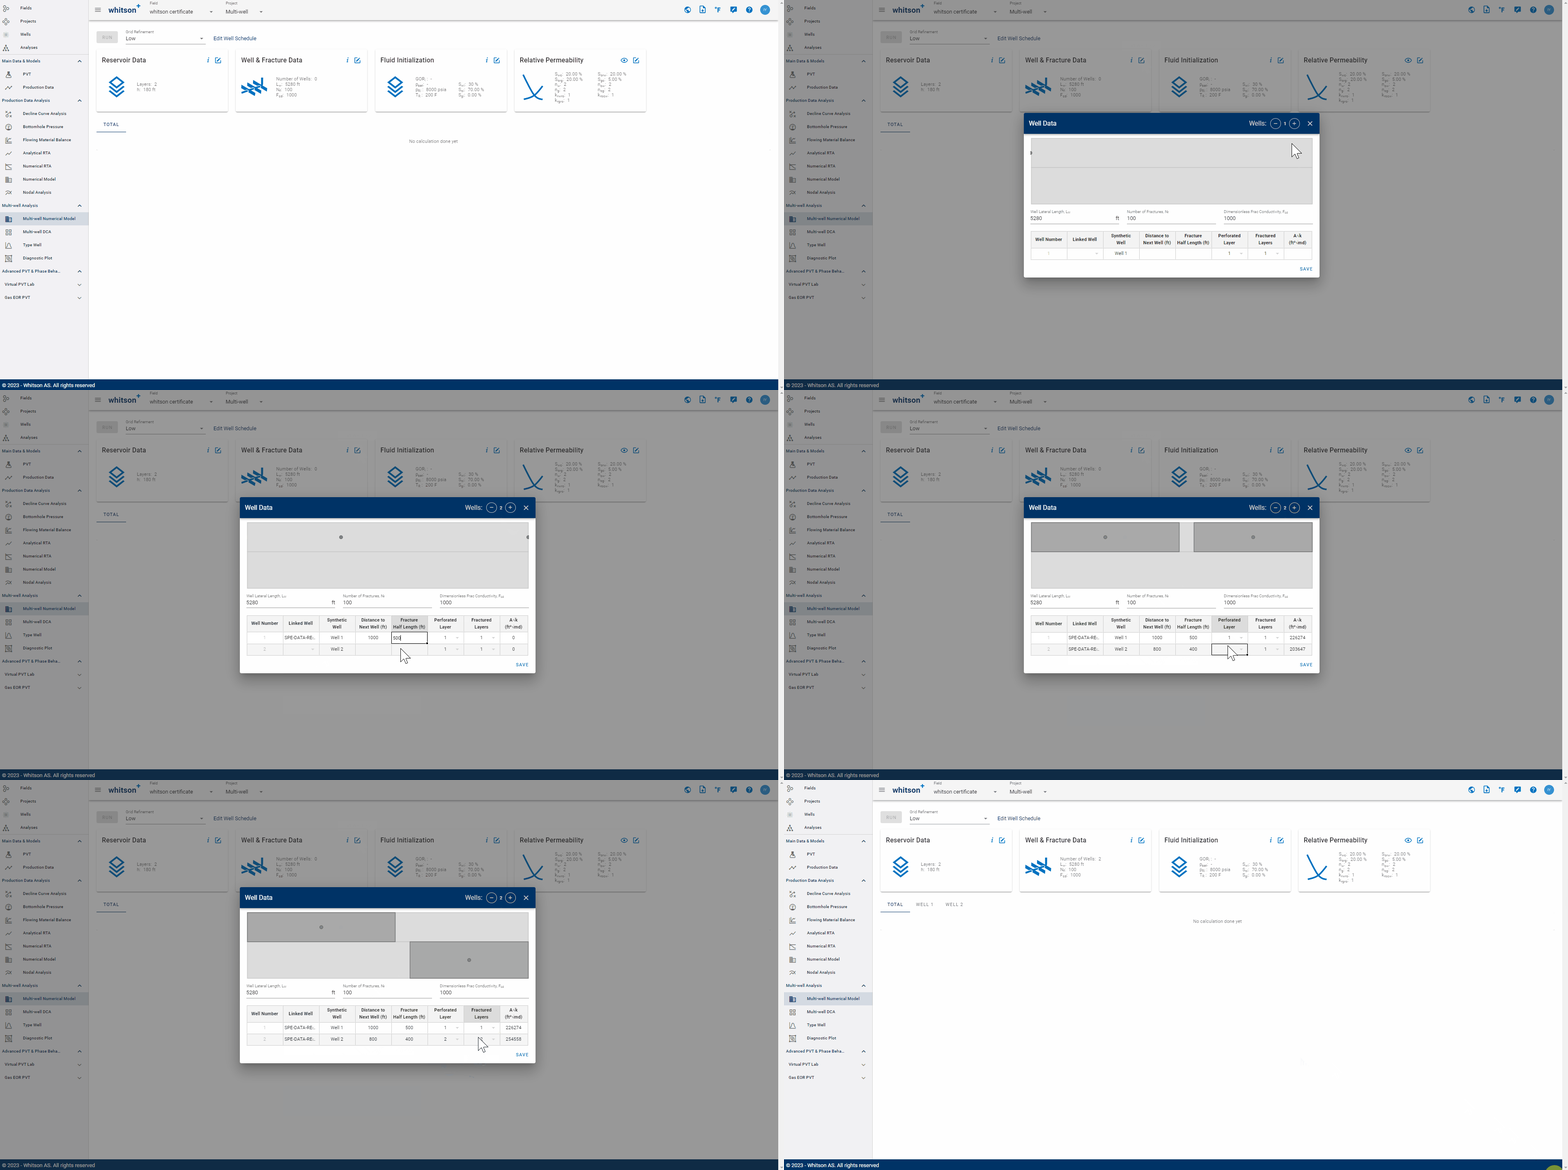
Fig. 9: Well & Fracture Data Input
2.3. Fluid Initialization
This feature offers both single and multi-layer fluid initialization options, seamlessly integrated with PVT characteristics of a designated well. The requirement is to input initial GOR \(\left(R_{ti}\right)\), initial water saturation \(\left(S_{wi}\right)\) and initial reservoir pressure \(\left(p_i\right)\). While for initial solution GOR \(\left(R_s\right)\), initial solution CGR \(\left(r_s\right)\), oil \(\left(S_o\right)\) and gas saturation \(\left(S_g\right)\), and saturation pressure \(\left(p_{sat}\right)\) are calculated by incorporating black oil table and initial GOR, ensuring accuracy and reliability in the modelling process.
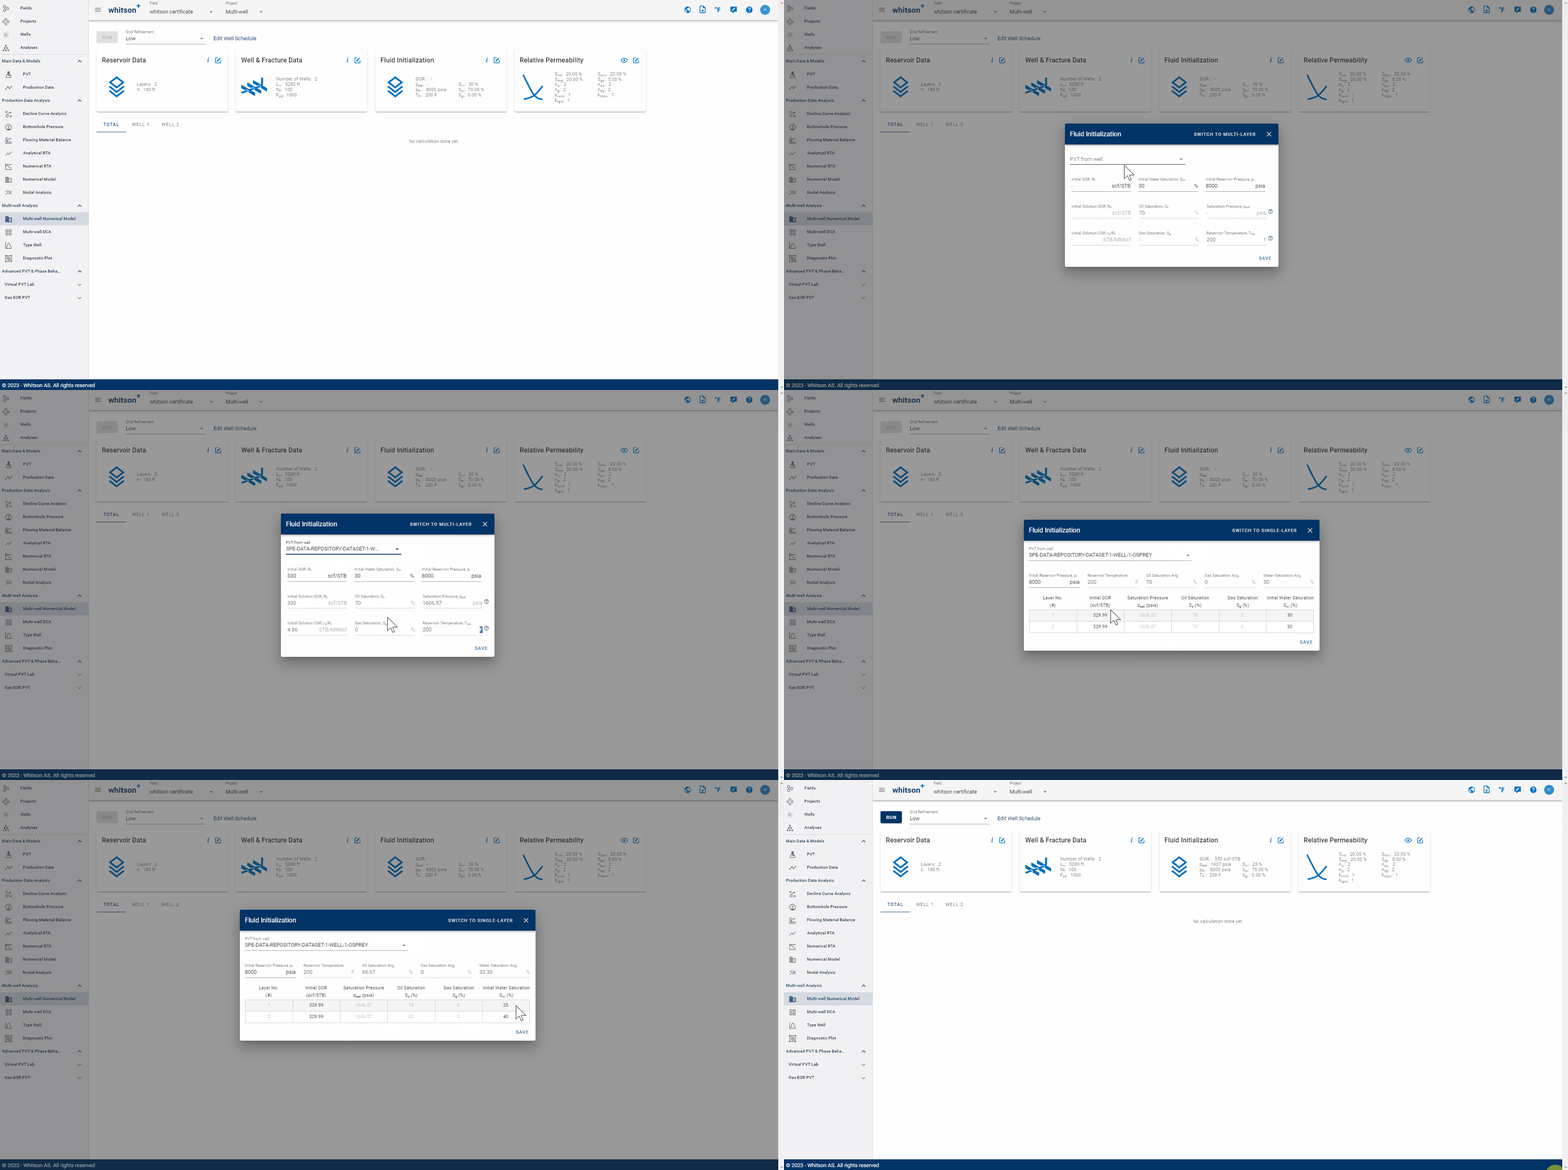
Fig. 10: Fluid Initialization Input
2.4. Relative Permeability
The numerical model incorporates a single set of matrix and fracture permeability.
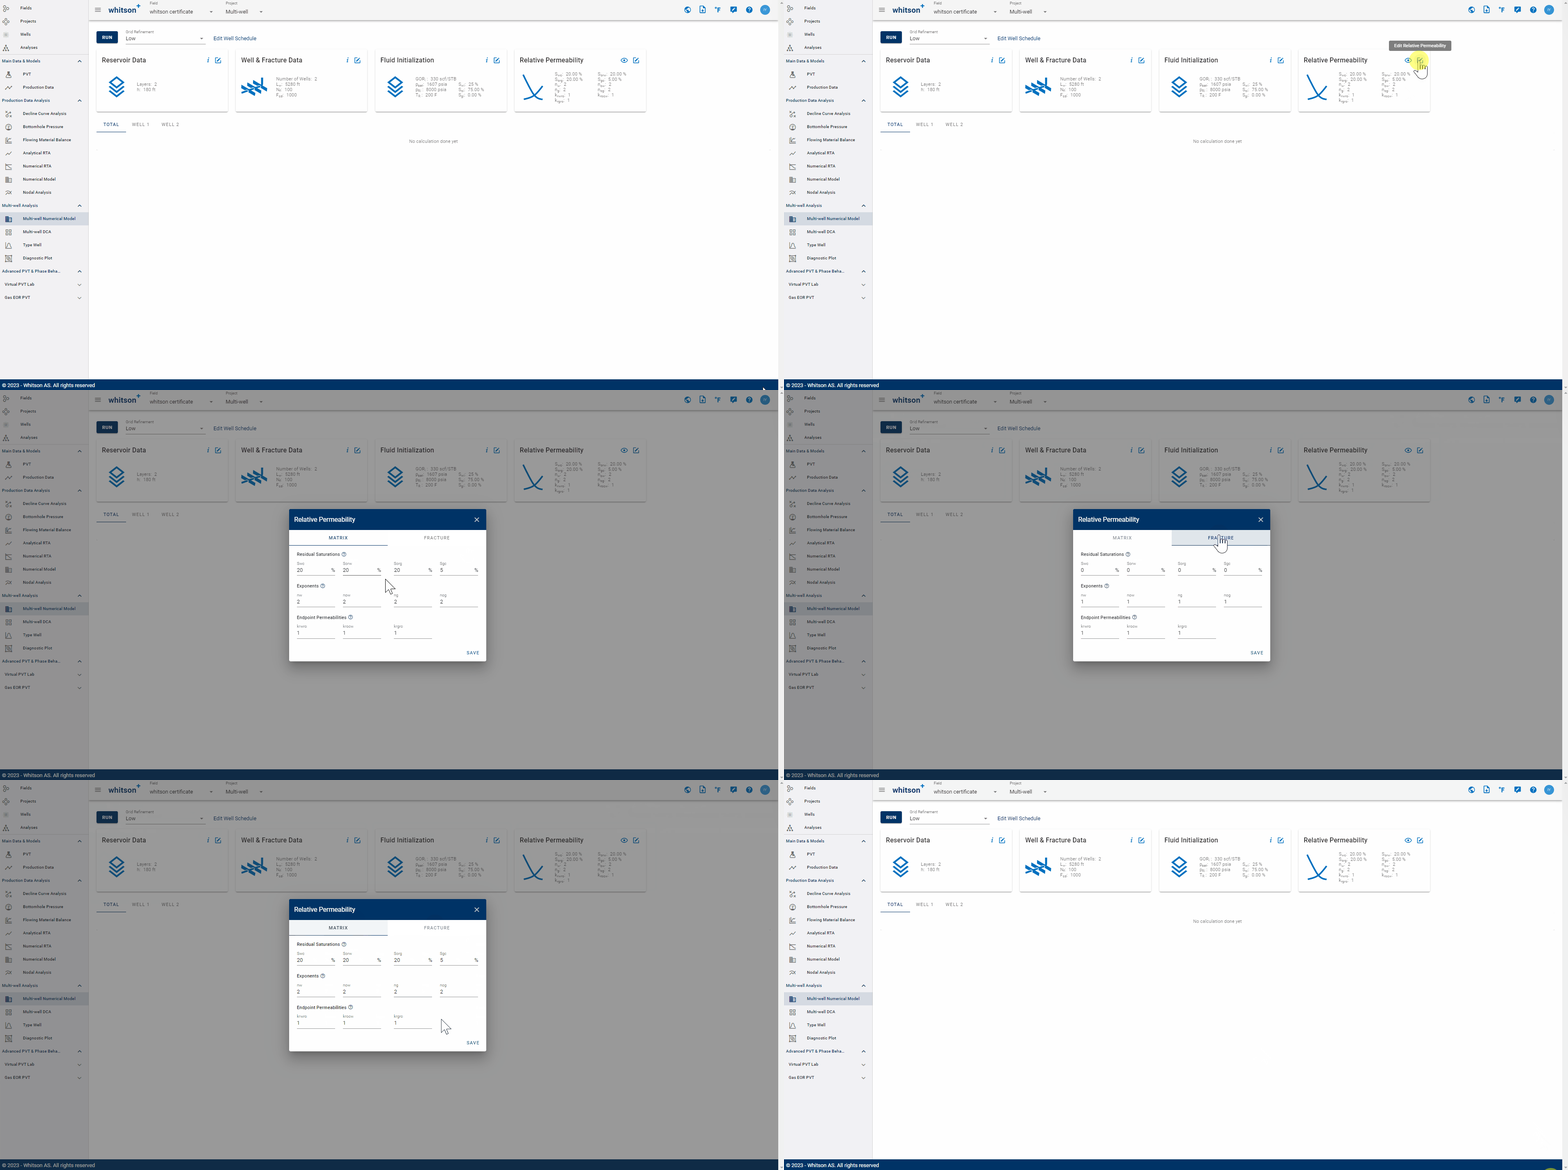
Fig. 11: Relative Permeability Input
2.5. Time Stepping
Time Stepping controls how frequently the simulator evaluates the production schedule during the simulation. Reducing the number of simulated timesteps can significantly decrease runtime while maintaining comparable accuracy for most engineering workflows.
The available time-stepping options are:
| Option | Description |
|---|---|
| All | Simulates every uploaded timestep without skipping any points. |
| Custom | Simulates every Nth timestep, where N is user-defined. For example, setting N = 7 will simulate weekly timesteps. |
2.6. Well Schedule
The Well Schedule defines the operating conditions for each well throughout the simulation. Control modes and target values can be specified for different time periods, allowing users to represent changes in field operations during both history matching and forecasting.
There are six well control options:
| Constraint | Description |
|---|---|
| Oil | Maximum surface oil production rate target or constraint. |
| Gas | Maximum surface gas production rate target or constraint. |
| Water | Maximum surface water production rate target or constraint. |
| Liquid | Maximum surface liquid (oil + water) production rate target or constraint. |
| BHP | Minimum bottomhole pressure target or constraint. |
| BHP (synthetic) | Bottomhole pressure profile target or constraint, with an option to include a maximum rate constraint. The BHP profile is defined by user inputs such as: (a) minimum BHP, (b) time to minimum BHP, and (c) total simulation days. |
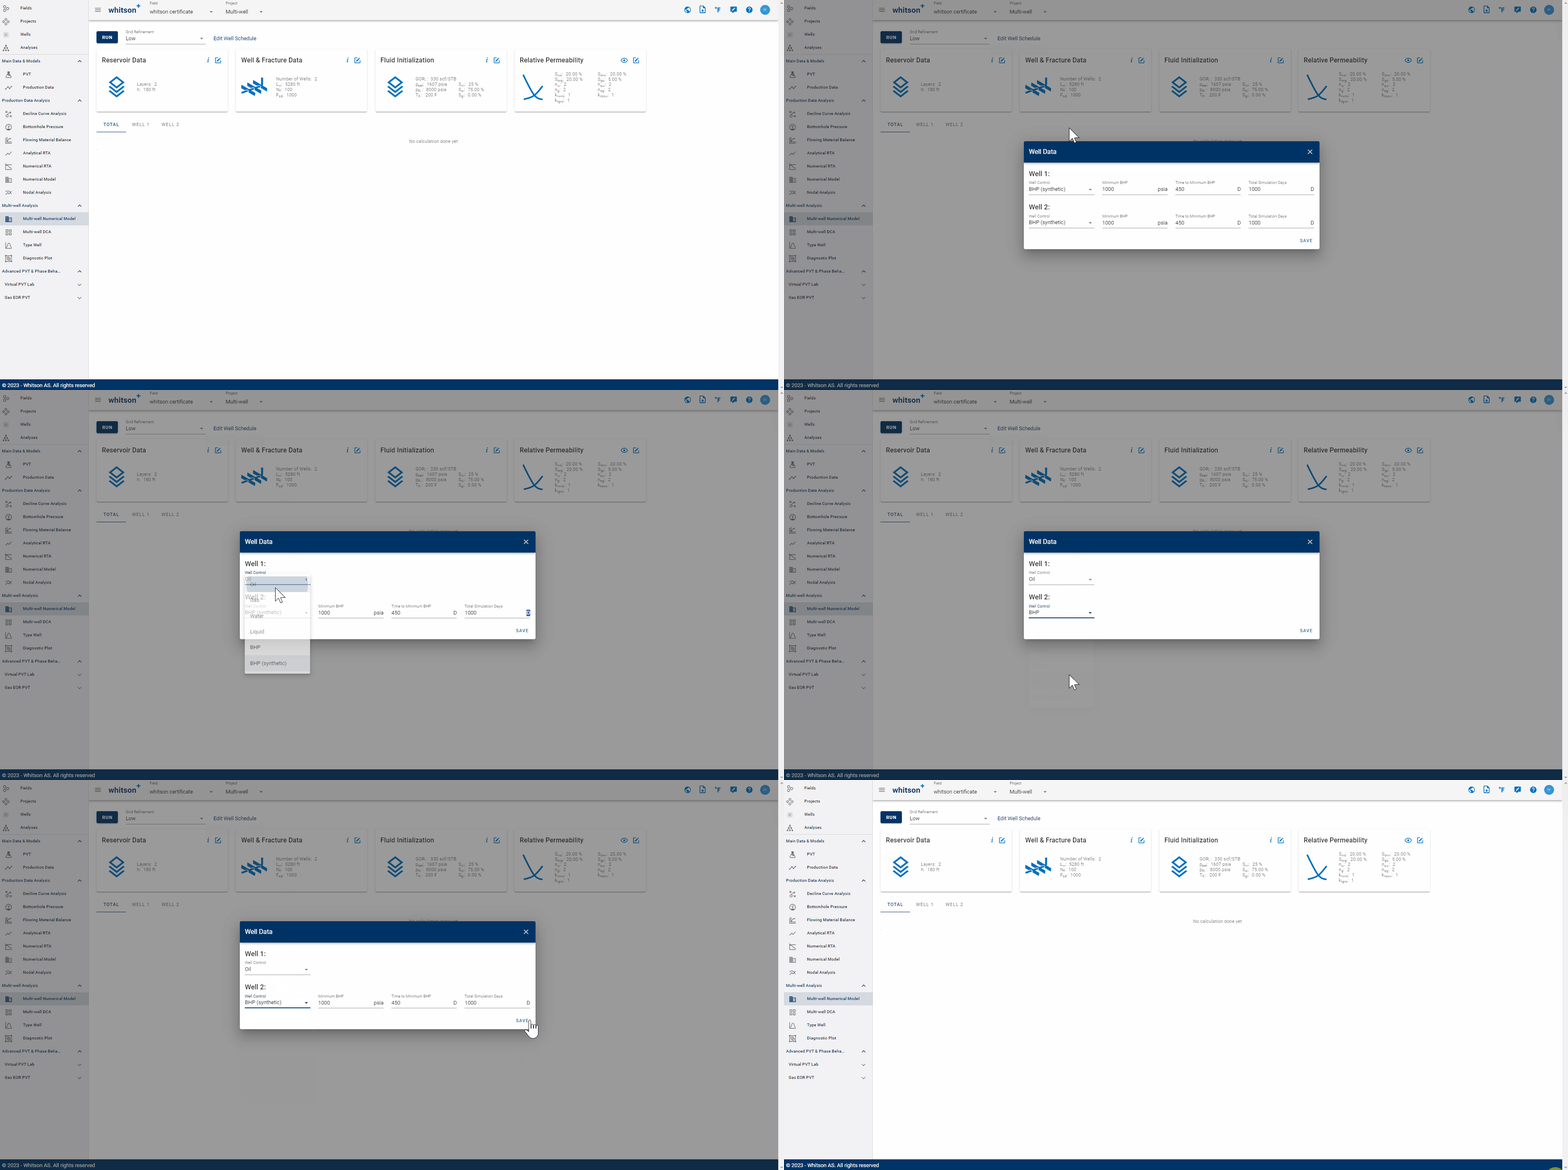
Fig. 12: Well Schedule Input
2.7. Forecast
The Forecast tab defines the operating conditions applied after the historical simulation period. Forecasting begins from the final simulated reservoir state, allowing future production to be evaluated under different operating strategies and well constraints.
2.7.1 Forecast Type
The BHP Forecast Type determines how the bottomhole pressure is controlled during the forecast period.
- Parametric Decline
The Parametric Decline option automatically generates a declining bottomhole pressure profile based on a parametric decline model. Rather than maintaining a constant pressure, the simulator gradually reduces the bottomhole pressure over time to represent changing operating conditions or reservoir depletion.
- Constant BHP
The Constant BHP option maintains a fixed bottomhole pressure throughout the forecast period. The well continues producing at the specified pressure until the selected forecast rate constraint is reached.
- Custom Schedule
The Custom Schedule option allows users to define multiple bottomhole pressure targets during the forecast.
Each schedule entry specifies a forecast date and the corresponding bottomhole pressure to be applied. The simulator updates the operating pressure according to the defined schedule throughout the forecast period.
2.7.2. Forecast Rate Constraint
The Forecast Rate Constraint defines the minimum production rate at which the forecast terminates. Once the selected production rate falls below the specified limit, production for that well is stopped.
The available rate constraints are:
| Option | Description |
|---|---|
| Oil Rate | Stops the forecast when the oil production rate falls below the specified limit. |
| Gas Rate | Stops the forecast when the gas production rate falls below the specified limit. |
| Water Rate | Stops the forecast when the water production rate falls below the specified limit. |
| Liquid Rate | Stops the forecast when the total liquid production rate (oil + water) falls below the specified limit. |
2.8. Case Examples
Below are three case examples that demonstrate how to configure and run the model in whitson+:
- Case 1 - Linked Wells: Model three SPE Data Repository wells and use production data as well schedule control.
- Case 2 - Synthetic Wells: Model two synthetic wells.
- Case 3 - Combination: Model two SPE Data Repository wells and a synthetic well.
2.8.1. Case 1 - Linked Wells
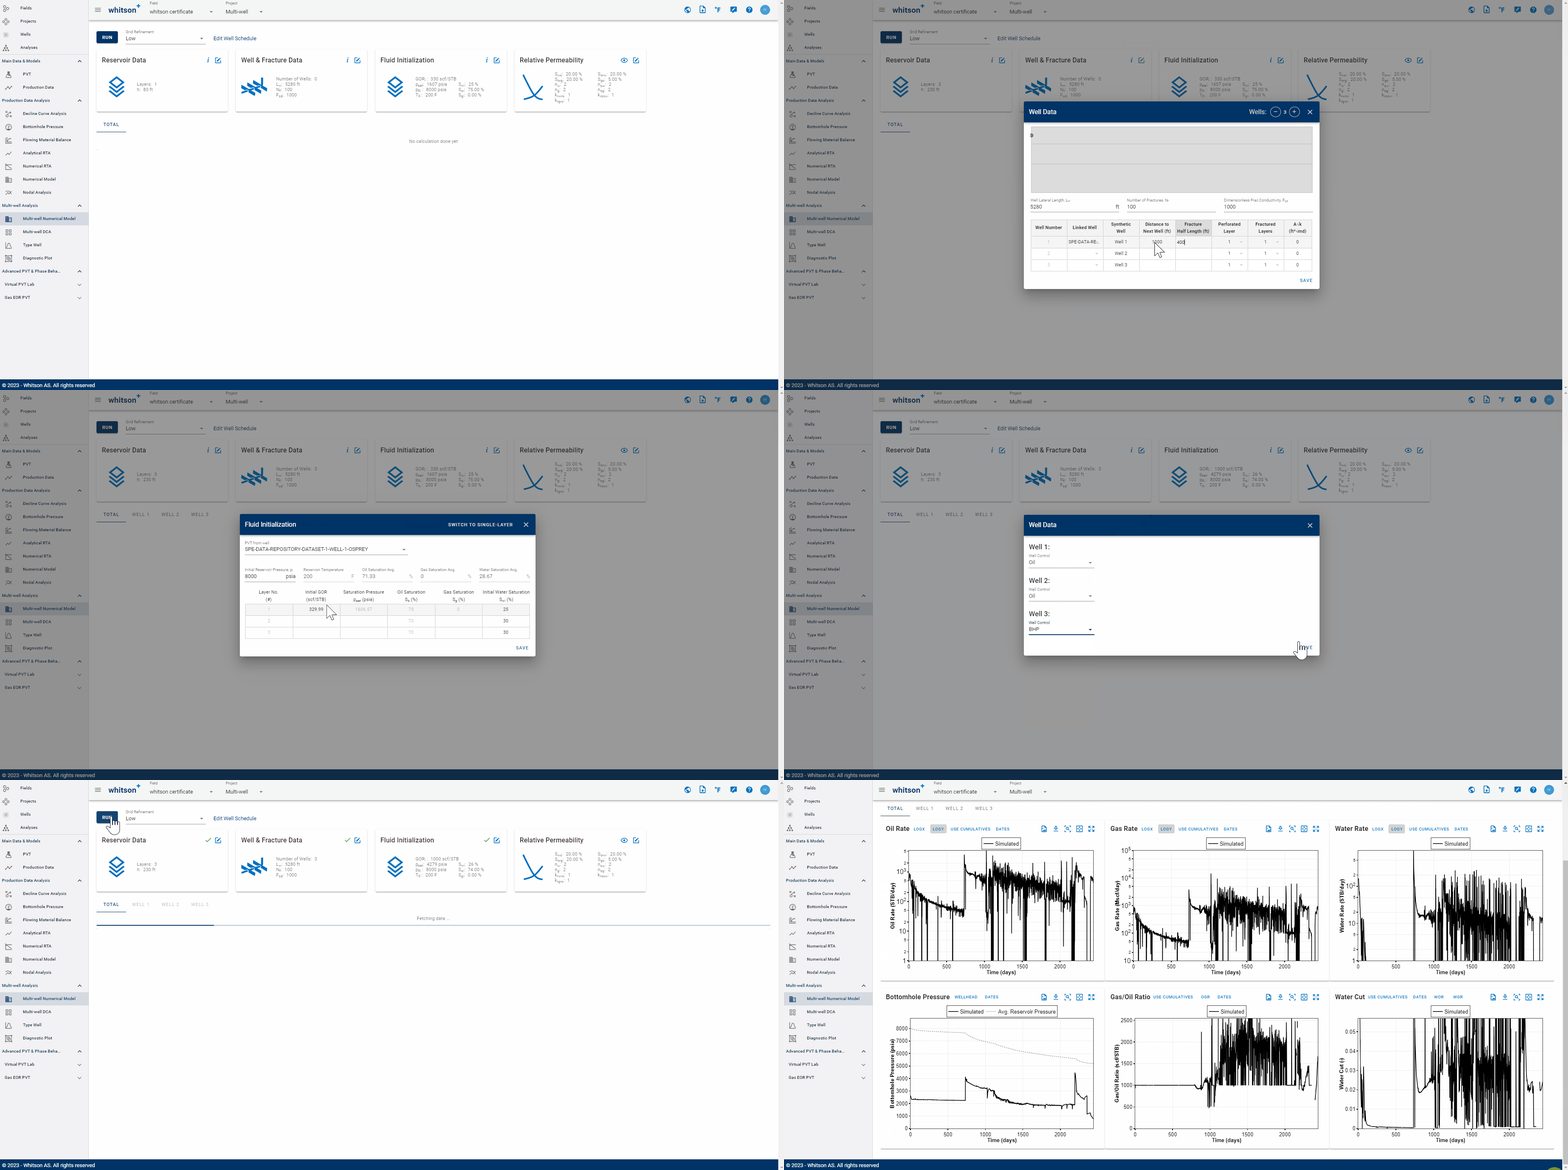
Fig. 13: Example Case 1
2.6.2. Case 2 - Synthetic Wells
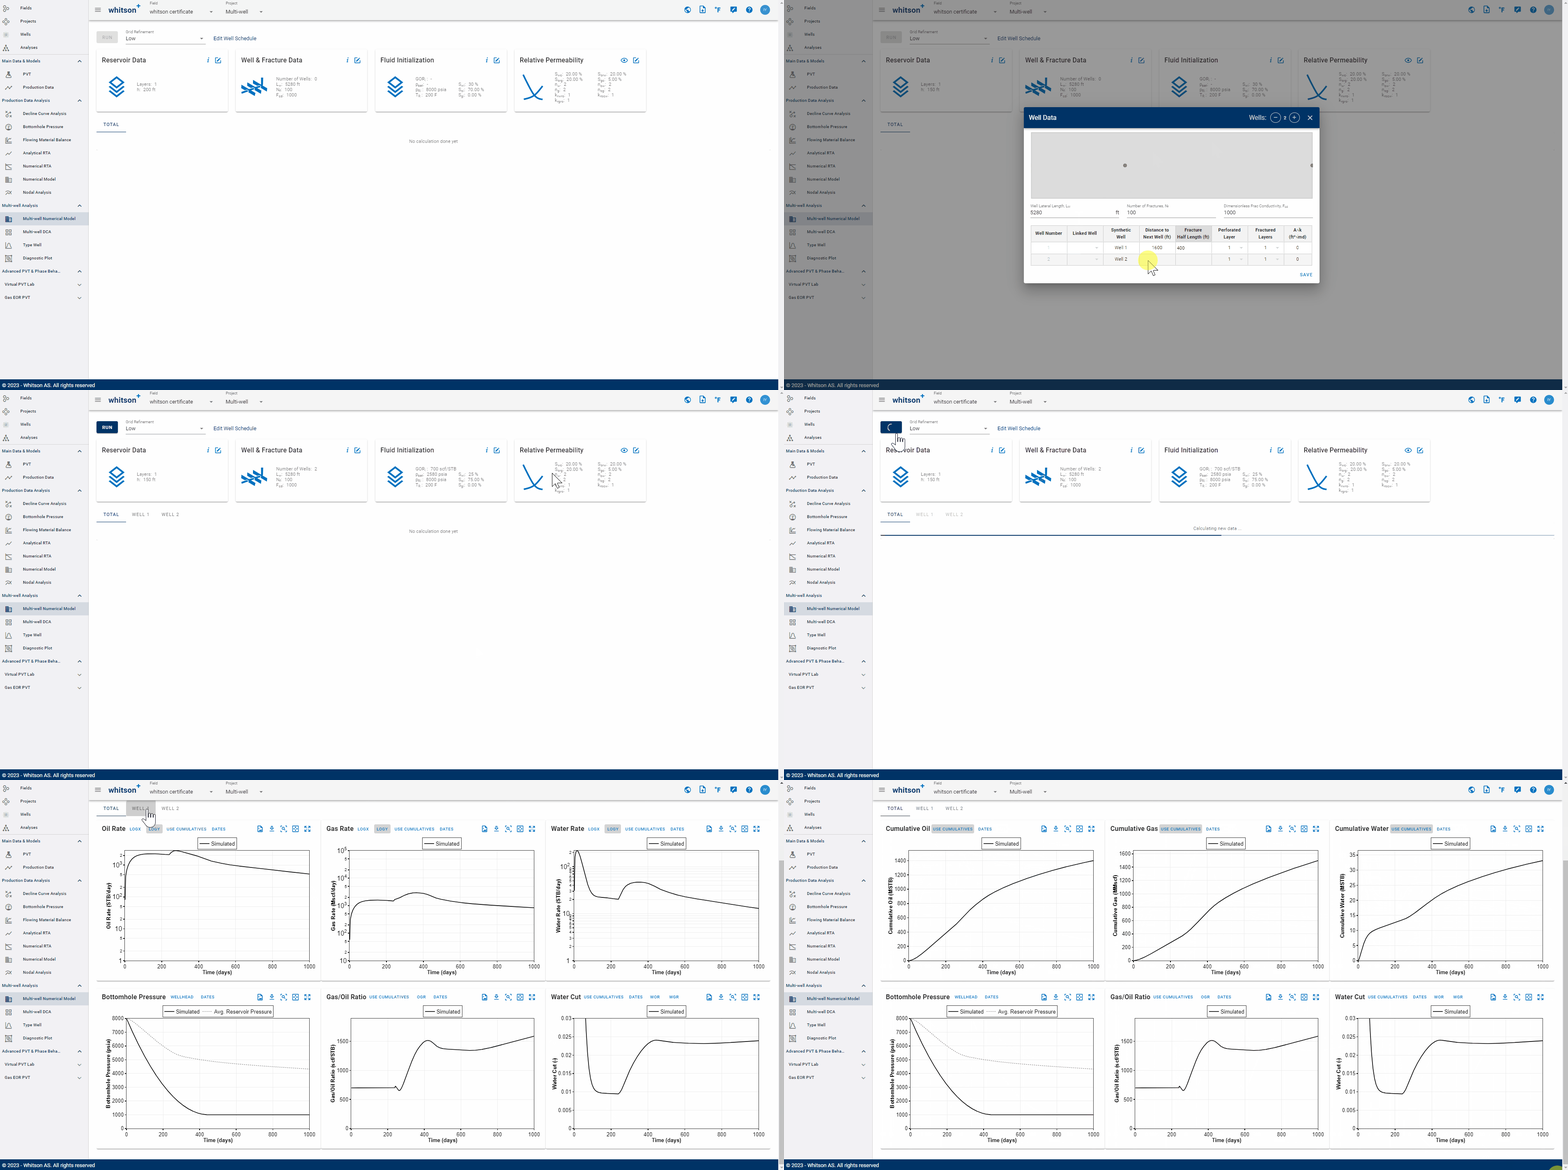
Fig. 14: Example Case 2
2.6.3. Case 3 - Combination
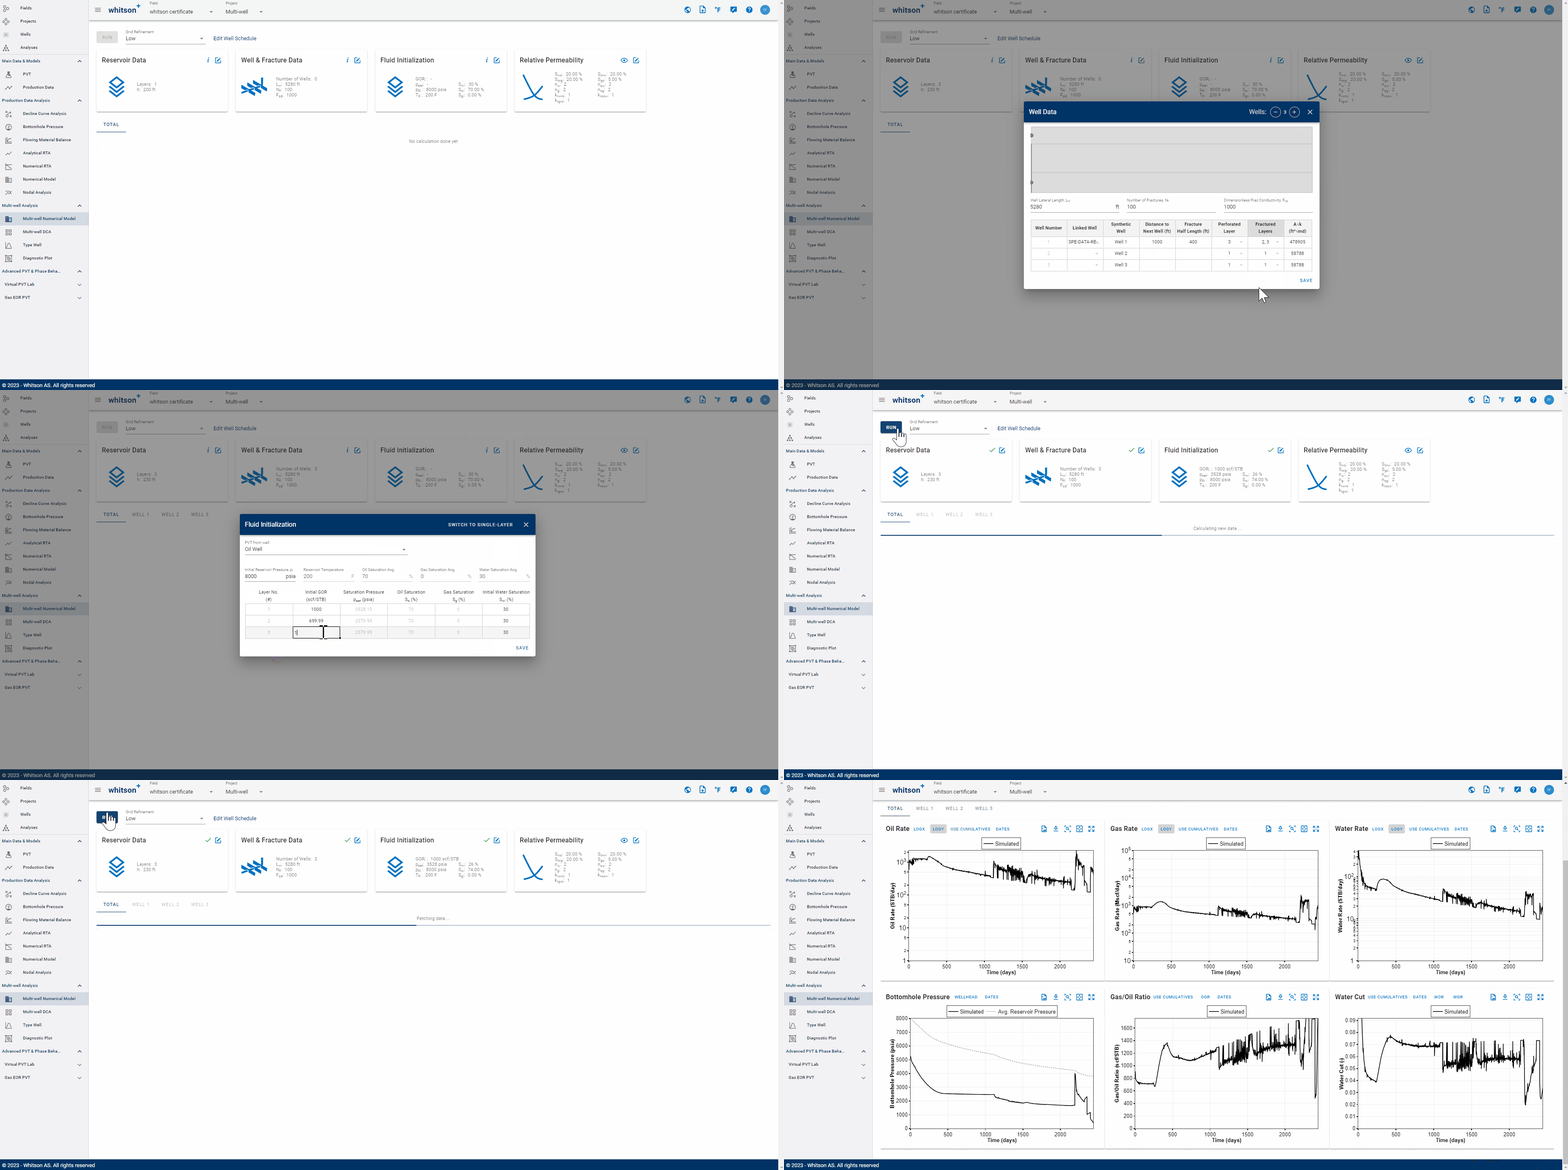
Fig. 15: Example Case 3
3. Multi-well Numerical Model Functionality
whitson+ supports 2D pressure and saturation maps in the multi-well numerical model, extending the capability that was previously available only for the single-well model. This enhancement helps users to visualize the change of pressure and saturation over time for the model.
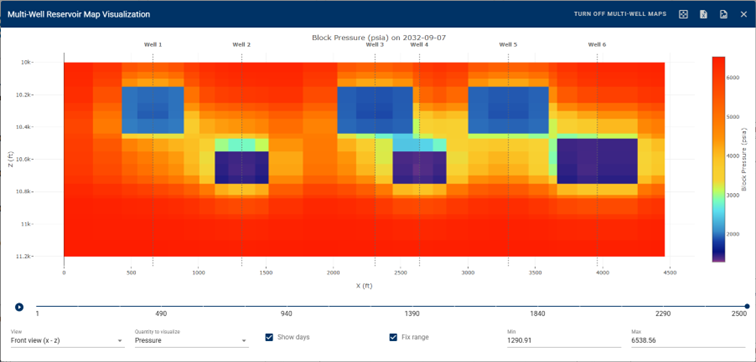
3.1. Total Tab Bottomhole Pressure Plot
In the Total tab, the bottomhole pressure plot contains two different data representations:
- BHP markers: Recorded bottomhole pressure data from production (historical measurements).
- Simulated BHP line: Calculated flowing wellbore pressure () from the simulation engine, averaged across all wells in the Total tab.
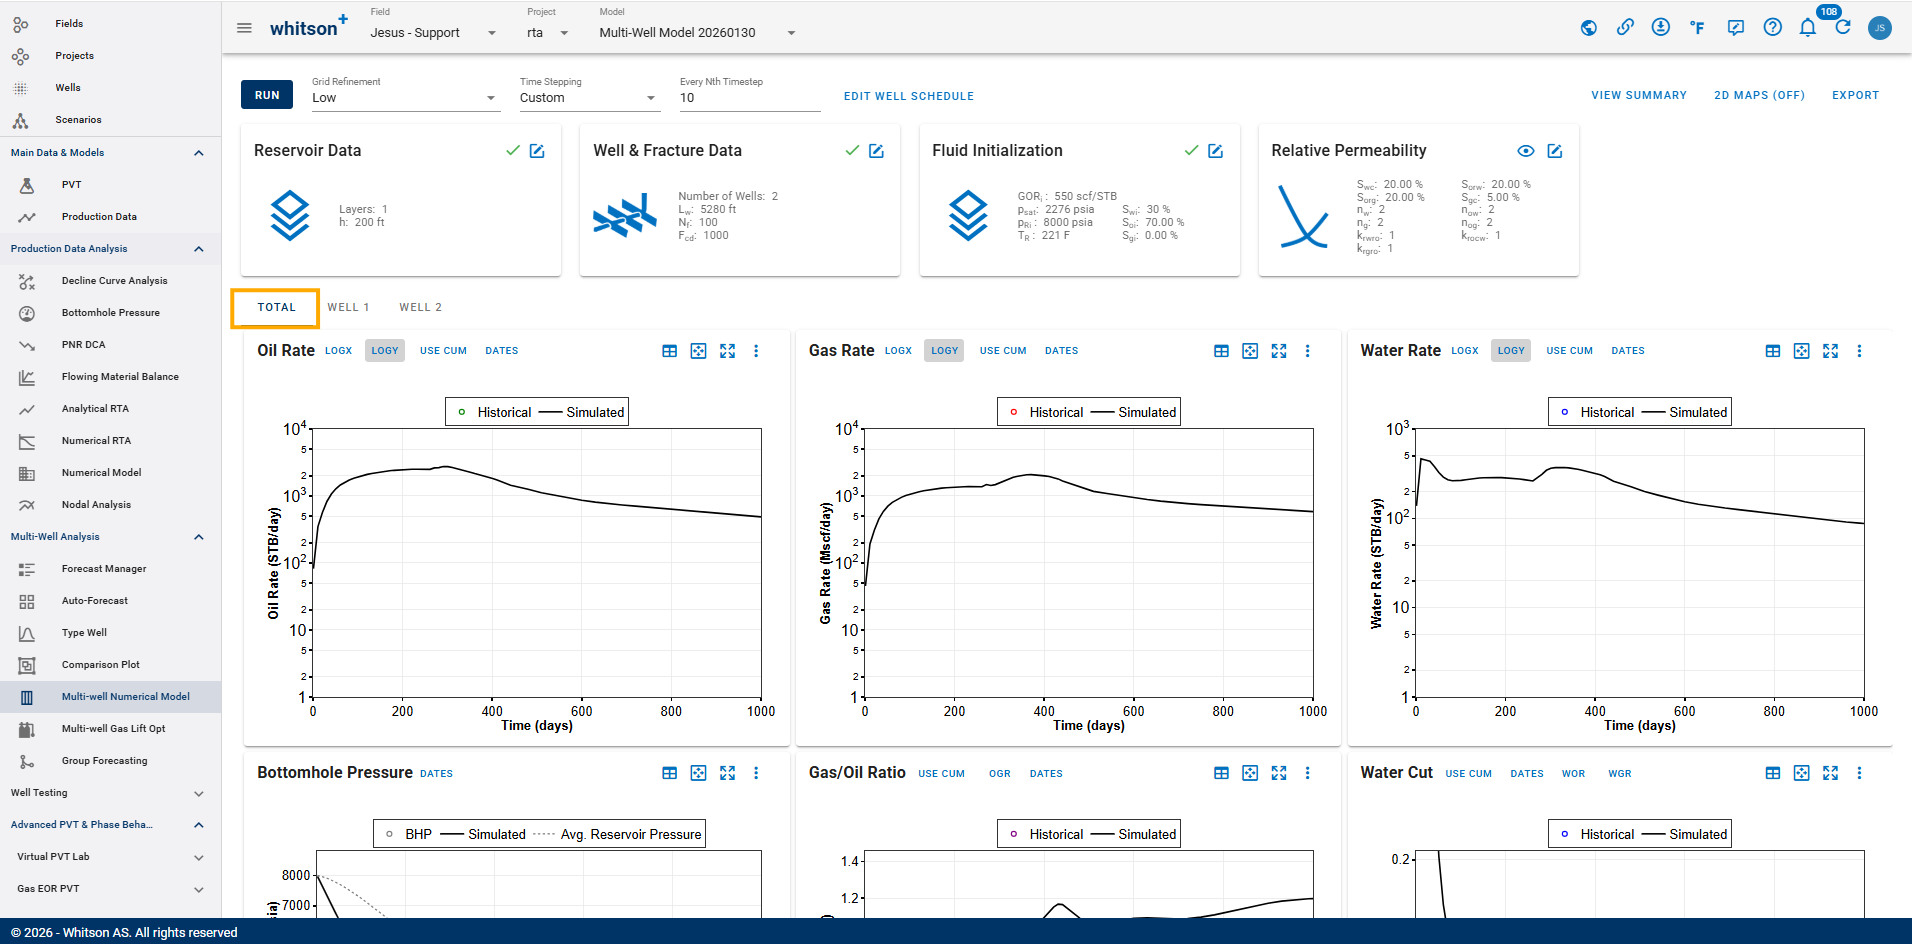
Per-well vs Total tab scope
Per-well bottomhole pressure plots display the simulated () for an individual well, while the Total tab displays the well-average () across all wells in the model.