Establishing a connection between an ARIES database and whitson+ through our external API is a standard practice. While this example involves an ARIES database, the majority of the steps are applicable to connecting any data source to whitson+, such as an SQL database.
Auto Update Prod Data to whitson+: Workflow Overview
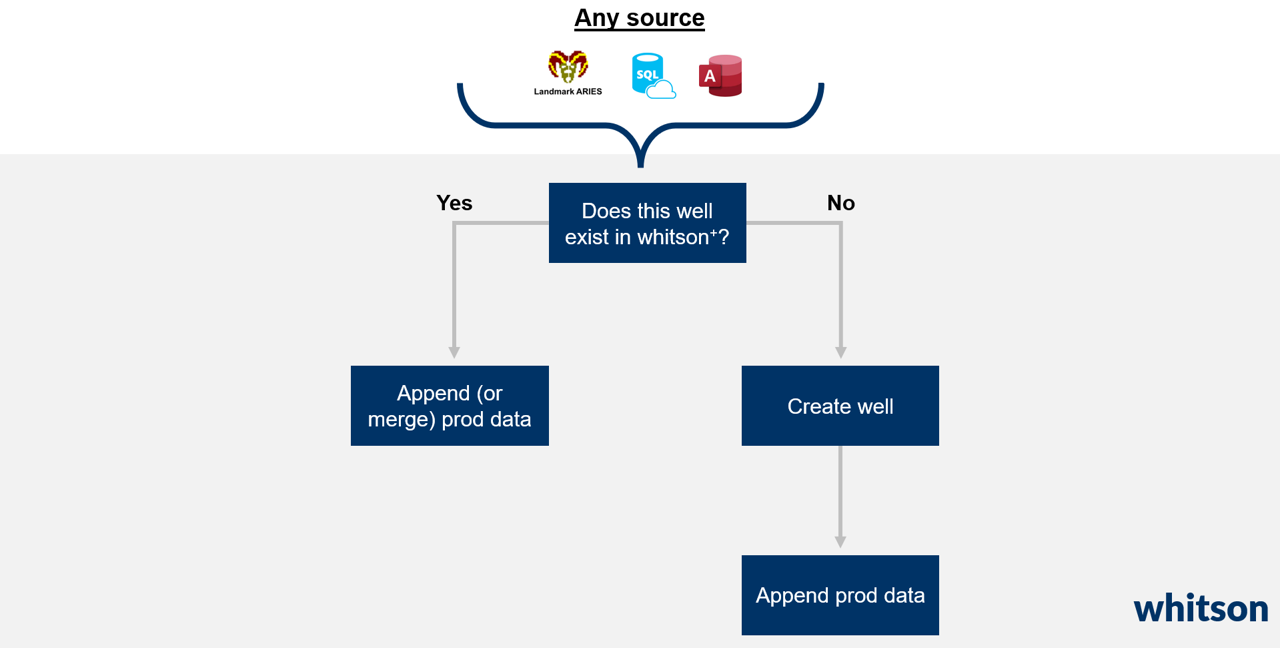
Engineers spend 95% of their time uploading data. This example demonstrates an automated daily update of production data. The process adheres to a widely used structure: connecting to a database, verifying if the well is already uploaded to whitson+, and creating a new well with production data if it isn't. Alternatively, if the well exists, it appends the new production data to the existing entity. Let's explore the details!
Connect ARIES to whitson+: Python Example
Main Script: aries.py
What does the aries.py file do?
This file shows an example of how one connect to an ARIES database and a relevant whitson+ domain. The file uses a helper class provided below.
importpyodbcimportwhitson_connect# To fillCLIENT="your_domain_here"CLIENT_ID="your_client_id_here"CLIENT_SECRET="your_client_secret"PROJECT_ID="your_project_id_here"whitson_connection=whitson_connect.WhitsonConnection(CLIENT,CLIENT_ID,CLIENT_SECRET,PROJECT_ID)# whitson_connection.access_token = whitson_connection.get_access_token() # ONLY RUN ONCE PER WORK SESSIONwhitson_connection.access_token="your_access_token_here"# Set up the connection string# Replace 'YourAccessDatabase.accdb' with the path to your Access database fileconn_str=r"DRIVER={Microsoft Access Driver (*.mdb, *.accdb)};DBQ=C:\\Bitbucket\\whitson-pvt-user-manual\\docs\\external_api\\aries_python_code\\AriesExample.mdb;"# Note: If you're using a password-protected Access database, you need to include the UID and PWD parameters in the connection string to provide the username and password.# conn_str = r'DRIVER={Microsoft Access Driver (*.mdb, *.accdb)};DBQ=YourAccessDatabase.accdb;UID=YourUsername;PWD=YourPassword;'aries_connection=pyodbc.connect(conn_str)cursor=aries_connection.cursor()# In this example, the wellname is put in the lease column AC_PROPERTY tablecursor.execute("""SELECT AD.propnum, AP.LEASE AS WellNameFROM AC_Daily AS ADLEFT JOIN AC_PROPERTY AS AP ON AD.propnum = AP.propnumUNIONSELECT AP.propnum, AP.LEASE AS WellNameFROM AC_PROPERTY AS AP""")aries_wells=cursor.fetchall()whitson_wells=whitson_connection.get_wells()# Create well if not in project alreadyforaries_wellinaries_wells:propnum,wellname=aries_wellifany(well["name"]==wellnameforwellinwhitson_wells):print(f"Well with name '{wellname}' already exists.")else:well_info={"project_id":PROJECT_ID,"name":wellname,"uwi_api":propnum}whitson_connection.create_well(payload=well_info)# Get updated list after potential new wells are addedwhitson_wells=whitson_connection.get_wells()# Fetch daily production data from relevat ARIES table (AC_DAILY)cursor.execute("SELECT * FROM AC_DAILY")# The AC_DAILY table column headers must be mapped to relevant whitson+ production data types.# In this example the headers are: ['PROPNUM', 'D_DATE', 'OIL', 'GAS', 'WATER', 'TBG', 'CSG', 'LINE_PRES', 'CHOKESIZE']# print("Column Headers for AC_Daily: " + str([column[0] for column in cursor.description])) # UNCOMMENT TO SEE COLUMN HEADERS FOR YOUR CASEaries_prod_data_rows=cursor.fetchall()production_payload=[]prior_propnum=aries_prod_data_rows[0][0]foraries_prod_rowinaries_prod_data_rows:propnum,date,qo,qg,qw,p_tubing,p_casing,p_line,chokesize=aries_prod_rowthis_prod_time={"date":date.strftime("%Y-%m-%dT%H:%M:%S.%fZ")ifdateelseNone,"qo_sc":max(0,qo)ifqoisnotNoneelseNone,"qg_sc":max(0,qg)ifqgisnotNoneelseNone,"qw_sc":max(0,qw)ifqwisnotNoneelseNone,"p_wf_measured":None,"p_tubing":max(0,p_tubing)ifp_tubingisnotNoneelseNone,"p_casing":max(0,p_casing)ifp_casingisnotNoneelseNone,"qg_gas_lift":None,"liquid_level":None,"choke_size":max(0,chokesize)ifchokesizeisnotNoneelseNone,"line_pressure":max(0,p_line)ifp_lineisnotNoneelseNone,}ifpropnum==prior_propnum:production_payload.append(this_prod_time)else:well_id=whitson_connection.get_well_id_by_propnum(whitson_wells,prior_propnum)whitson_connection.upload_production_to_well(well_id,{"production_data":production_payload},append_only=True,)production_payload=[]production_payload.append(this_prod_time)prior_propnum=propnum# Upload data for the last wellwell_id=whitson_connection.get_well_id_by_propnum(whitson_wells,prior_propnum)whitson_connection.upload_production_to_well(well_id,{"production_data":production_payload},append_only=True,)cursor.close()aries_connection.close()
Helper Class: whitson_connect.py
What does the whitson_connect.py do?
This is a helper class used in the aries.py file above.
These are the only two files required to run the outlined workflow.
The class shows a few examples of the available endpoints. A complete list can be found here.
importhttp.clientimportjsonimportrequestsclassWhitsonConnection:def__init__(self,client_name,client_id,client_secret,project_id):self.client_name=client_nameself.client_id=client_idself.client_secret=client_secretself.project_id=project_idself.access_token=Nonedefget_access_token(self):""" Get a access token for a given work session. """conn=http.client.HTTPSConnection("whitson.eu.auth0.com")payload={"client_id":self.client_id,"client_secret":self.client_secret,"audience":f"https://{self.client_name}.whitson.com/","grant_type":"client_credentials",}headers={"content-type":"application/json"}conn.request("POST","/oauth/token",json.dumps(payload),headers)res=conn.getresponse()data=res.read()returnjson.loads(data.decode("utf-8")).get("access_token")defget_well_id_by_propnum(self,wells,propnum):""" Get the well_id of a given propnum. """returnnext((well["id"]forwellinwellsifwell.get("uwi_api")==propnum),None)defget_fields(self):""" Get all fields on domain. """base_url=f"https://{self.client_name}.whitson.com/api-external/v1/"response=requests.get(base_url+"fields",headers={"content-type":"application/json","Authorization":f"Bearer {self.access_token}",},)res=response.json()ifnotres:raiseException("no existing fields")returnresdefget_wells(self):""" Get a list of wells in a project. """base_url=f"http://{self.client_name}.whitson.com/api-external/v1/wells"response=requests.get(base_url,headers={"content-type":"application/json","Authorization":f"Bearer {self.access_token}",},params={"project_id":self.project_id},)res=response.json()ifnotres:return[]returnresdefget_projects(self,field_id:int|None=None):""" Get a list of projects in field. """base_url=f"http://{self.client_name}.whitson.com/api-external/v1/fields/{field_id}/projects"response=requests.get(base_url,headers={"content-type":"application/json","Authorization":f"Bearer {self.access_token}",},)res=response.json()ifnotres:raiseException("no existing wells")returnresdefcreate_well(self,payload:dict)->requests.Response:""" Create a new well on a domain. """base_url=f"http://{self.client_name}.whitson.com/api-external/v1/wells"response=requests.post(base_url,headers={"content-type":"application/json","Authorization":f"Bearer {self.access_token}",},json=payload,)ifresponse.status_code>=200andresponse.status_code<300:print(f"successfully created well {payload['name']}")else:print(response.text)returnresponsedefcreate_project(self,field_id:int,payload:dict)->requests.Response:""" Create a new project on a domain. """base_url=f"http://{self.client_name}.whitson.com/api-external/v1/fields/{field_id}/projects"response=requests.post(base_url,headers={"content-type":"application/json","Authorization":f"Bearer {self.access_token}",},json=payload,)ifresponse.status_code>=200andresponse.status_code<300:print(f"successfully created project {payload['name']}")else:print(response.text)returnresponsedefupload_production_to_well(self,well_id:int,payload:list[dict],append_only:bool=False,)->requests.Response:""" Upload production data to well. """response=requests.post(f"http://{self.client_name}.whitson.com/api-external/v1/wells/{well_id}/production_data",headers={"content-type":"application/json","Authorization":f"Bearer {self.access_token}",},json=payload,params={"append_only":append_only},)ifresponse.status_code>=200andresponse.status_code<300:print(f"successfully updated production data on well {well_id}")else:print(response.text)returnresponsedefbulk_upload_production_to_well(self,payload:list[dict])->requests.Response:""" Upload production to well. """response=requests.post(f"http://{self.client_name}.whitson.com/api-external/v1/wells/production_data",headers={"content-type":"application/json","Authorization":f"Bearer {self.access_token}",},json=payload,)ifresponse.status_code>=200andresponse.status_code<300:print("success")else:print(response.text)returnresponsedefget_production(self,well_id:int,)->requests.Response:""" Get a list of wells. """response=requests.get(f"http://{self.client_name}.whitson.com/api-external/v1/wells/{well_id}/production_data",headers={"content-type":"application/json","Authorization":f"Bearer {self.access_token}",},)res=response.json()ifnotres:raiseException("no existing wells")returnresdefedit_input_quick(self,well_id:int,payload:dict)->requests.Response:""" Edit the input quick (PVT) property of a well. """response=requests.put(f"http://{self.client_name}.whitson.com/api-external/v1/wells/{well_id}/input_quick",headers={"content-type":"application/json","Authorization":f"Bearer {self.access_token}",},json=payload,)ifresponse.status_code>=200andresponse.status_code<300:print(f"successfully edited input quick for well {well_id}")else:print(response.text)returnresponsedefupload_well_data_to_well(self,well_id:int,payload:list[dict])->requests.Response:""" Upload a well data to a well. """base_url=f"http://{self.client_name}.whitson.com/api-external/v1/wells/{well_id}/bhp_input/well_data"response=requests.post(base_url,headers={"content-type":"application/json","Authorization":f"Bearer {self.access_token}",},json=payload,)ifresponse.status_code>=200andresponse.status_code<300:print(f"successfully updated well_data to well {well_id}")else:print(response.text)returnresponsedefedit_well_deviation_data(self,well_id:int,payload:list[dict])->requests.Response:""" Edit well deviation data of a well in the database. """base_url=f"http://{self.client_name}.whitson.com/api-external/v1/wells/{well_id}/bhp_input/well_deviation_survey"response=requests.put(base_url,headers={"content-type":"application/json","Authorization":f"Bearer {self.access_token}",},json=payload,)ifresponse.status_code>=200andresponse.status_code<300:print(f"changed well deivation survey on well_id {well_id}")else:print(response.text)returnresponsedefrun_composition_calc(self,well_id:int)->requests.Response:""" Run PVT (composition) calculation on well. """response=requests.get(f"http://{self.client_name}.whitson.com/api-external/v1/wells/{well_id}/run_composition_calc",headers={"content-type":"application/json","Authorization":f"Bearer {self.access_token}",},)ifresponse.status_code>=200andresponse.status_code<300:print(f"success on running composition calc on well {well_id}")else:print(response.text)returnresponsedefrun_bhp_calc(self,well_id:dict)->requests.Response:""" Run bhp calculation on the well specified by the provided well_id. """base_url=f"http://{self.client_name}.whitson.com/api-external/v1/wells/{well_id}/run_bhp_calculation"response=requests.get(base_url,headers={"content-type":"application/json","Authorization":f"Bearer {self.access_token}",},)ifresponse.status_code==202:print(f"successfully ran bhp calc on {well_id}")else:print(response.text)returnresponsedefget_pwf_active(self,well_id:int,from_date:str=None)->requests.Response:""" Get active pwf from the database for the given well_id, from the start date in from_date. Example payload: this_well_id = integer this_from_date = "YYYY-MM-DD" Example function call: active_pwf_well = whitson_connection.get_pwf_active(this_well_id, this_from_date) """base_url=f"http://{self.client_name}.whitson.com/api-external/v1/wells/{well_id}/pwf_active"response=requests.get(base_url,headers={"content-type":"application/json","Authorization":f"Bearer {self.access_token}",},params={"from_date":from_date},)ifresponse.status_code==200:print(f"successfully received active pwf on {well_id}")else:print(response.text)returnresponse.json()defget_pwf_active_multiple(self,payload:dict)->requests.Response:""" Get active pwf from the database for all the well_ids in the self.project_id from the start date in from_date Example payload: payload = {"from_date":"YYYY-MM-DD", "page": 0, "page_size": 10} Example function call: active_pwf_wells = self.get_pwf_active_multiple(payload) """base_url=f"http://{self.client_name}.whitson.com/api-external/v1/wells/pwf_active"response=requests.get(base_url,headers={"content-type":"application/json","Authorization":f"Bearer {self.access_token}",},params=payload,)ifresponse.status_code==200:print(f"successfully recieved active pwf")elifresponse.status_code==404:print(f"No wells found matching the payload criteria")else:print(response.text)returnresponse.json()
Windows Task Scheduler: Automating Daily Script Execution
A scheduler, such as the Windows Task Scheduler, is a tool vital for automating dataflow in and out of whitson+software upkeep. It enables the regular update of e.g. production data and the addition of new wells, ensuring the system stays current. The video above shows an example of how this done with Windows Task Scheduler.
Windows Task Scheduler
To run a Python script from the Windows Task Scheduler, follow these steps:
Open Task Scheduler: Press Win + S, type "Task Scheduler," and hit Enter.
Create a Basic Task: In the Actions pane, click on "Create Basic Task."
Provide a Name and Description: Enter a name and description for your task, then click "Next."
Choose Trigger: Select the trigger for your task. For example, choose "Daily" if you want to run the script every day. Click "Next."
Set Trigger Details: Specify the start date, time, and recurrence pattern. Click "Next."
Choose Action: Select "Start a Program" and click "Next."
Specify Program/Script:
In the "Program/script" field, provide the path to your Python executable (e.g., C:\Path\to\python.exe
In the "Add arguments" field, provide the path to your Python script (e.g., C:\Path\to\your\script.py). Click "Next."
Review Settings: Review your settings and click "Finish."
Now, your Python script will be executed automatically according to the schedule you specified. Ensure that the Python executable and your script paths are correct.
If you encounter any issues, you can check the Task Scheduler's "History" tab for information about the last run result. Additionally, make sure your Python script has the necessary permissions to access resources and that the Python interpreter is in the system's PATH or specify the full path to it.
Are there alternatives to Windows Task Scheduler?
Several alternatives to the Windows Task Scheduler exist, offering additional features and flexibility. Here are some popular alternatives:
Cron on Linux/Unix
Cron is a time-based job scheduler in Unix-like operating systems. Users can schedule tasks using a cron syntax. It is particularly prevalent in Linux environments.
Task Scheduler on macOS
Similar to the Windows Task Scheduler, macOS also has a built-in scheduler called launchd.
It allows users to run tasks based on events or schedules.
Automate on macOS
Automate is a built-in app on macOS that allows users to create scripts to automate tasks.
It provides a graphical user interface for creating automation workflows.
cronie on Linux
An extension of the cron daemon for Linux systems, providing additional features and compatibility with the traditional cron syntax.
GNU at for Unix-like Systems
Allows for one-time execution of commands at a specified time.
Useful for ad-hoc scheduling.
Systemd Timers on Linux
Systemd is a system and service manager for Linux, and it includes a timer component for scheduling tasks.
Third-party Task Scheduler Software
Various third-party tools offer advanced features for task scheduling on different platforms.
Examples include Task Scheduler Pro, VisualCron, and Advanced Task Scheduler.
Azure Logic Apps or Azure Functions
In cloud environments like Azure, services like Logic Apps or Functions can be used for serverless task scheduling.
Choose the tool that best fits your requirements and integrates seamlessly with your workflow. The selection may depend on your operating system, specific scheduling needs, and the level of automation you seek.
Adding Logging to Python Script Run via Windows Task Scheduler
I found it somewhat hard to debug while using the Windows Task Scheduler, so found it very beneficial to use Python's logging library in tandem during the testing period.
Logging progress from a Python script running in the Windows Task Scheduler can be achieved by utilizing Python's logging module. Here's a basic example of how you can incorporate logging into your script:
1. Import the logging Module:
Add the following import statement at the beginning of your Python script:
1
importlogging
2. Configure the Logging:
Configure the logging settings. You can do this in your script's if name == "main": block or at the beginning of your script. For example:
This configuration sets up logging to write messages to a file named script_log.txt and sets the logging level to DEBUG, which captures all messages.
3. Log Progress:
Use the logging functions to log progress at various points in your script. For example:
1
2
3
4
5
6
7
8
9
10
defmain():logging.info("Script execution started.")# Your main script logic herelogging.debug("Some progress update.")# More script logiclogging.debug("Another progress update.")# ...if__name__=="__main__":main()
You can use different logging levels (DEBUG, INFO, WARNING, ERROR, CRITICAL) based on the importance of the logged information.
4. Review the Log File:
After your script runs through the Task Scheduler, you can check the log file (script_log.txt in this example) for progress updates and any logged information.
Remember to adjust the logging configuration and levels based on your needs. You can customize the log file path, logging format, and other settings according to your preferences.
This logging approach provides a convenient way to capture progress and debug information during script execution, making it easier to diagnose any issues that may occur when the script is run through the Windows Task Scheduler.