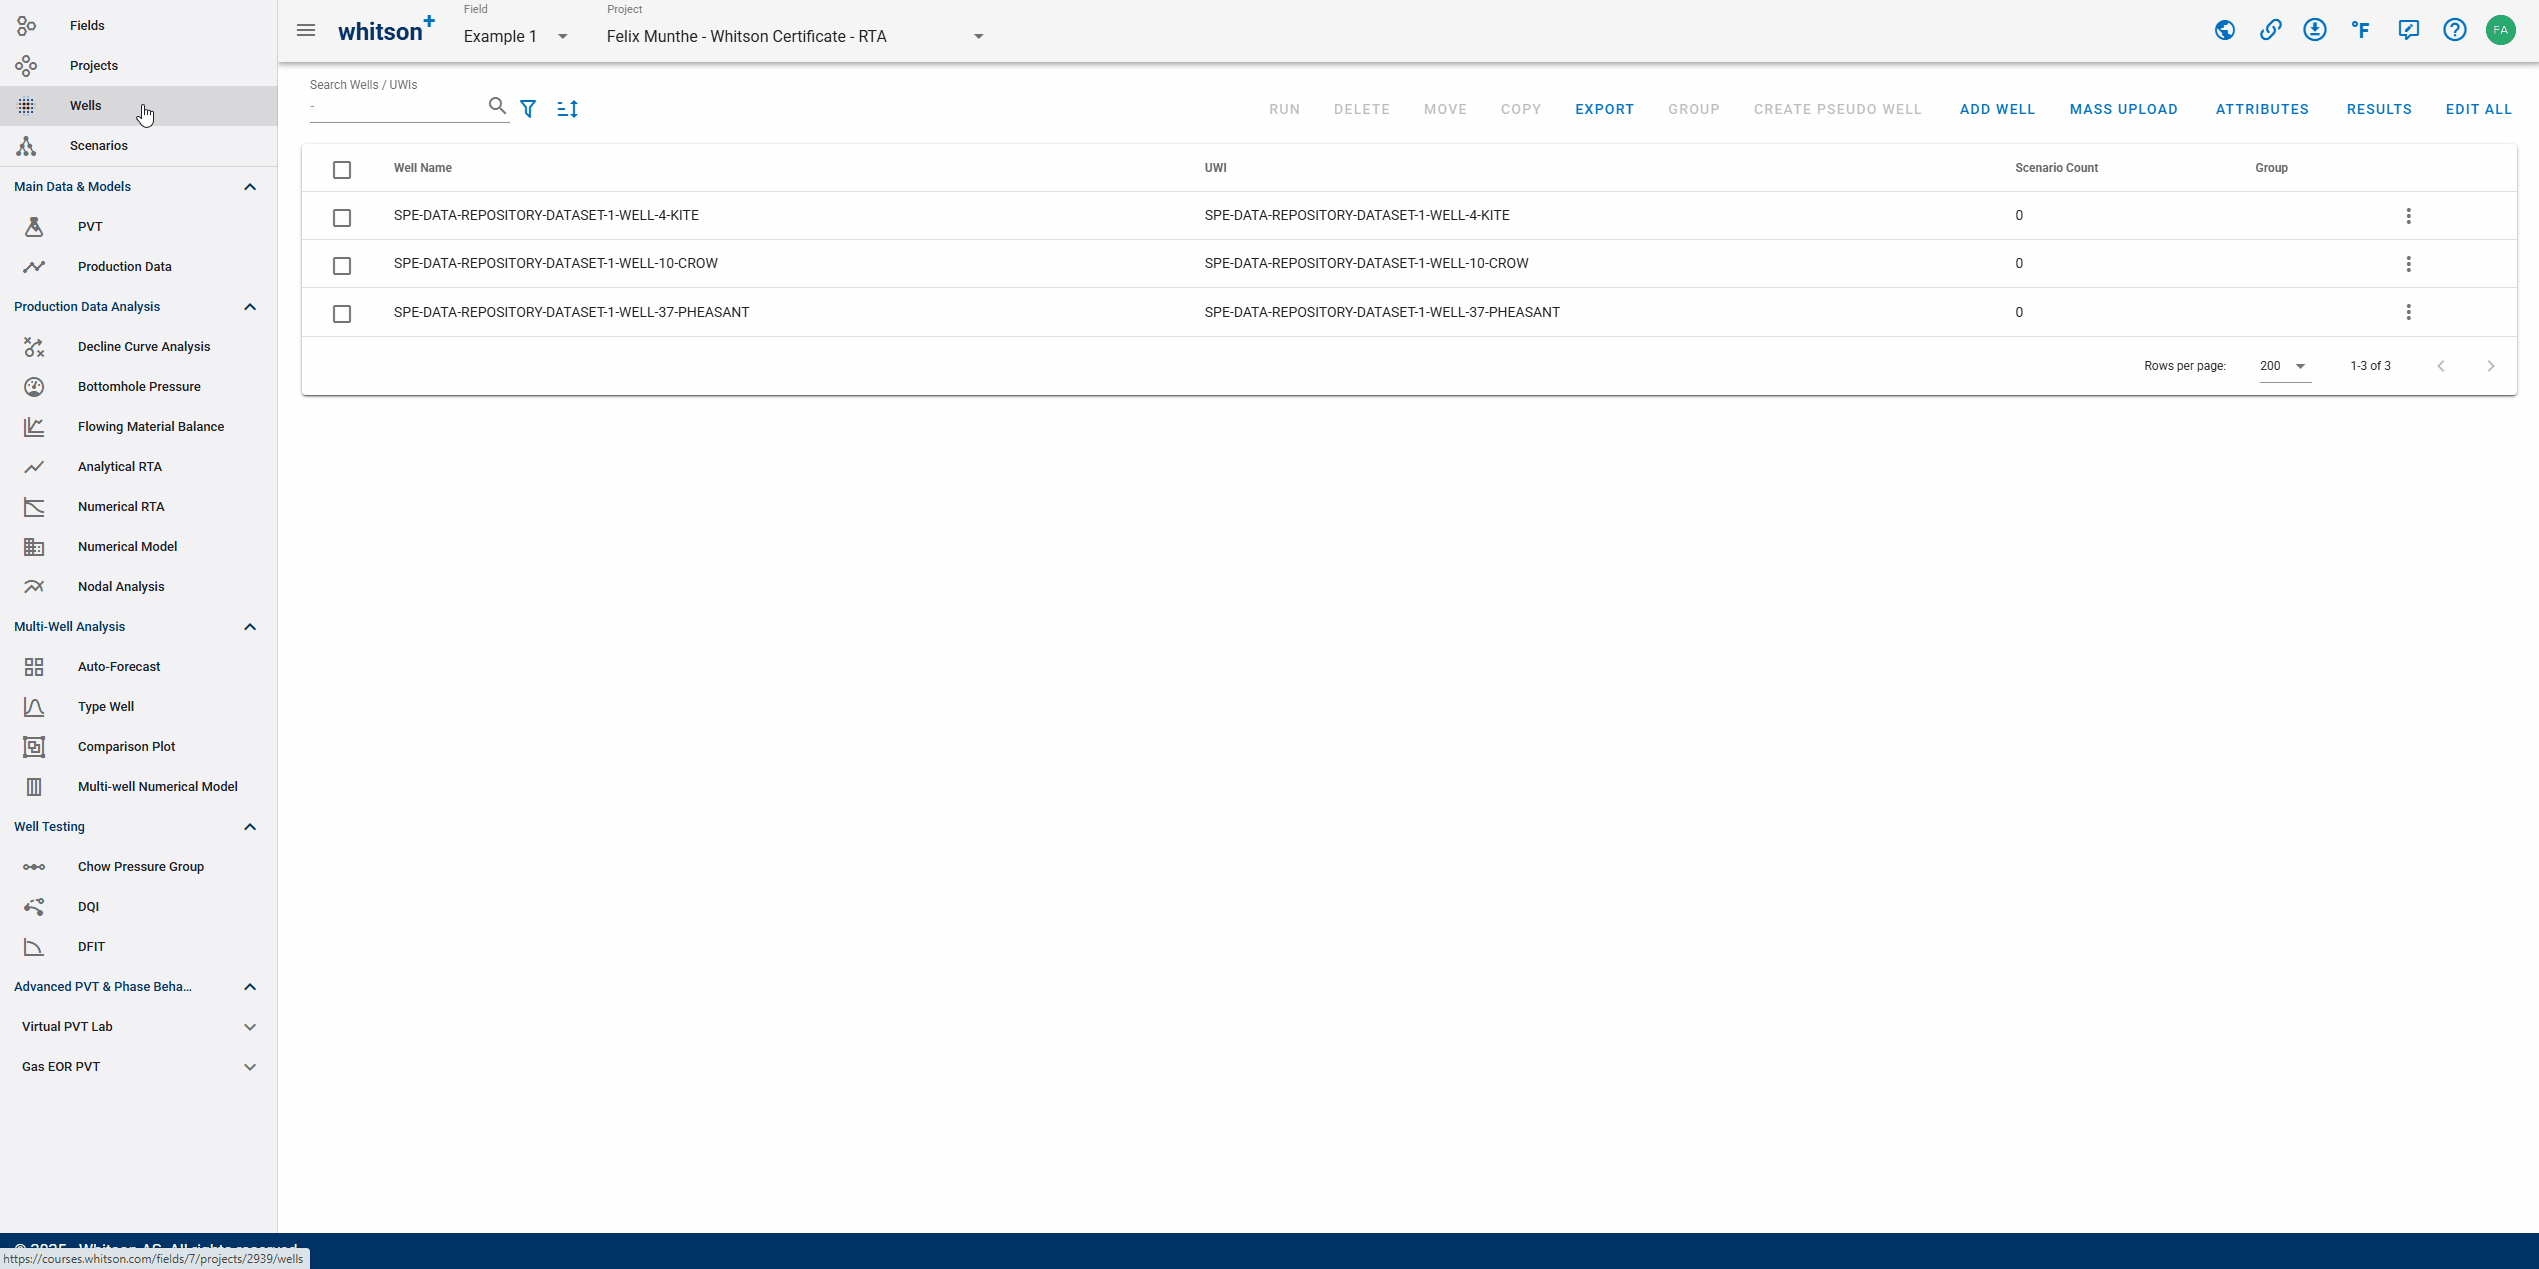
Wells
This module has the following functionalities:
Filter Well List
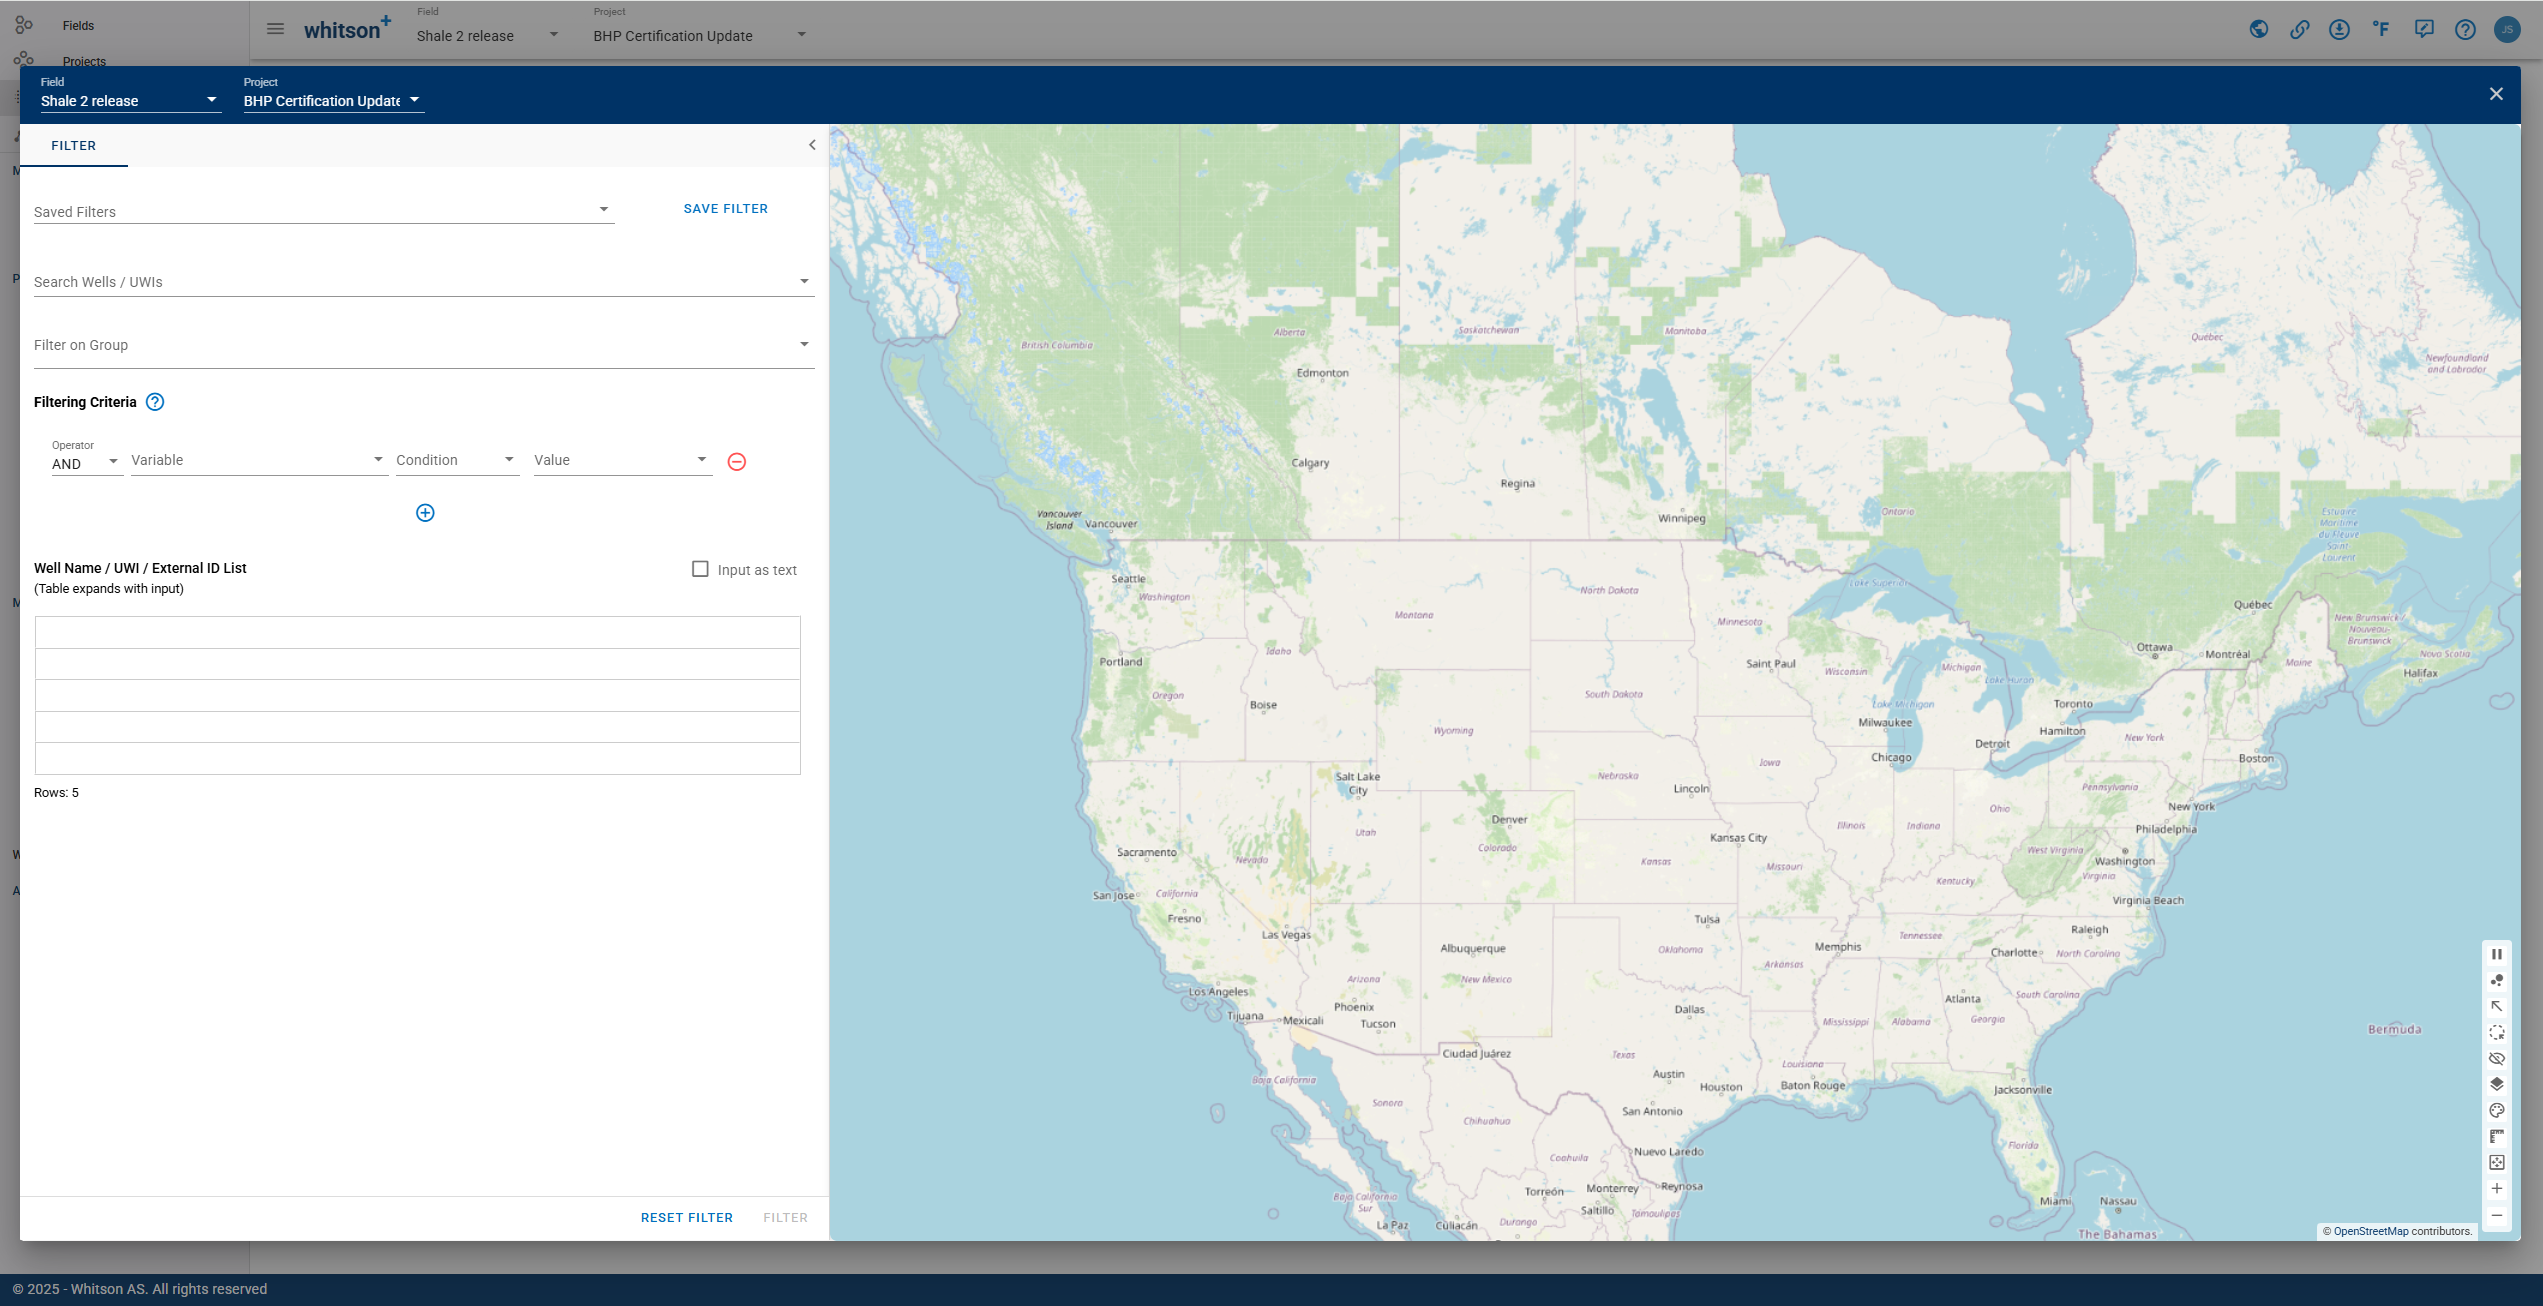
Allows you to filter wells based on differents criteria:
-
Search Wells/ UWI: To filter by well name or unique well identifier.
-
Filter on Group: To filter wells based on user-created groups.
-
Filtering Criteria: To filter wells based on a condition that a variable meets.
- Variable: Can be selected from a drop-down list, includes variables related to main well information & inputs, reservoir properties, completion metrics and well location information.
- Condition: The following conditions can be selected from a drop-down list: equal to (=), less than (<), greater than (>), less than or equal to (), greater than or equal to (), not equal to () and case-sensitive text filtering on a string variable (in). For more specific filtering, you can add multiple conditions that will be combined using AND logic.
- Value: The value associated with the condition.
-
Well Name / UWI List: There are two filtering options. You can copy and paste a list of wells in a table format (the table will automatically expand to fit the data). Alternatively, you can copy and paste a list of wells as text, separated by commas.
RESET ALL to remove all filters and see all the wells in the project.
Remember
- Activating a filter applies it consistently across all modules.
- The filter symbol turns blue to indicate that there is a filter applied to the project.
Sort Well List
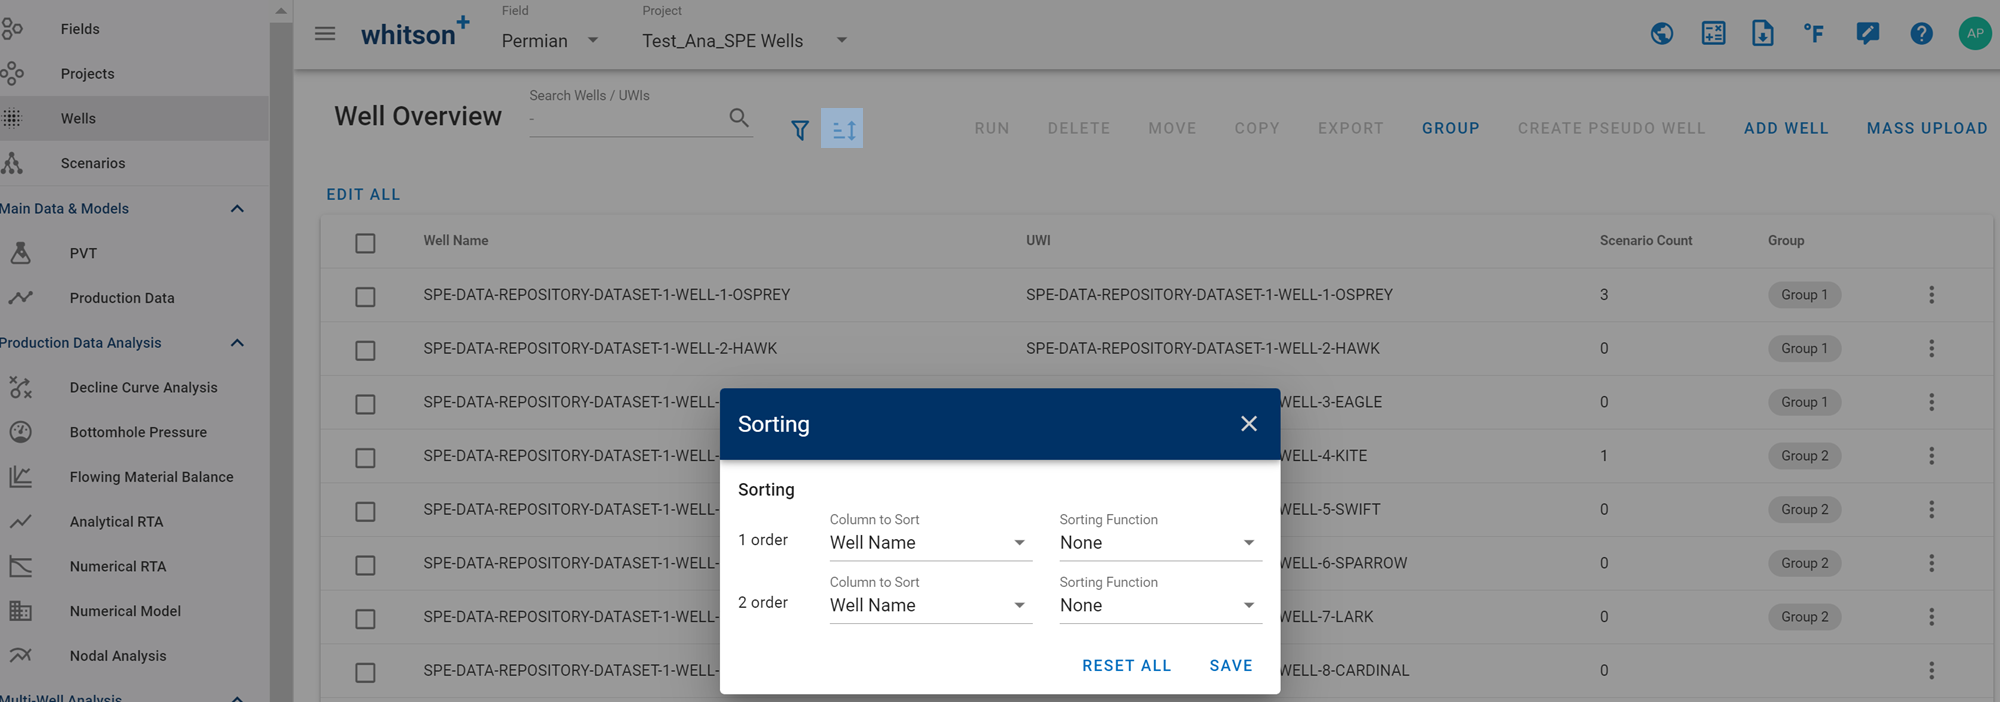
First-order sorting involves sorting wells based on a single column or criterion.
Second-order sorting involves sorting wells based on two or more columns simultaneously.
The software first sorts the wells based on the primary sorting column. This establishes the overall order for most of the data. If there are rows with duplicate values in the primary column, the software then performs a secondary sort on those rows only.
RESET ALL to remove all sorting criteria.
Run
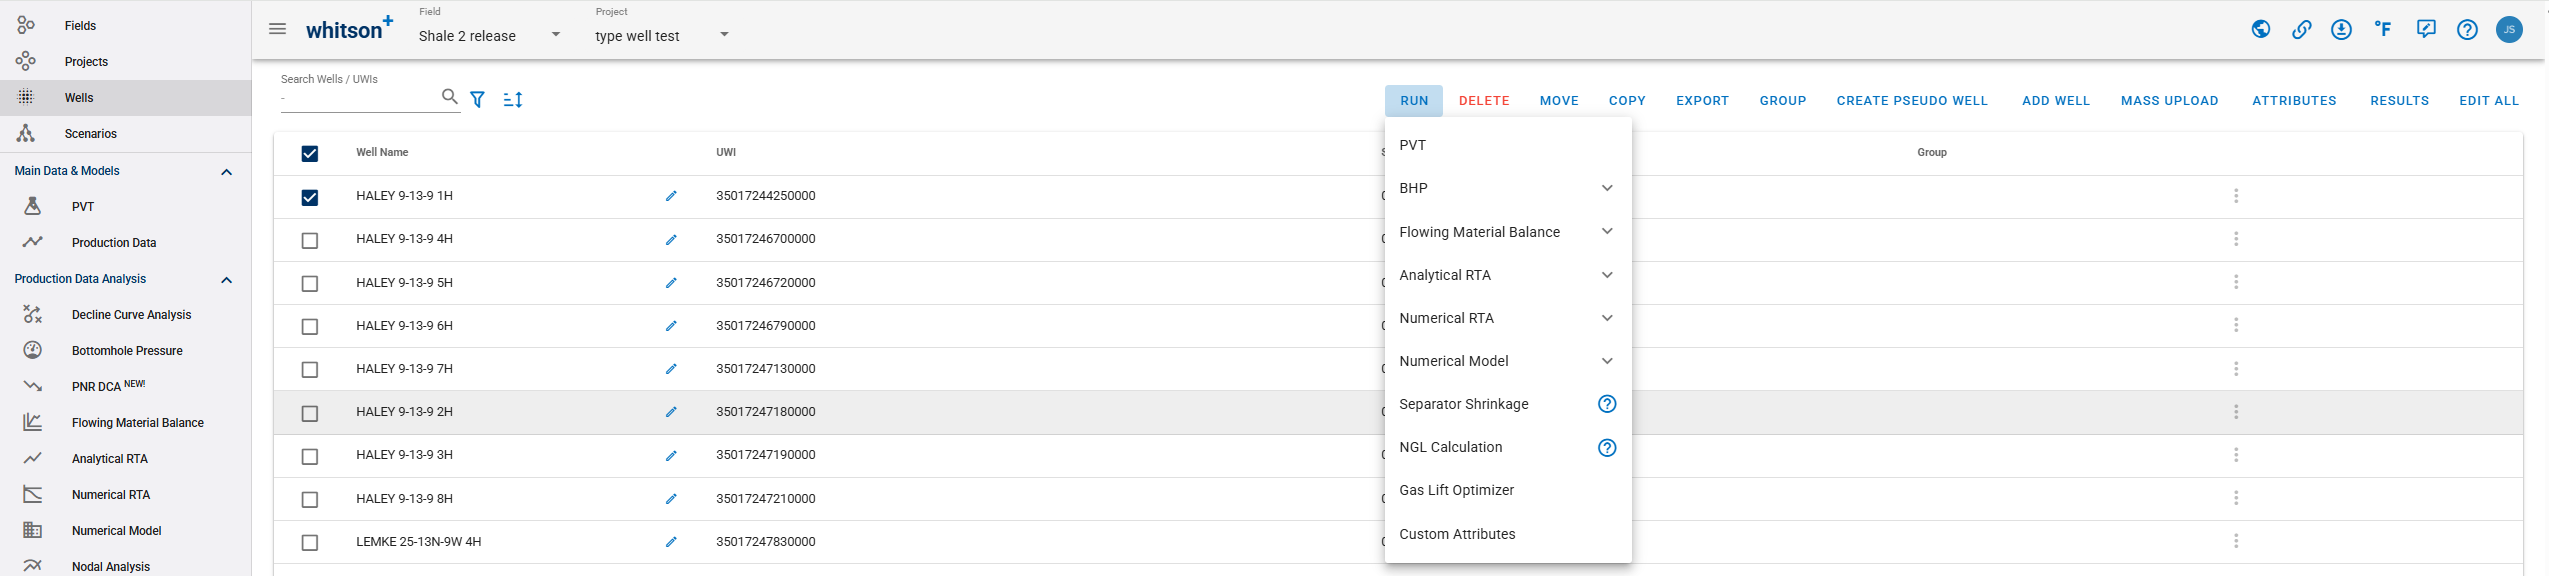
For a bulk run of a process, select the wells and clicking "Run" will then display all the processes that can be selected for bulk execution.
Delete
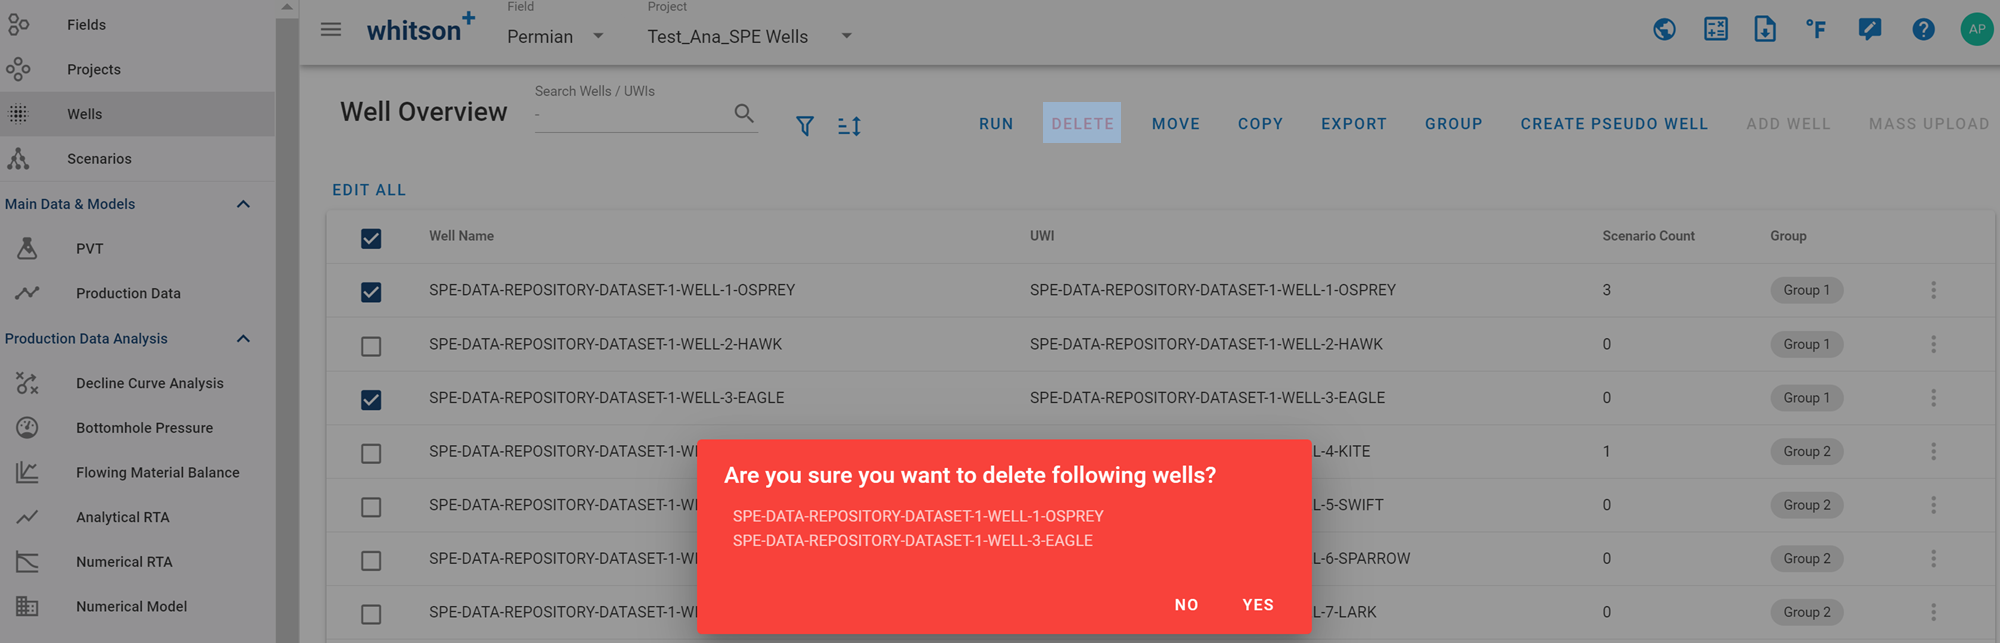
Select the wells you want to delete from the project. Click "Delete" to confirm permanent removal.
Move
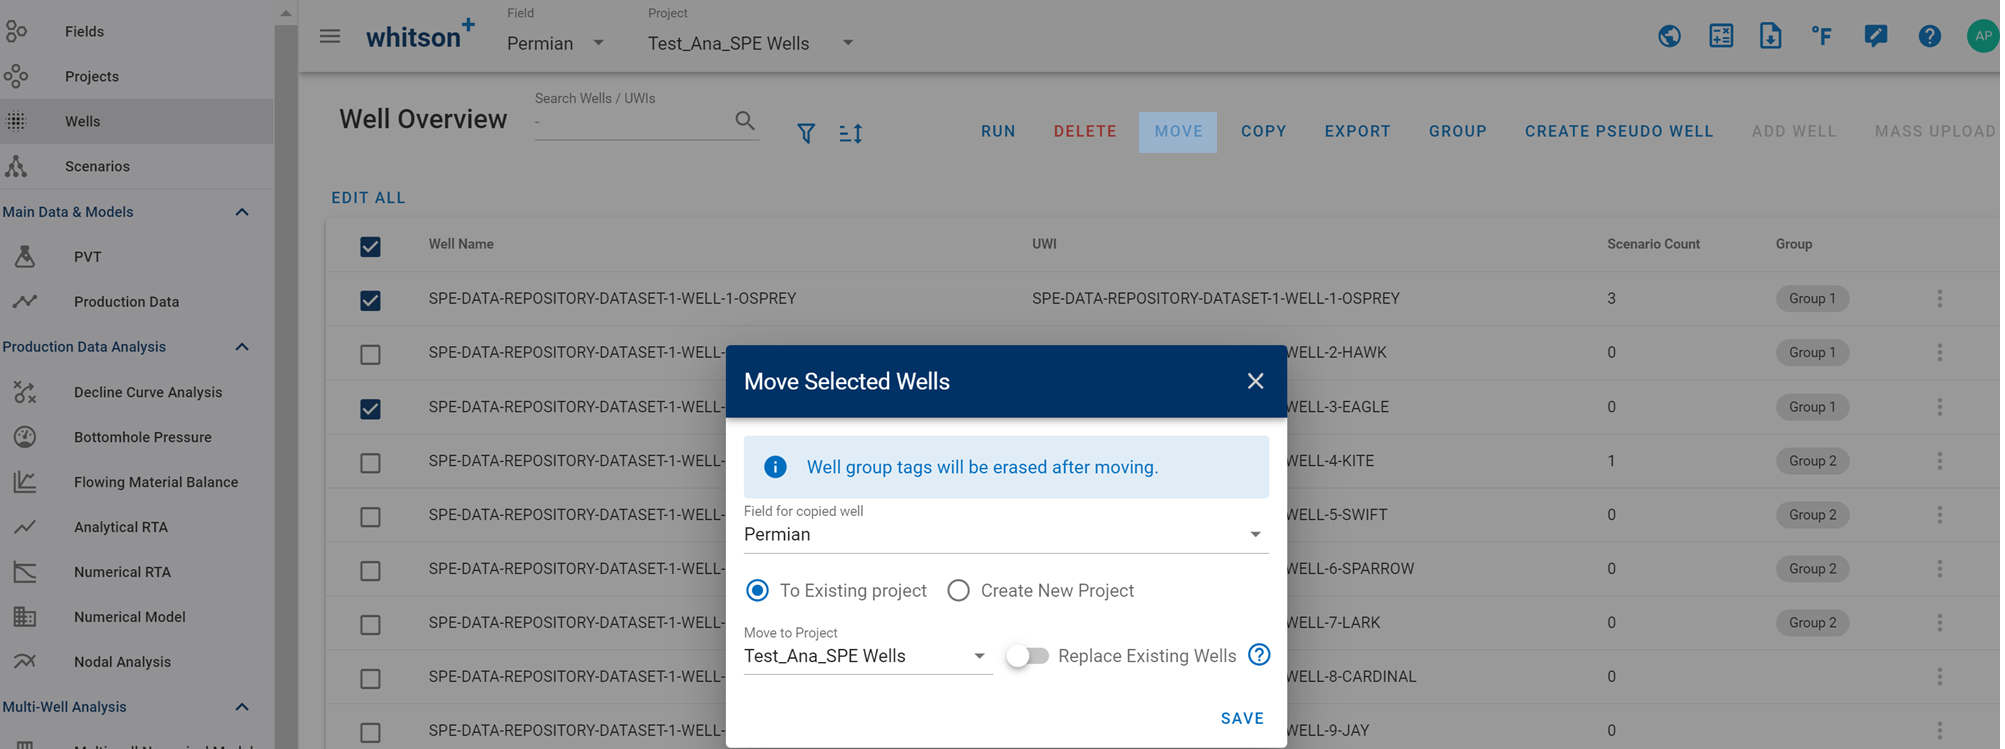
Select the well(s) you want to move from the project. Click "Move" and choose a destination field for the moved well(s). You can either move them to an existing project (in this case, select the name of the project from the display list) or create a new project.
Remember moving a well will remove the well from the source project!
Is "Replace Existing Wells" is toggle on wells with the same name in the destination project will be replaced by the wells from the source project. If the toggle is off, wells with the same name will be skipped (not moved).
Copy
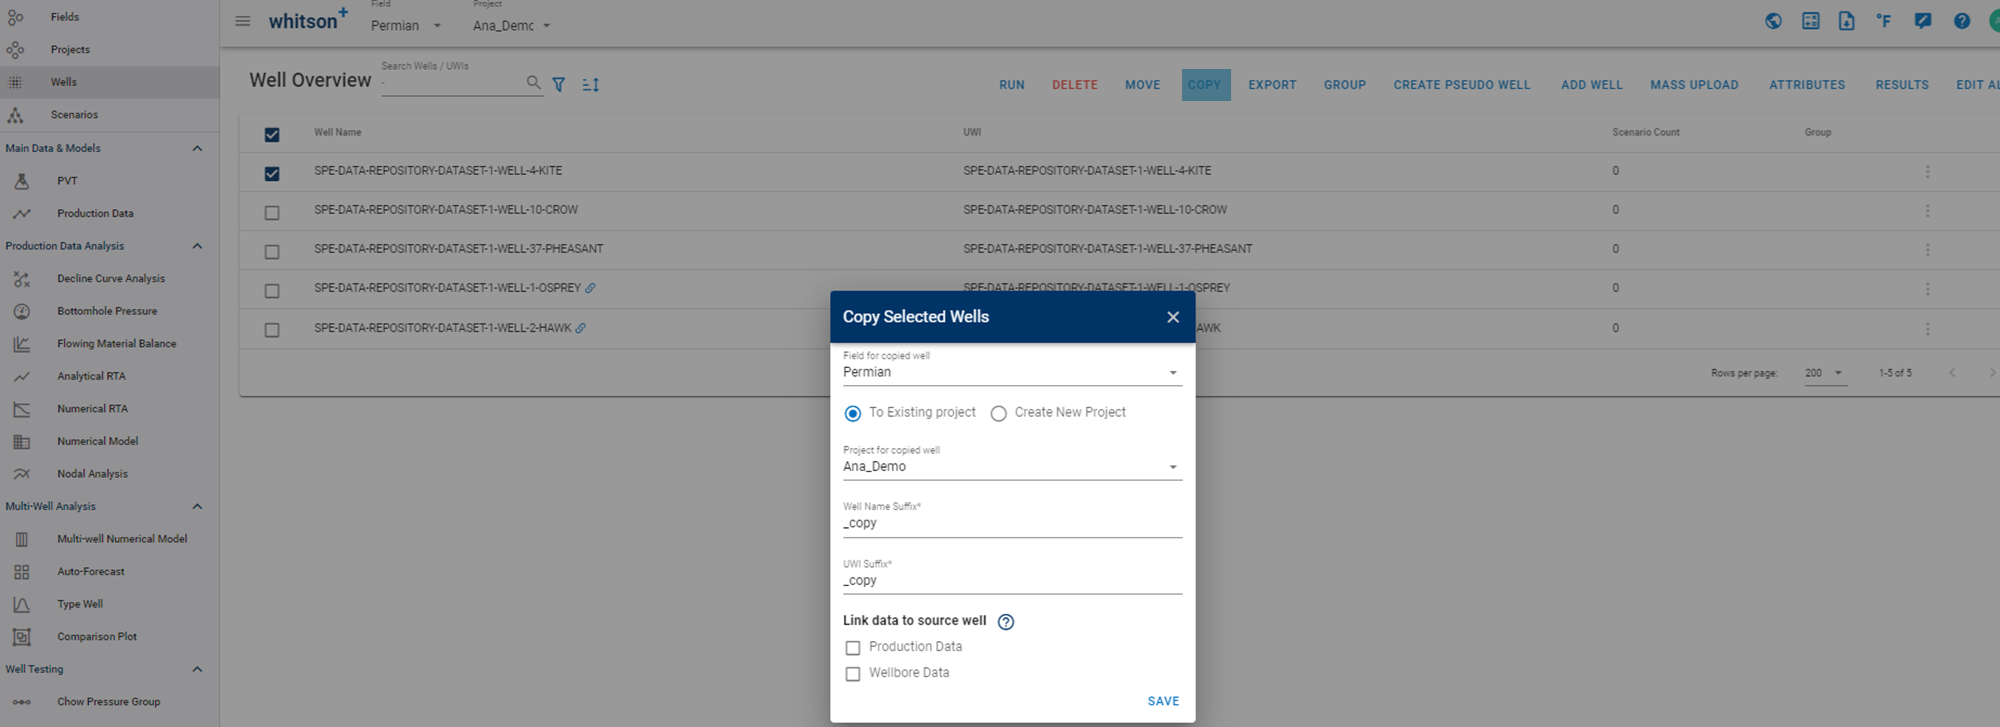
Select the well(s) you want to copy from the project. Click "Copy" and choose a destination field for the copied well(s). You can either copy them to an existing project (in this case, select the name of the project from the display list) or create a new project. Add a suffix to the well name and UWI, this suffix will be append to each copied well.
When a well is copied, only the "Main" scenario will be copied.
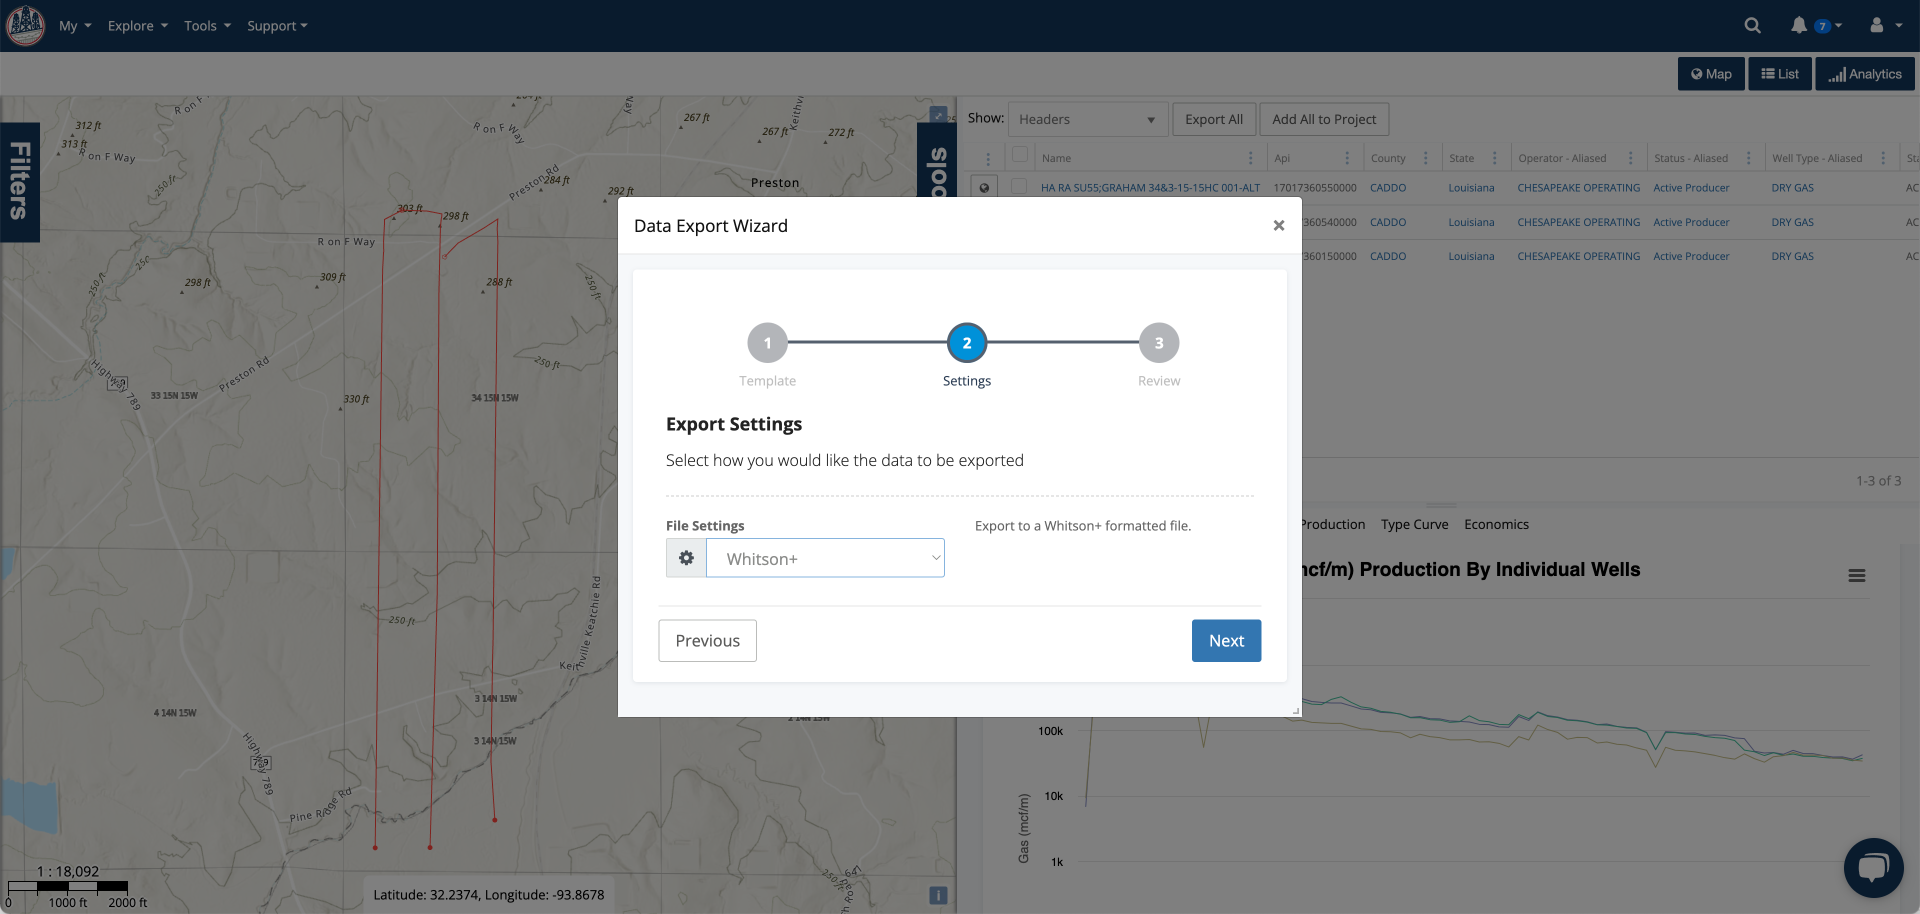
Export
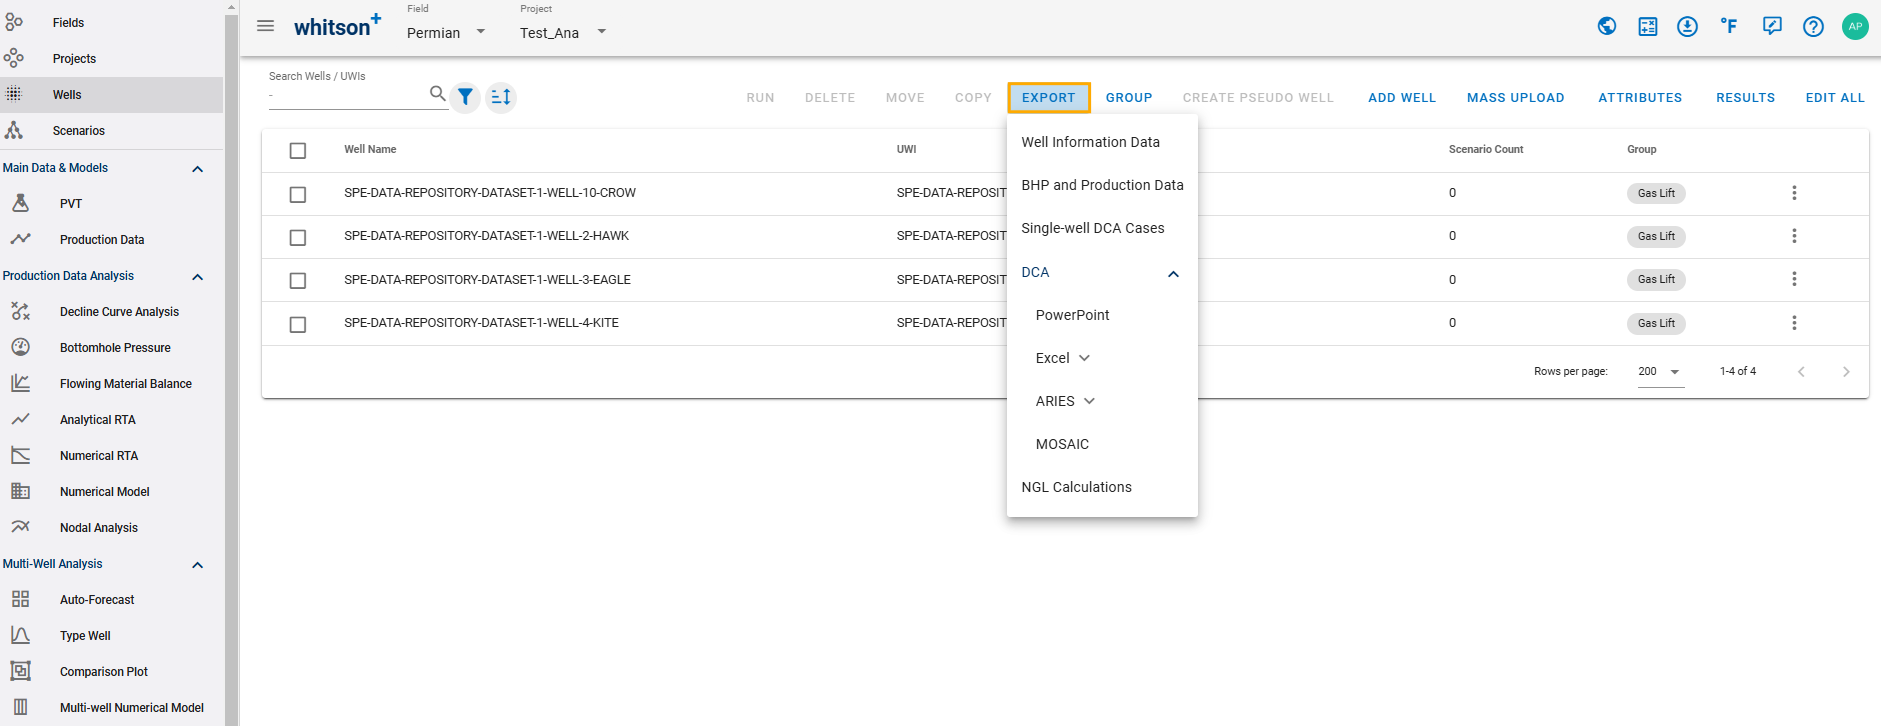
This option allows you to export to a excel file “Well Information Data”, “BHP and Production Data” or “Single-well DCA”.
Group
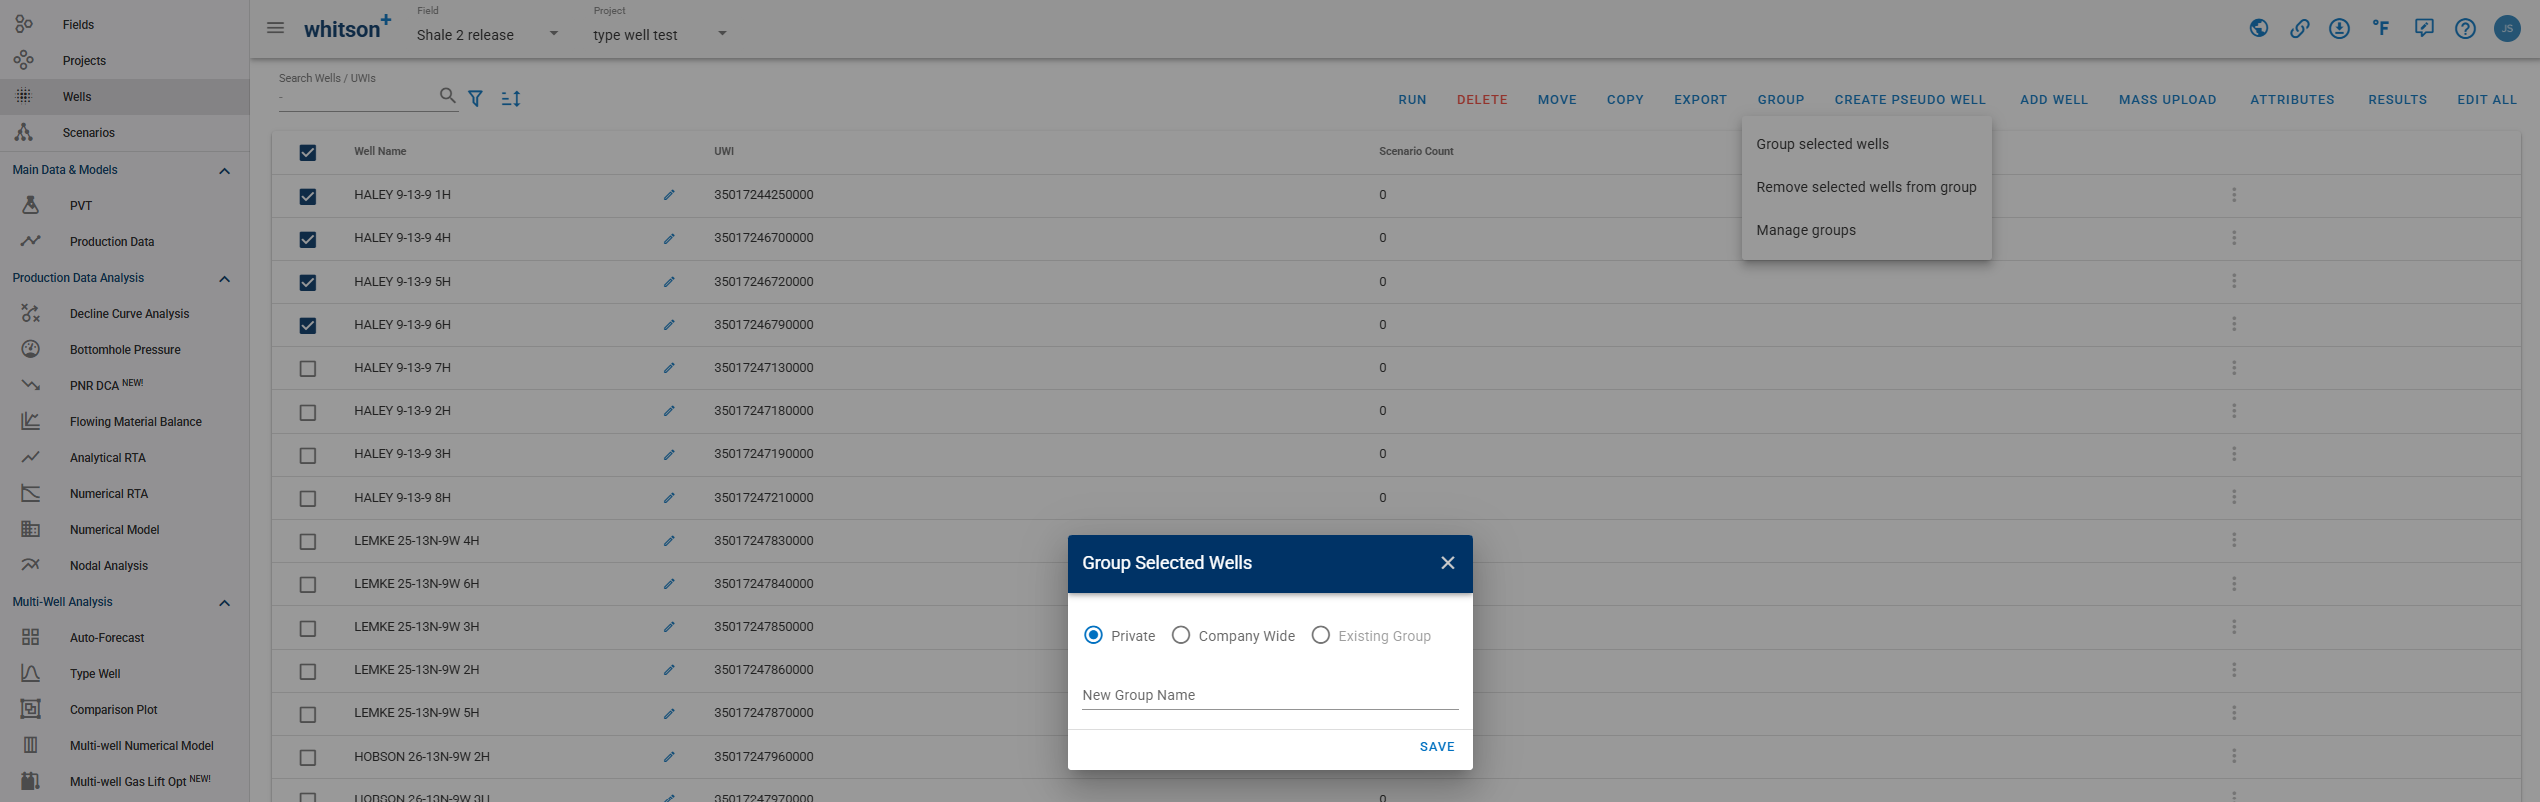
Select the well(s) and create a group tag based on the desired criteria.
Create Pseudo Well
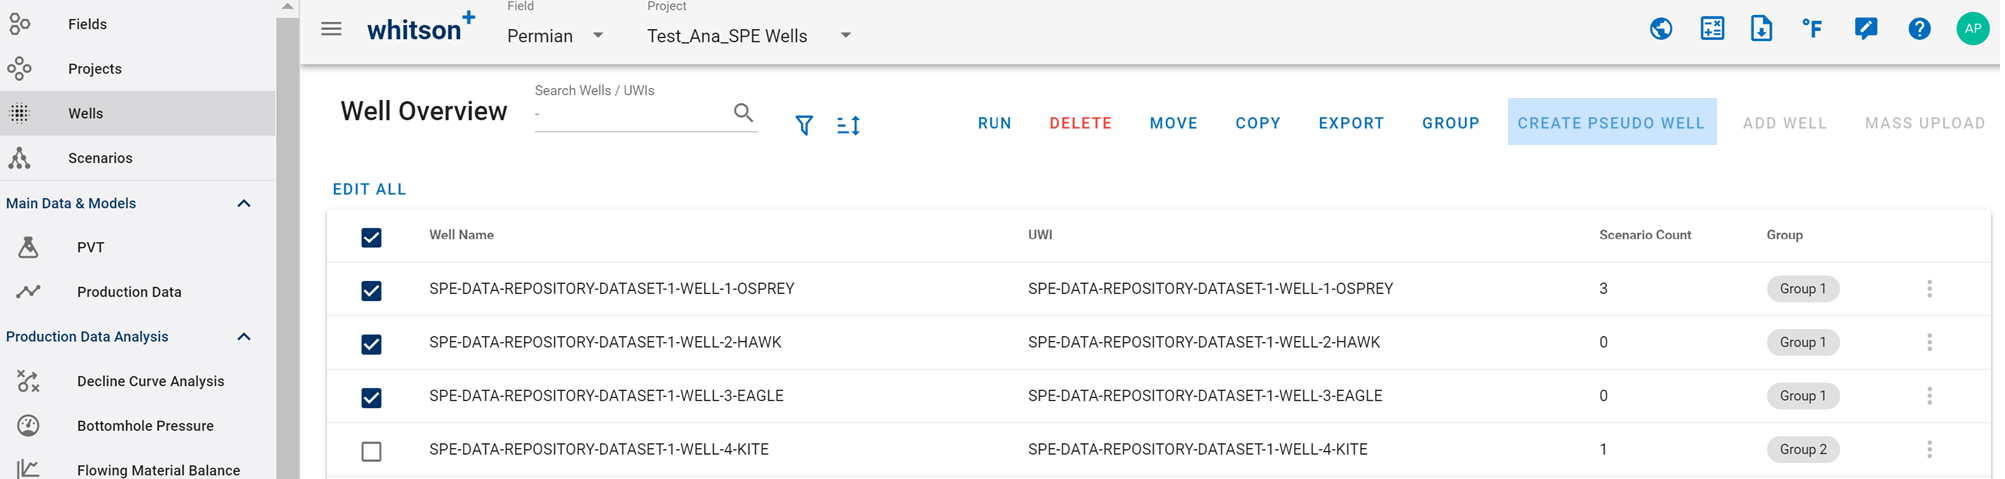
Several wells can be combined into a "pseudo well," as outlined by Thompson et al. (2023), where rates and bottomhole pressures are merged into one composite well.
Rates are summed for each stream and each data point.
Bottomhole pressures are aggregated based on the proportion of total mass produced by the well, i.e., a mass rate-weighted bottomhole pressure.
Prior to utilizing this functionality, ensure that the individual well PVT and bottomhole pressures are defined. Additionally, verify that the flowing material balance feature has been executed for each individual well.
Add Well
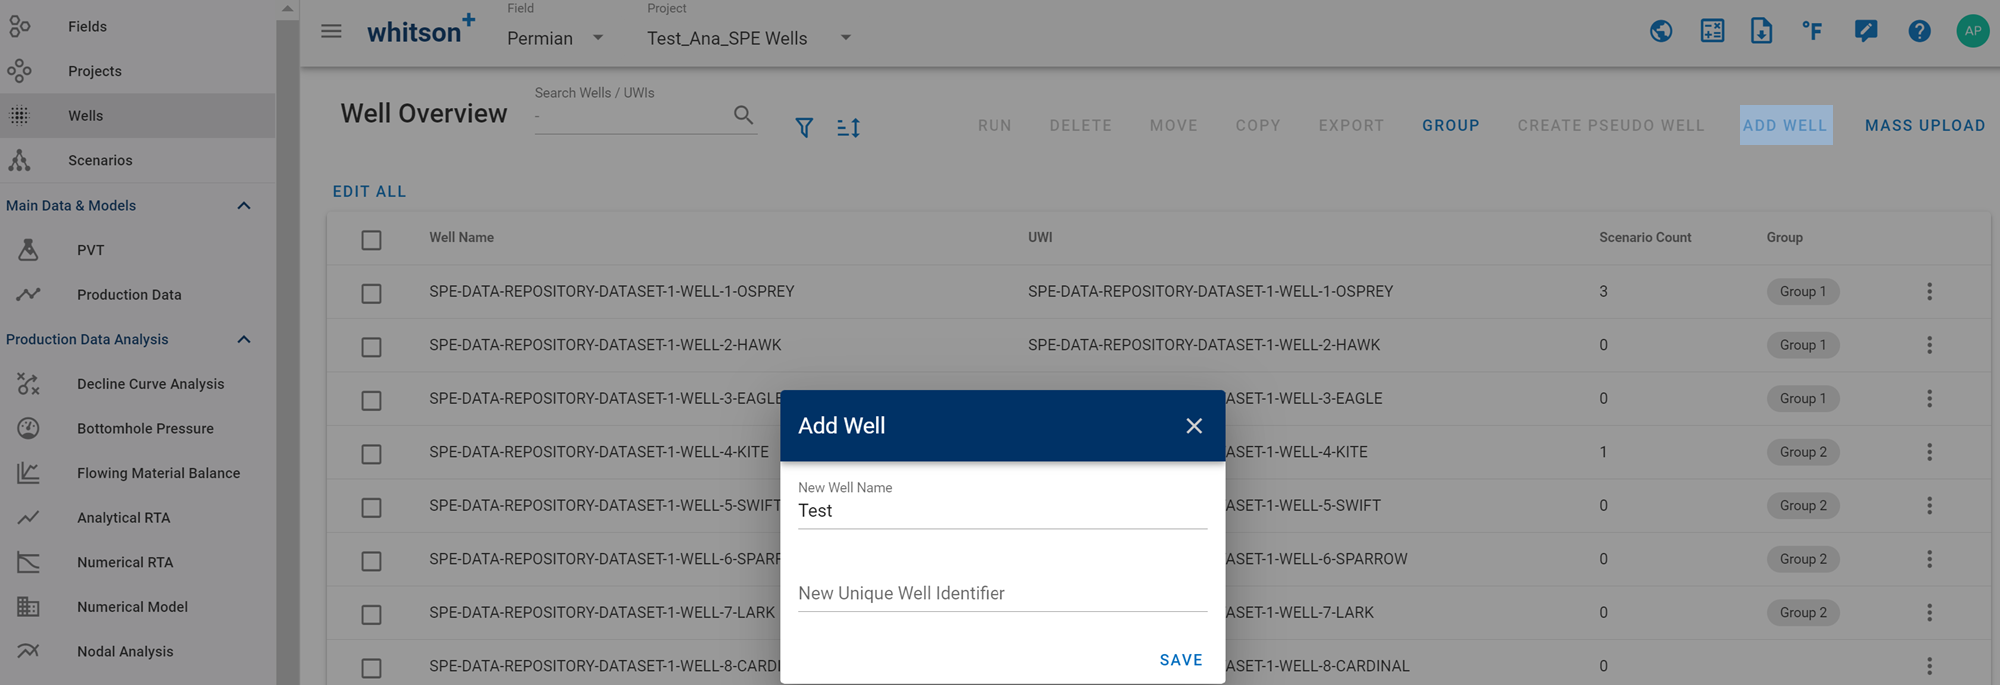
To add a new well, provide the well name and the unique well identifier.
Edit All
For a bulk edit, select the wells and clicking "Edit All" will then display all the processes and relevant parameters that can be selected for bulk edition in one view.
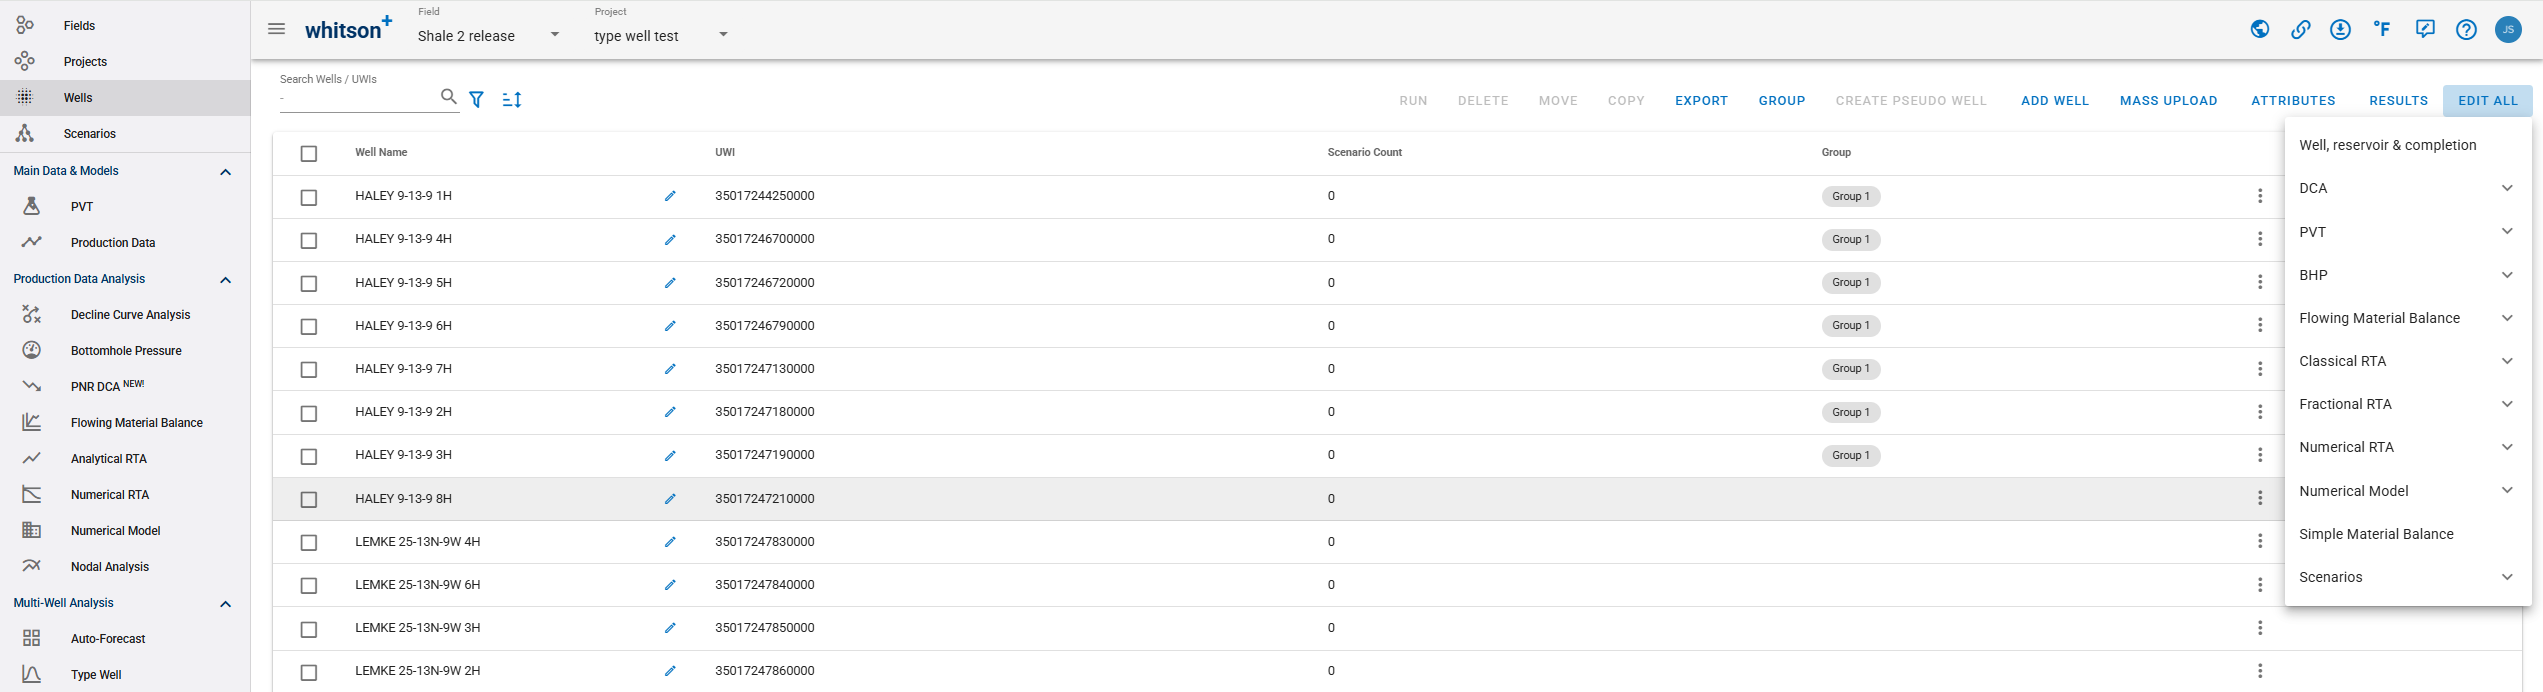
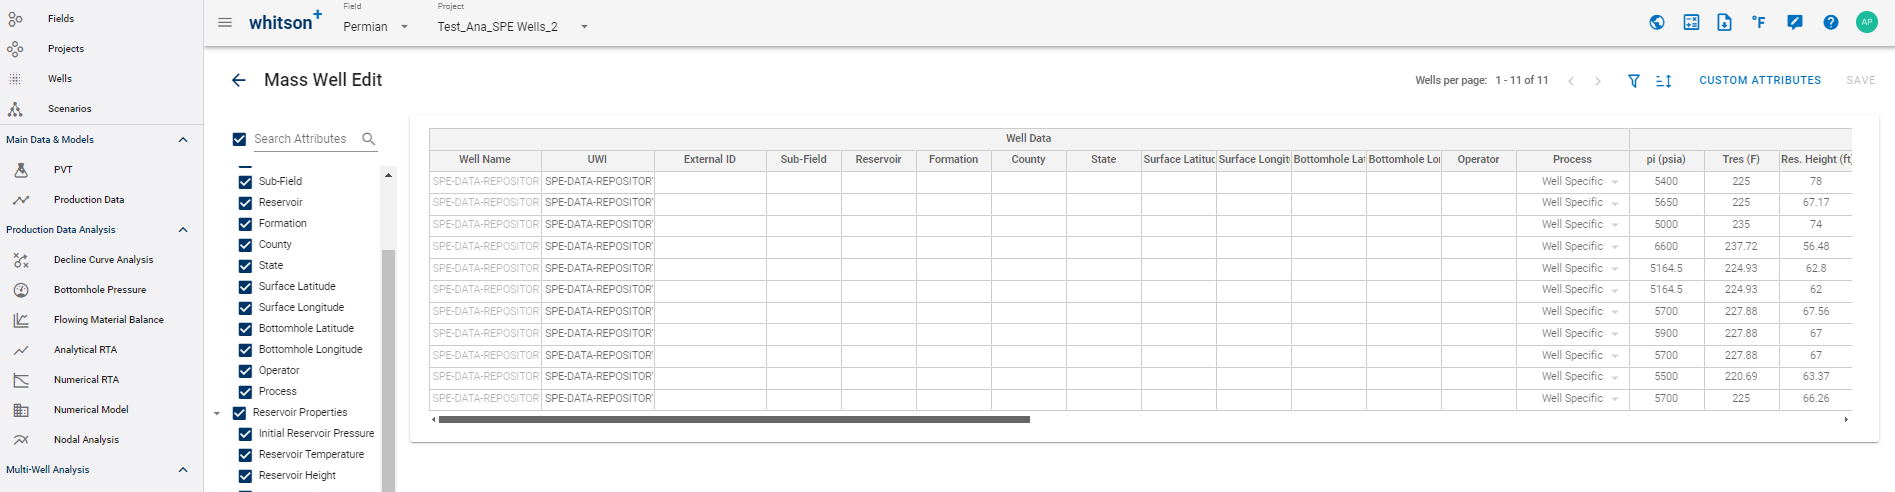
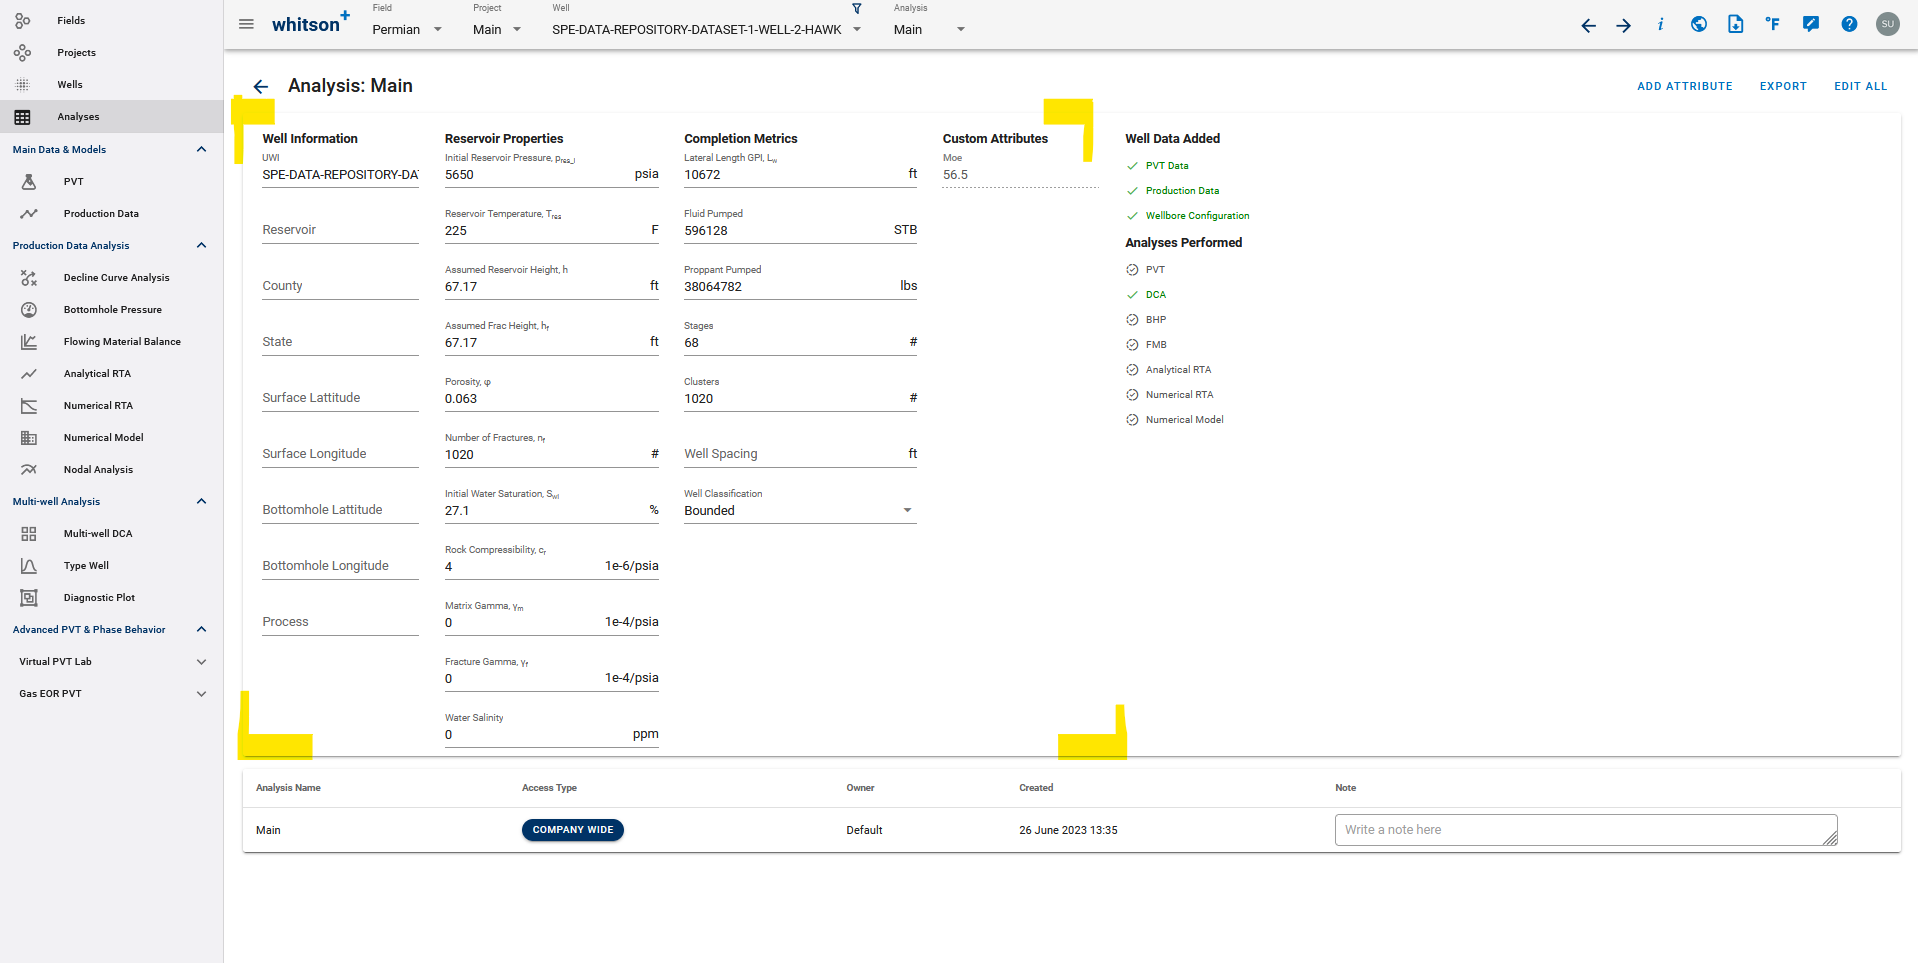
Well, reservoir & completion
Mass well edit: This table has all the well data, reservoir properties, completion metrics, and custom attributes associated with each well. This information can be edited manually within the table or bulk edited by copying and pasting information from Excel. Also available is the option to add "Custom Attributes".
DCA
- Forecast: Option to bulk edit DCA Forecast information for all selected wells:
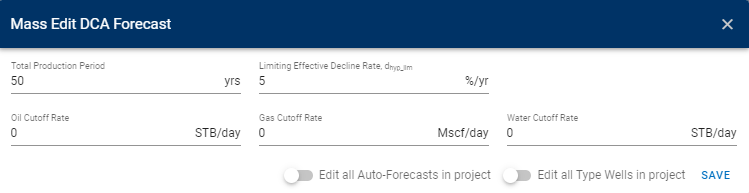
If this information is modified, it will edit the forecast information for the “Decline Curve Analysis” module. To modify forecast information for the “Auto-Forecast” module, toggle on "Edit All Auto-Forecasts in project". To modify forecast information for the “Type wells” module, toggle on “Edit All Type Wells in project”.
PVT
- Edit PVT Inputs: This Category involves editing the PVT properties for each well independently and explicitly.
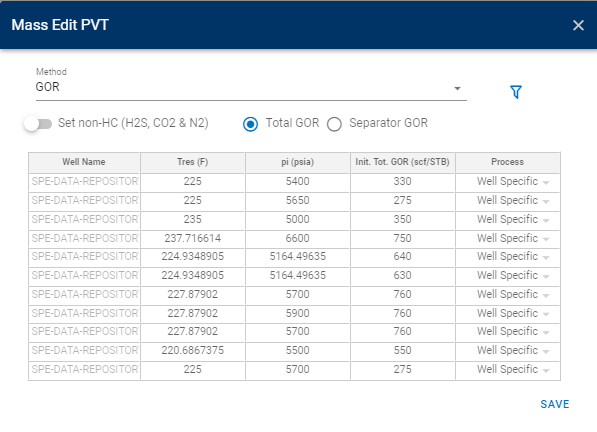
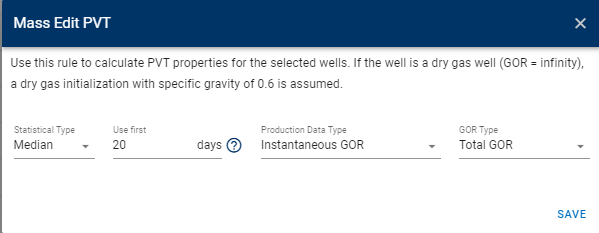
- Set GOR based on Production Data: In this category editing is performed based on mathematical rules applied to production data for multiples wells. This could involve methods such as averaging or using the median to derive a representative value for the entire group of wells.
BHP
- BHP Correlation to Use: This involves bulk editing the 'BHP Correlation to Use' for all selected wells.

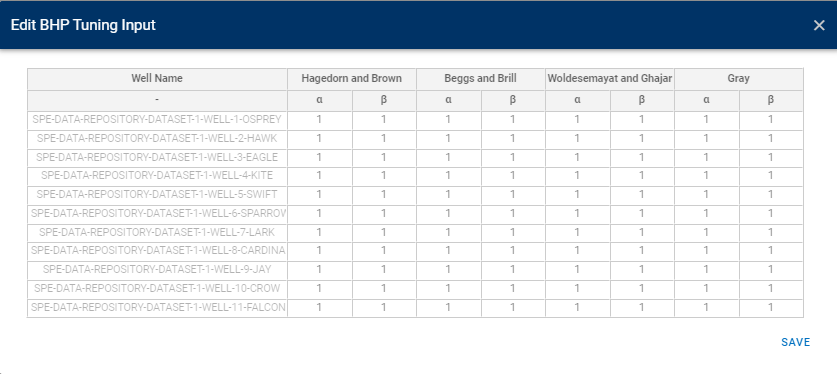
- BHP Tunning Input: Edit the 'BHP Tuning Input' parameters for the correlations of all selected wells.
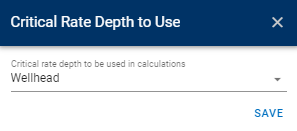
- Critical Rate Depth to Use: Set the 'Critical Rate Depth' to be used in calculations for all selected wells.
Flowing Material Balance
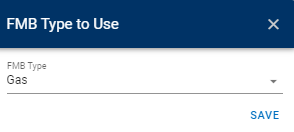
Select the 'FMB Type' to be applied for all selected wells. The available options are Gas and Multiphase.
Classical RTA
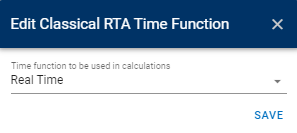
- Time Function: Edit the 'Time Function' to be used in Classical RTA calculations for the selected wells.
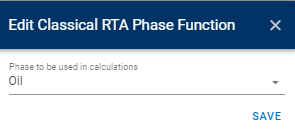
- Phase: Edit the 'Phase' to be used in Classical RTA calculations for the selected wells.
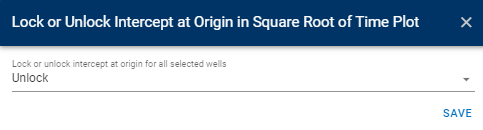
- Lock/Unlock Intercept: Lock or unlock intercept at origen in Square Root of Time Plot for all selected wells.
Fractional RTA
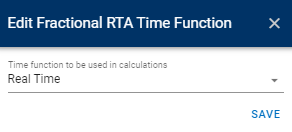
- Time Function: Edit the 'Time Function' to be used in Fractional RTA calculations for the selected wells.
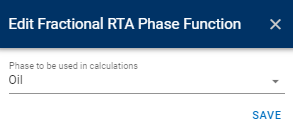
- Phase: Edit the 'Phase' to be used in Fractional RTA calculations for the selected wells.
Numerical RTA
- Input: Bulk edit reservoir properties, matrix & fracture relative permeability for the all the wells.

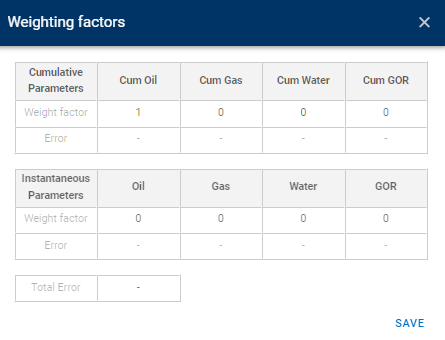
- Weight Factors: Bulk edit default weight factors (cumulative & instantaneous) for oil, gas, water, & GOR on selected wells.
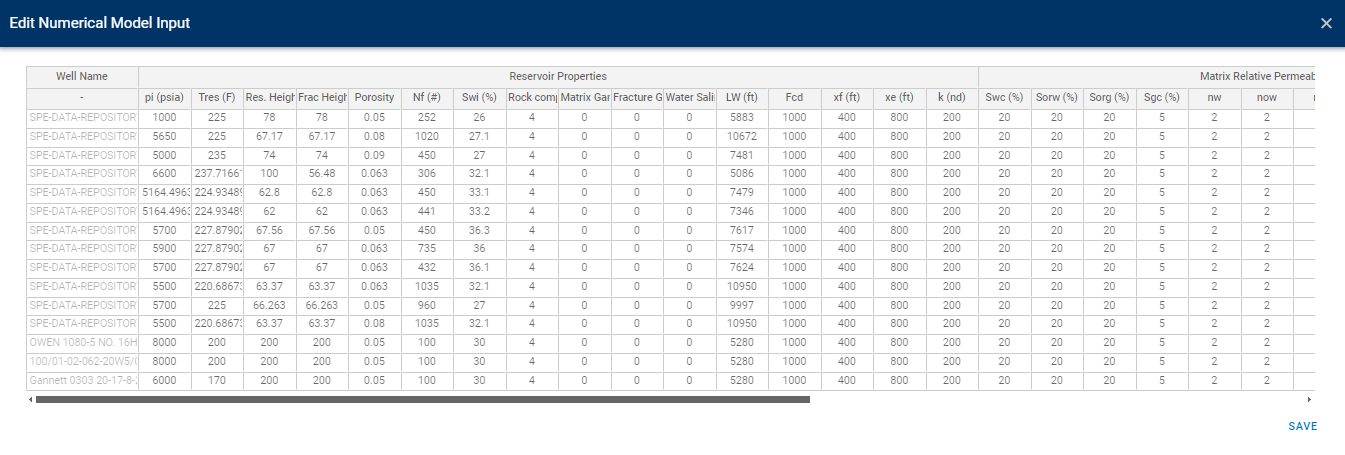
Numerical Model Input
Bulk edit reservoir properties, matrix & fracture relative permeability for the all the wells.
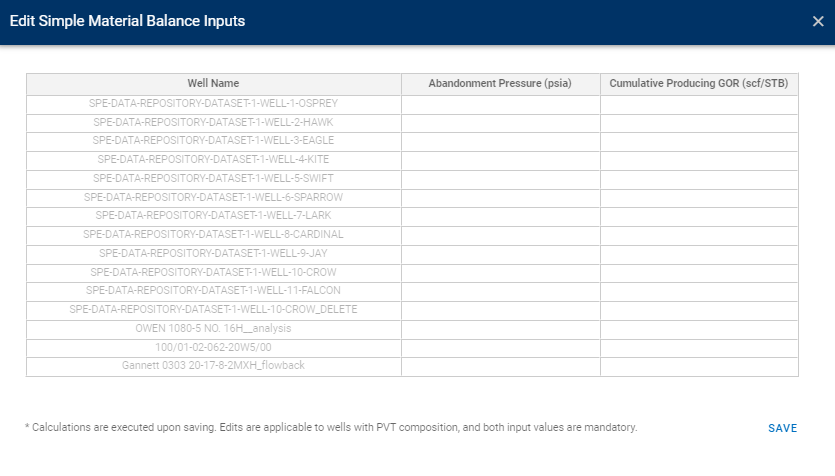
Simple Material Balance
Edit Simple Material Balance Inputs (abandonment pressure and cumulative production FOR) for the selected wells.
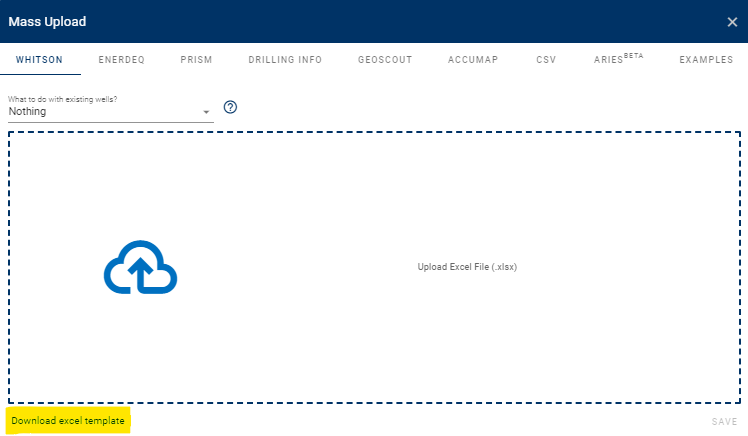
Mass Upload
whitson+ supports mass upload functionality from flat files from
- whitson+ template
- Enerdeq
- PRISM
- DrillingInfo
- geoScout
- .csv template (for prod data only)
whitson+ template
Here are a few different examples of use of the "Mass Upload" feature.
- Download 11 Eagle Ford wells from the SPE Data Repository here.
- Download 15 Haynesville wells from the SPE Data Repository here.
- Download 27 Marcellus wells from the SPE Data Repository here.
- Download 2 different wells for demo purposes here.
Note
Make sure to not change the headers in the mass upload template and make sure to fill in all mandatory columns. Also, avoid adding in additional columns and sheets.
On the Wells page within the project, click Mass Upload (on the top-right of the page) to get started with bulk loading wells into whitson+

The Mass Upload templates are designed to load a large number of new wells to any project in one go. It can also be used to update existing wells in the project with additional production data.
You can download the latest mass upload template here -
The Mass Upload template has the following sheets -
-
Well Data (Required) - Main well information and inputs such as well header information, reservoir properties, completion metrics, location, etc that populate this section -
-
Production-Data (Optional) - All the production data for the well that populates the section below goes here.
-
Deviation Survey Data (Optional) - Input Deviation survey as MD-TVD which populates this section -
-
Wellbore Data (Optional) - Input wellbore configurations like Top and Bottom Perforations which populates this section -

The mass upload dialog box also has the following options for what needs to be done if the well already exists -
Nothing - is the default behavior, where an error will be shown if a well is being uploaded with the same name as an existing well in the same project.
Merge will merge the data being uploaded with whatever data is already present.
If the same date in production data is present in the existing production data and the data being uploaded, the uploaded data will be used otherwise it will just append to existing production data. Merge can also be used to add wellbore / deviation survey data to a set of already existing wells.
General Tips 1. The parser is now able to recognize the sheets and columns by the name, irrespective of the order in which they appear. Do not rename any of the existing columns or sheets. 2. Here are sheets you would use in the mass upload template to initialize a well depending on how you would like to initialize PVT. These sheets (except the first Well Data sheet) may be hidden by default, just use 'Unhide Sheets' on Excel to see them all.
<ul><li>The Well Data sheet is used to initialize a Well and PVT using GOR only method. </li>
<li>The Well Data (Sep Compositions) is used to initialize a Well and PVT using separator compositions. </li>
<li>The Well Data (Full Compositions) is used to initialize a Well and PVT using full compositions. </li>
<li>The Well Data (Dry Gas) is used to initialize a Well and PVT using dry gas compositions. </li>
<li>The Well Data (Dry Gas simplified) is used to initialize a Well and PVT using the only the dry gas specific gravity (simplified input).</li></ul>

All wells need to appear at only once in at least one of the sheets above to be read fully. <br>
If the well exists in other sheets like Production Data, etc.,  but is not initialized in at least one of the ways above, the well will not be uploaded with a relevant error message.
- The Well Name used in the Well Data sheet is considered the primary key to tie data from the different sheets together, make sure to use the same well name in other sheets as well.
- Wells with duplicates in Production Date will be highlighted in the error message and will not be uploaded.
- Do not use blanks for MD or TVD in Deviation Survey sheet since they are assumed to be zero.
- In the Wellbore Data sheet,
- Wellbore configurations are optional on the Wellbore Data sheet but if you do include them in the upload, make sure to have the Top and Bottom perforations in the sheet.
- Configuration Number and its associated 'Use by Date' is optional for the first one but required to add multiple configurations as 2, 3, etc. and the 'Use by Date' to indicate when the wellbore configuration is switched over for BHP calculations.
- Fields with preset options are - 'Flowpath' which is used to indicate production path of the reservoir fluid, 'Lift Method' to specify the Artificial Lift method used, and the 'Gas Lift Configuration' where we can specify the type of gas lift. Values other than the preset options are not recognized.
- If you are specifying a Rock Temperature in this sheet, this is not the reservoir temperature but is instead the rock temperature at the surface to create a linear temperature profile in the rock. Setting this to reservoir temperature causes the BHP calculation to fail.
- Other logical checks in every wellbore configuration - End of the last casing section must be deeper than the top perforation depth, the tubing bottom MD must be less than or equal to top perforation depth, and the tubing OD can never be larger than the Casing ID.
Tips Using Merge
This mode is primarily designed and used to add production data and other information to an existing well on whitson+.
- Be sure to use the same Well Name as on whitson+
- For updating the production data, you can add the new data to the Production-Data sheet with the rest of the sheets blank. New data is appended to the production history and if there is a conflict because the date already exists, the new data is used to overwrite. No duplicates will be allowed here as well.
- You can also update or add to the configurations by using the Wellbore Data sheet. New wellbore configurations with new 'Use from date' will be appended to the existing configurations. To replace an already existing wellbore configuration with the new one, use the same 'Use from date' as the already existing one and to replace the default configuration in the well (the first one) leave the 'Use from date' empty to override the default.
If you need help with any errors using mass upload files, we are trying to build relevant error messages and checks making the process more bullet-proof, so shoot an email to support@whitson.com and we'll be happy to take a look and help!
Enerdeq
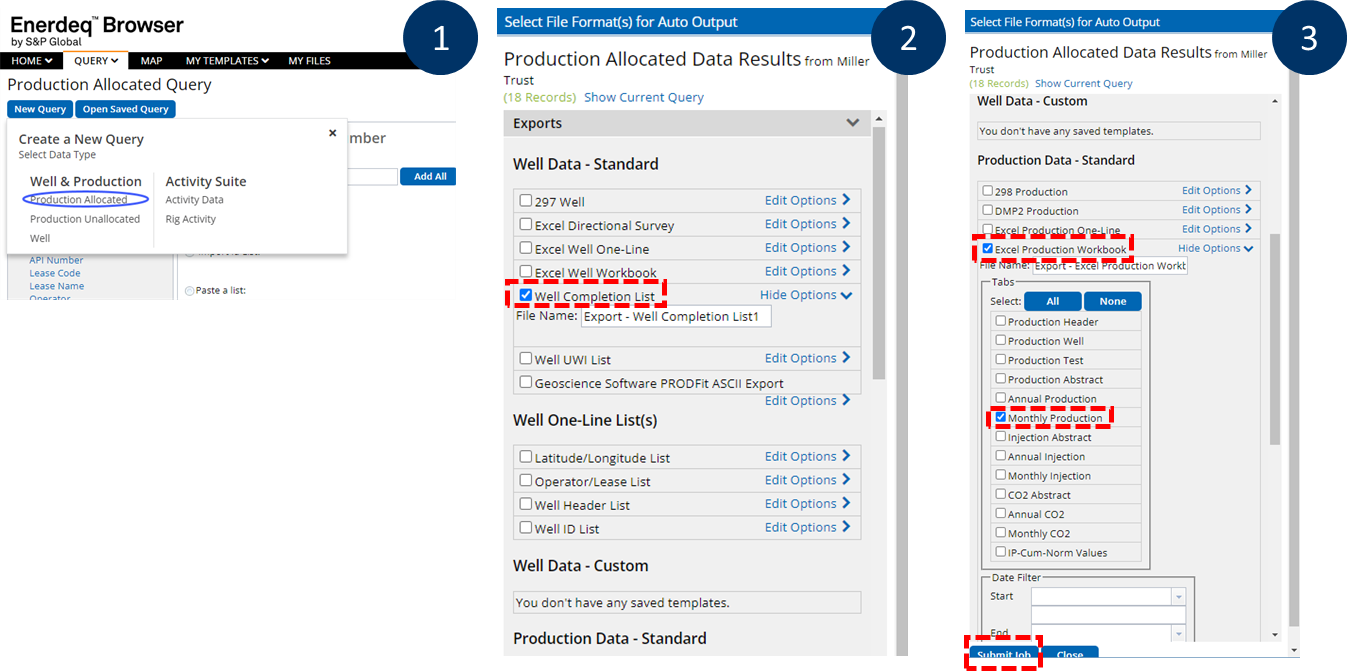
Download the Well Completion List and Monthly Production for a group of wells in Enerdeq by following the steps above. Unzip the downloaded folder on your computer, and drag-and-drop, the files into the frontend.
Here is an example of well attributes and well production data in Enerdeq format.
Enverus - PRISM
- Select "Wells" in "Exports".
- Use the default exports (DO NOT create a custom template)
- Click "EXPORT DATA".
- Repeat the same steps for "Production".
Here is an example of a
- Well Monthly Production file example can be found here.
- Well Headers file example can be found here.
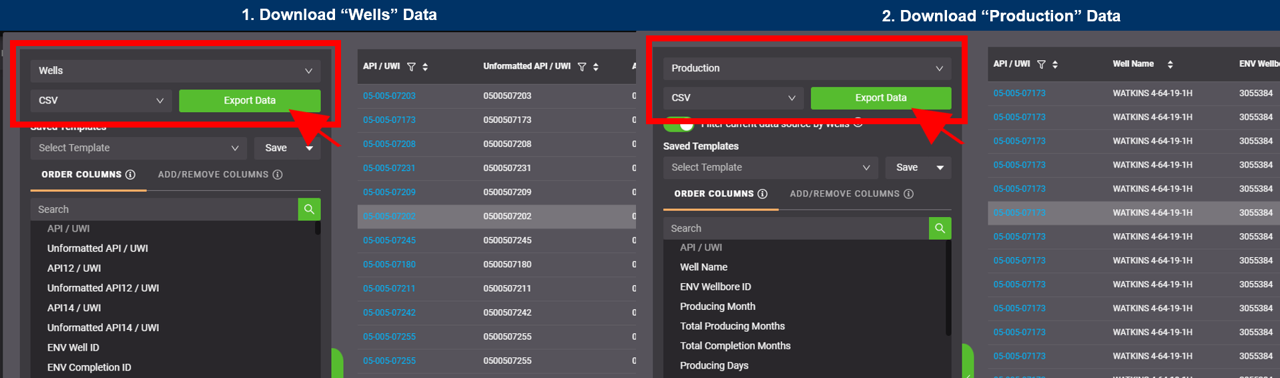
Enverus - DrillingInfo
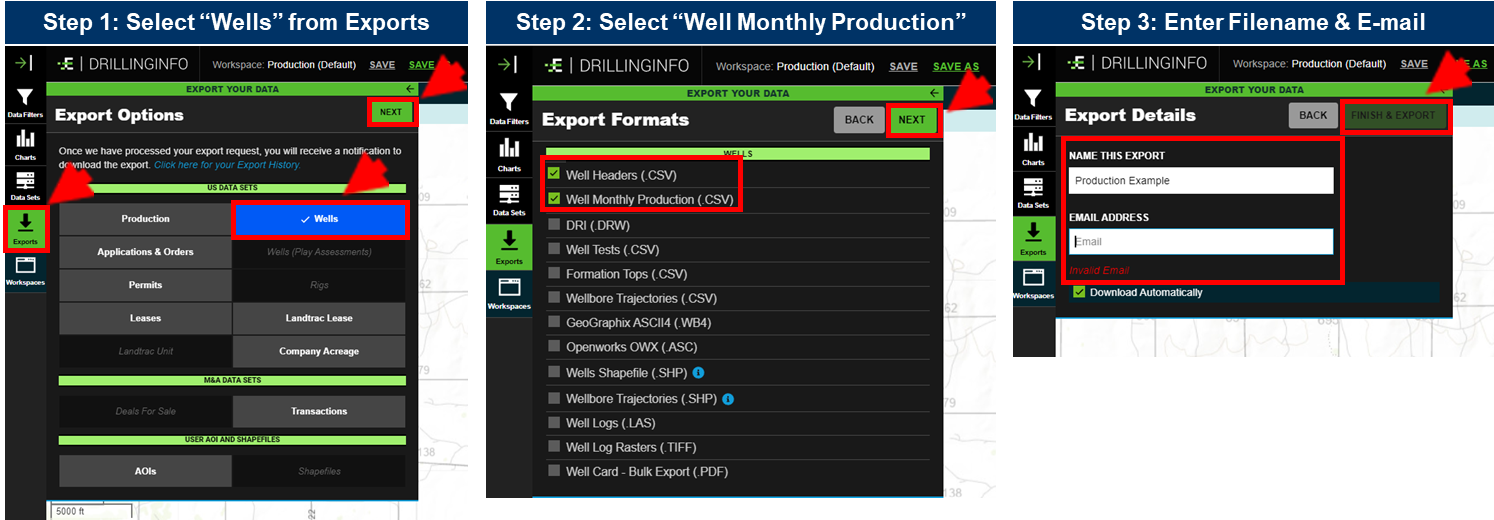
Download the relevant Enverus - DrillingInfo file by following the steps above.
- Select "Wells" in "Exports"
- Select "Well Headers" and "Well Monthly Production"
- Enter Filename & E-mail
Here is an example of a
- Well Monthly Production file example can be found here.
- Well Headers file example can be found here.
geoLogic - GeoScout
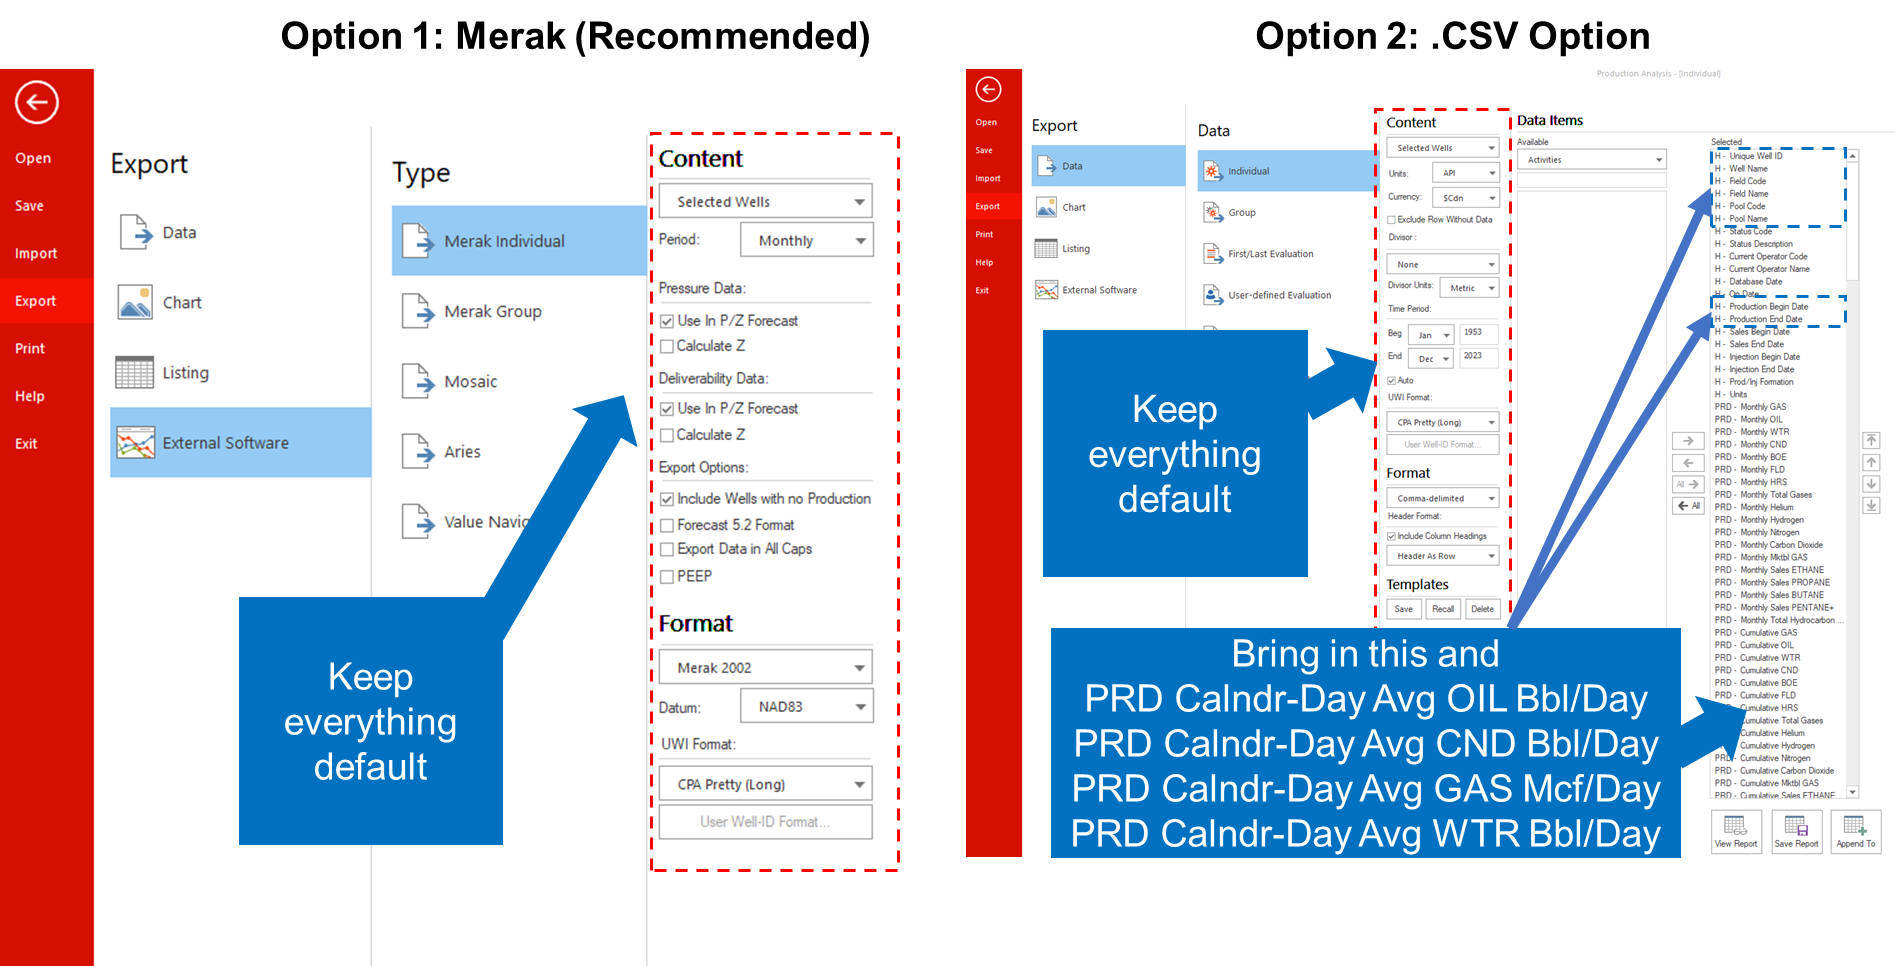
- Example of Merak (.mer) from GeoScout can be found here.
- Example of .csv file from GeoScout can be found here.
It is recommended to use the Merak file. If you use the .csv file ensure that you select the following data items
Headers
- Unique Well ID
- Well Name
- Pool Name
- Production Begin Date
- Production End Date
Prod Data
- PRD Calndr-Day Avg OIL Bbl/Day
- PRD Calndr-Day Avg CND Bbl/Day
- PRD Calndr-Day Avg GAS Mcf/Day
- PRD Calndr-Day Avg WTR Bbl/Day
AccuMap

AccuMap has no standarized export, but you can create a template as exemplified above that can be imported directly into whitson+.
- Example of a .xslx file from AccuMap can be found here.
CSV
Use the CSV template to upload only production data.
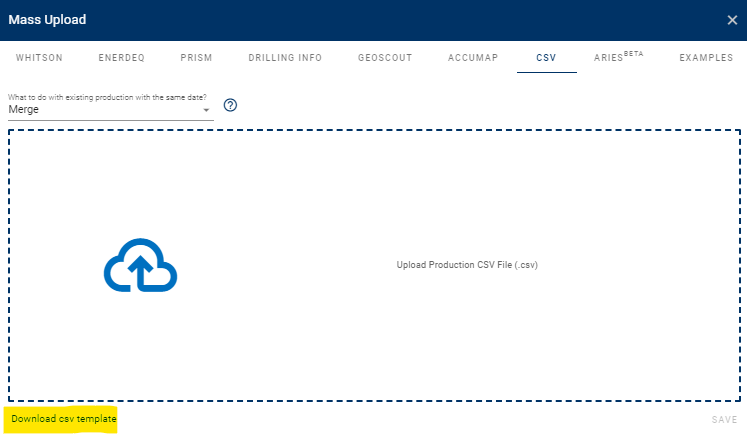
-
Production data for New Wells: Use the CSV template to upload production for new wells. In 'What to do with existing production with the same date?', choose the 'nothing' option. This will create new wells using the production data you provide. All other input fields will be populated with default values.
-
Production data for Existing Wells: Use the CSV template to update or add new production data to existing wells. In 'What to do with existing production with the same date?', choose the 'merge' option. This will append the new production data to the existing well's history. If there is a conflict because the date already exists, the new data will overwrite the existing record.
Example of a .csv file can be found here.
ARIES
Important Regarding ARIES Ratio Forecasting
Right now whitson+ does not support ratio forecasting, hence importing a ratio (e.g. 'GAS/OIL' or 'WTR/OIL') from ARIES will not work properly. If a ratio is used, whitson+ will assume a constant ratio and use the primary phase DCA parameters to obtain the parameter for the secondary stream.
Example 1
If your ARIES expression is
WTR/OIL 1.35200 1.35200 B/B TO LIFE LOG TIME
A constant water oil ratio of 1.352 STB/STB is assumed.
Example 2
If your ARIES expression is
GAS/OIL 1.6 2.0 M/B TO LIFE LOG TIME
A constant GOR of 1600 scf/STB is assumed.
We're working on including ratio forecasting in whitson+.
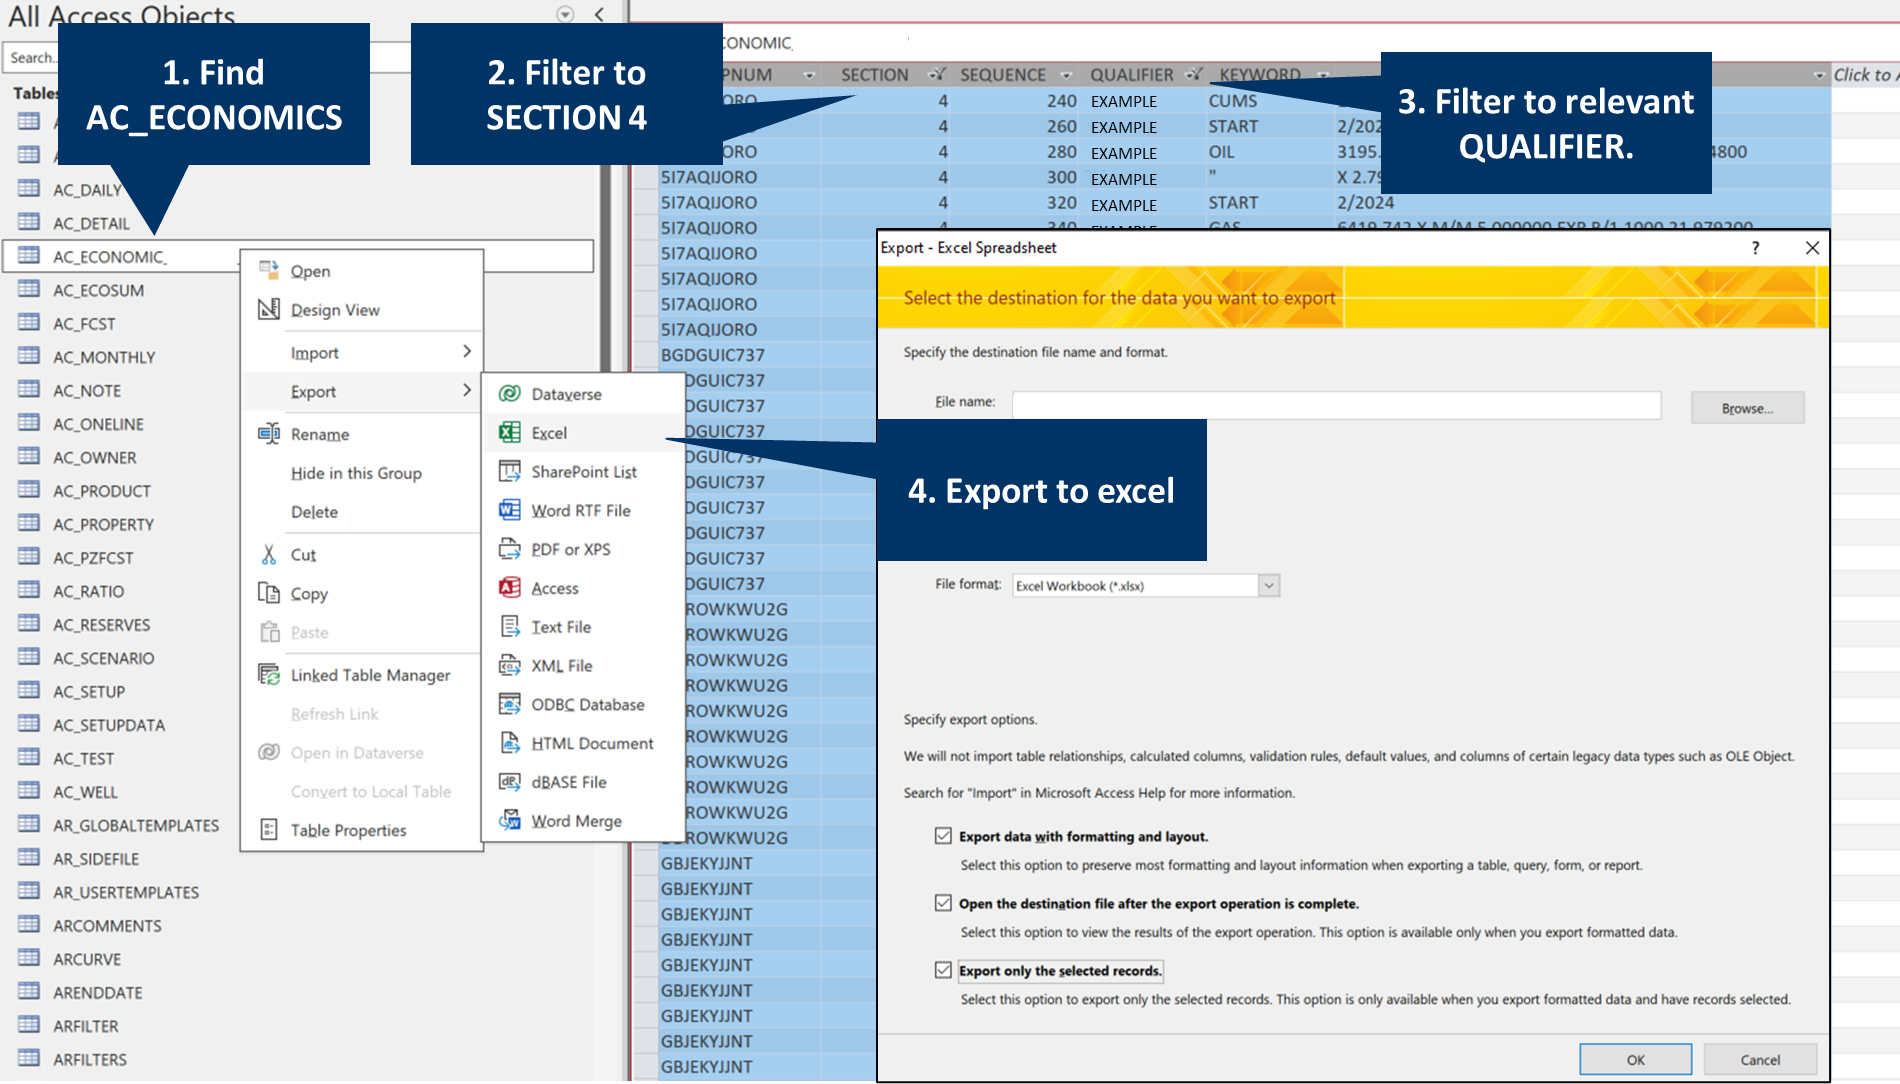
Required: AC_ECONOMICS
To import ARIES DCA forecasts into whitson+ from the AC_ECONOMICS table, please follow the steps below.
Filter the AC_ECONOMICS Table:
- Ensure the AC_ECONOMICS table is filtered to include only records with SECTION equal to 4.
- Select the relevant QUALIFIER for your forecast. Only one QUALIFIER should be used for the import.
Upload Requirements:
- The import process assumes that there is only one forecast per PROPNUM for each phase.
- Verify that each PROPNUM entry in the table corresponds to a single forecast.
This is how a properly formatted example looks like.
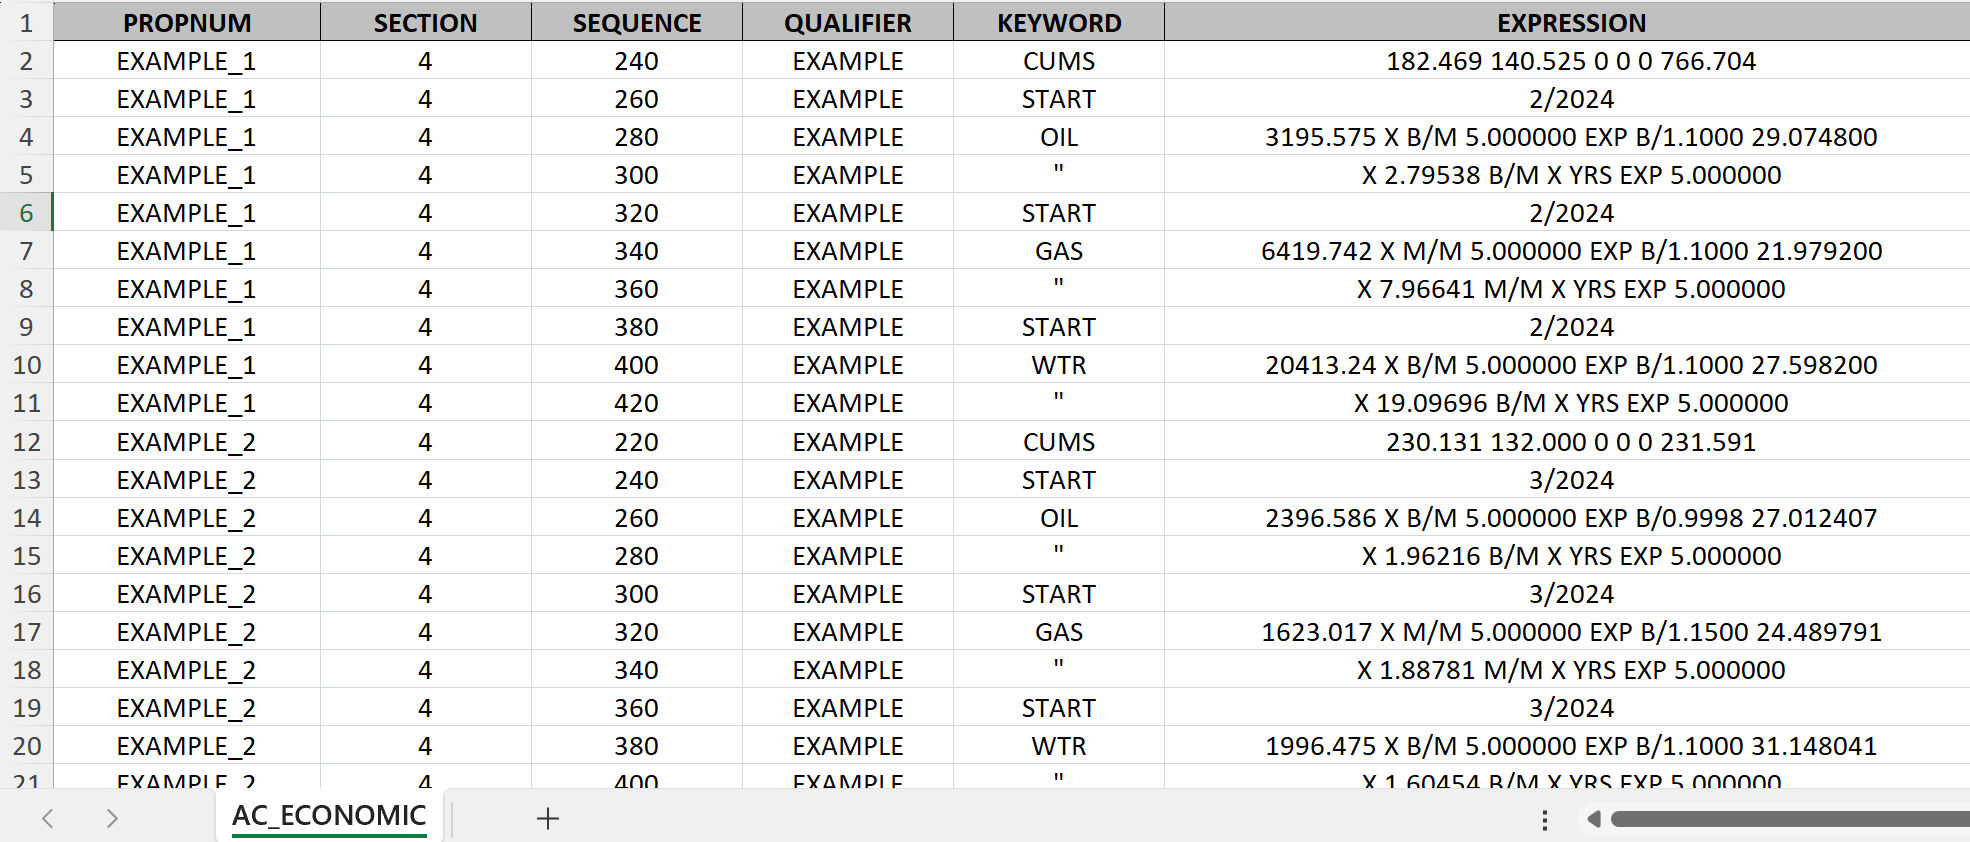
- Example of a .xslx file of an AC_ECONOMICS file can be found here.
Optional: AC_PROPERTY

- If START_DATE is referring a value in the master table AC_PROPERTY with '@M.START_DATE', the AC_PROPERTY table also must be uploaded for appropriate upload of the START_DATE.
- Providing this table is optional. If the table is not provided, all unreadable START_DATES will default to the earliest date in the well's historical data.
By adhering to these guidelines, you can ensure a smooth and accurate import of forecasts into whitson+.
MOSAIC
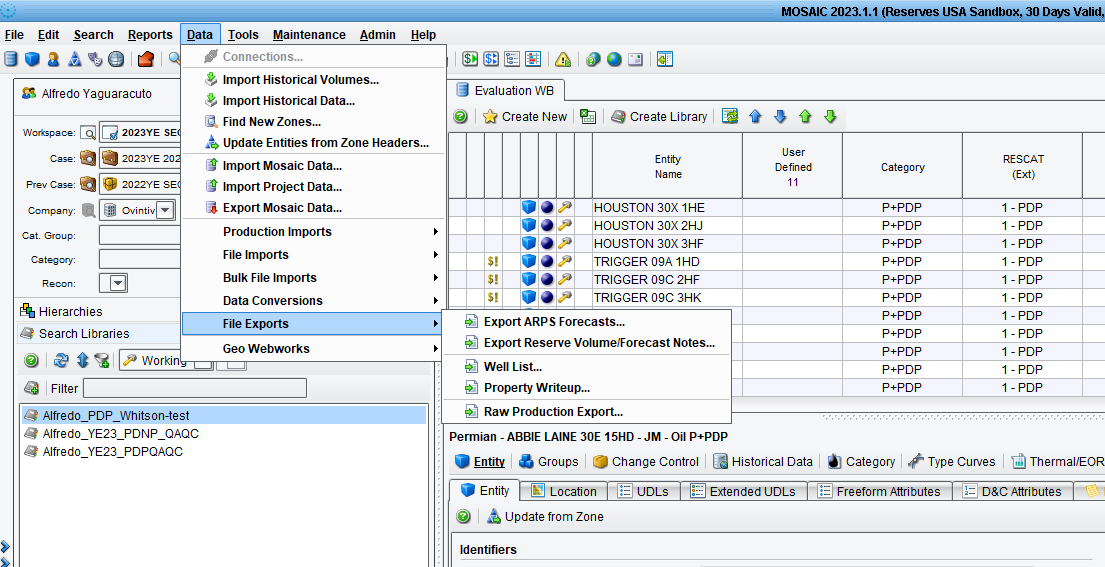
To export DCA ARPS parameters from MOSAIC.
- Open a Workbench of desired project > Select Data > File Exports > Export ARPS Forecasts…
- Filter on Workbench, the Reserve Category or cases to be exported.
- Define destination for export, select Entity State (Approved, Working, Pending or Vintage), and type of Vintage (if selected… e.g., year)
To import MOSAIC DCA forecasts into whitson+, upload the standard MOSAIC DCA export.
This is how the standard MOSAIC export example looks like.
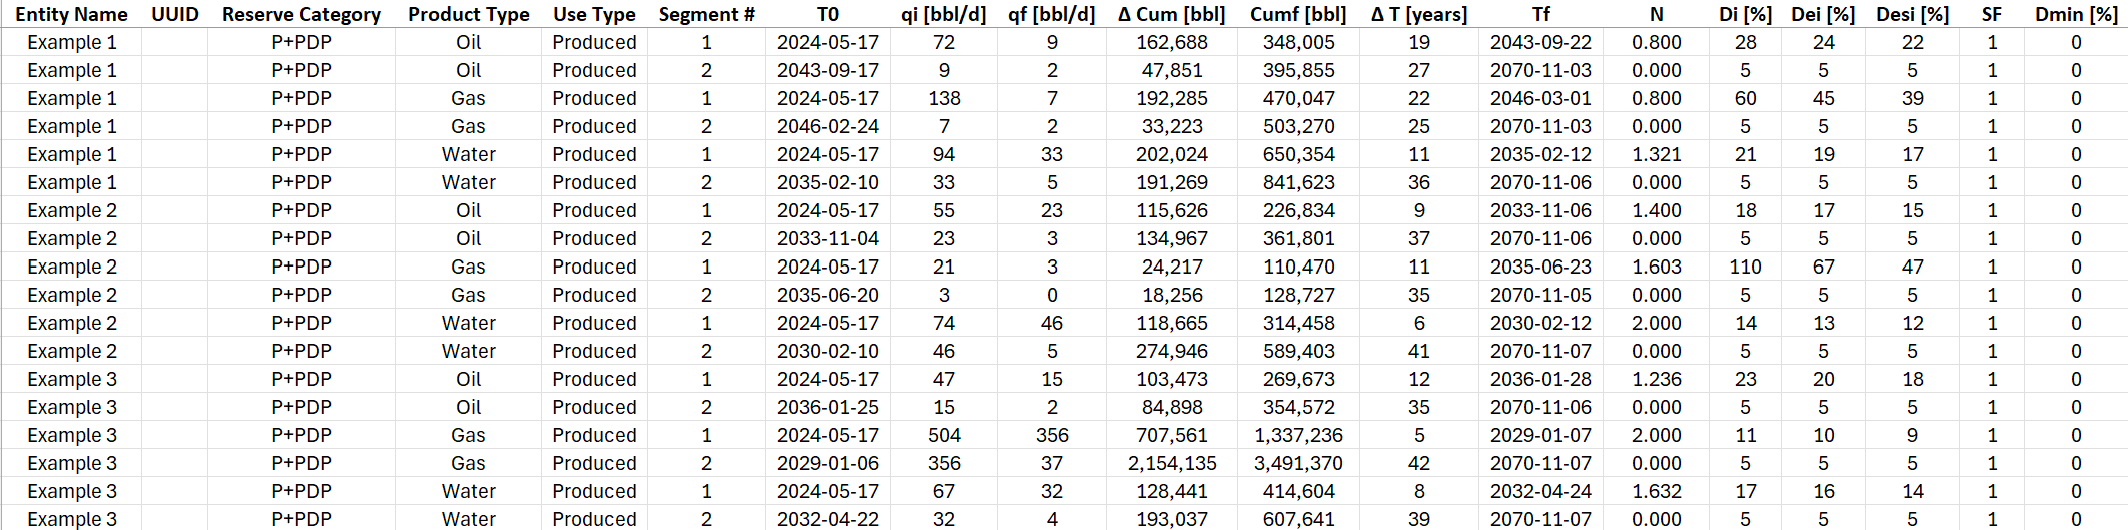
- Example of a .xslx file of an MOSAIC file can be found here.
PAS files
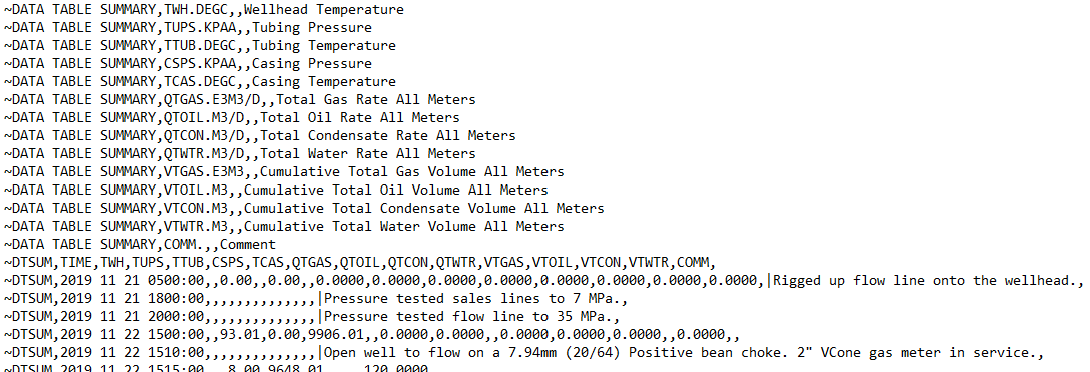
Purpose This option processes .PAS files, specifically those marked with 'PRD', to extract flowback data typically recorded at hourly intervals. It is designed to handle PAS files that contain separator rates (oil, gas and water), separator conditions (temperature and pressure) and tubing/casing pressure. The PAS files are standardized by the Alberta Energy Regulator (AER).
Data Assumptions= Separator Rates, Tubing, and Casing Pressure: These metrics are expected to be present in the DTSUM table within the PAS file. Separator Conditions: These metrics are expected to be found in the DTGAS table within the PAS file.
Example - Example of a .pas file of an PAS file can be found here.
Examples
Sample datasets are available for download directly from the software.
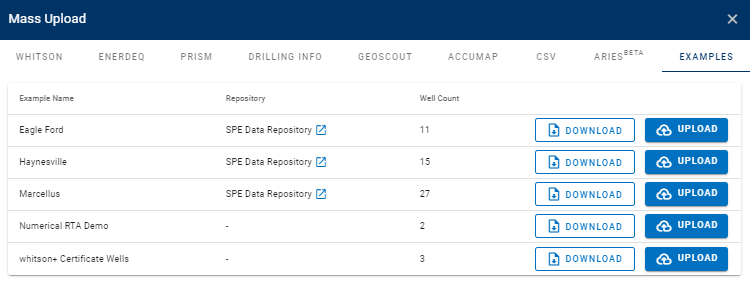
- 11 Eagle Ford wells from the SPE Data Repository.
- 15 Haynesville wells from the SPE Data Repository.
- 27 Marcellus wells from the SPE Data Repository.
- 2 different wells for demo purposes.
- 3 whitson+ Certificate wells.
WellDatabase
There is a whitson+ export in WellDatabase that can be used out of the box in the whitson+ mass upload.