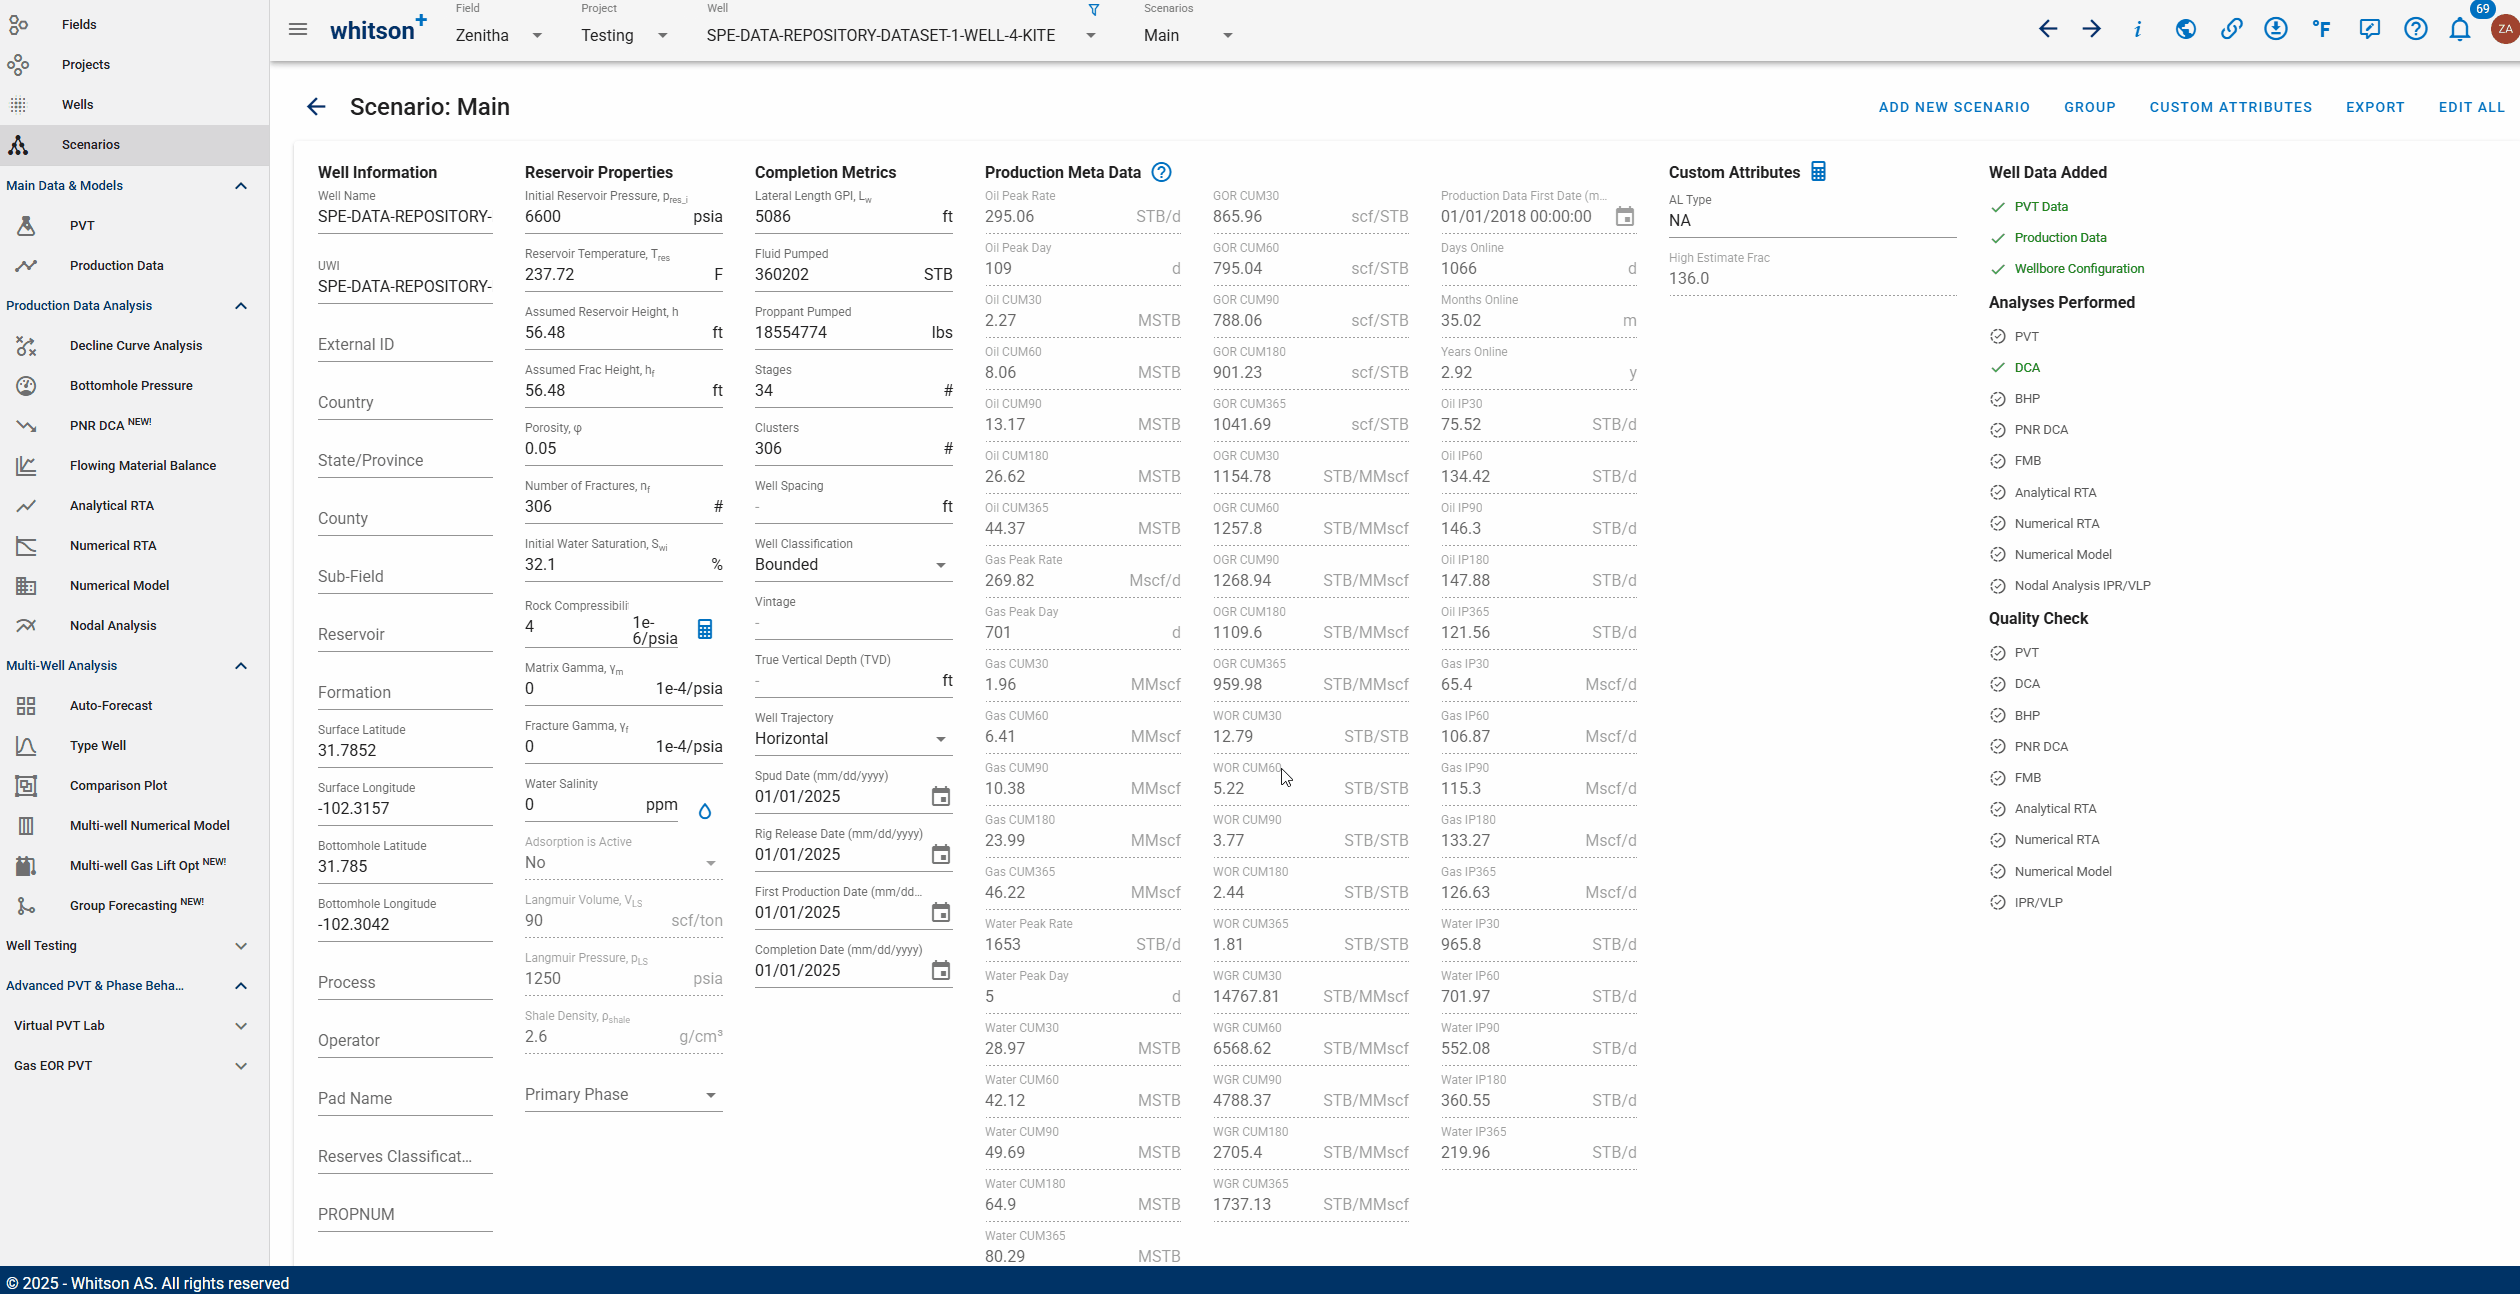
Scenarios
This page contains well-related information, such as input well data, an overview of scenarios, and the status of scenarios being performed in whitson+.
1. Introduction
Key functionalities:
- Reservoir Properties, Completion Metrics, Production Meta Data Overview
- Scenarios Overview
- ADD NEW SCENARIO
- GROUP
- CUSTOM ATTRIBUTES
- EXPORT
- EDIT ALL
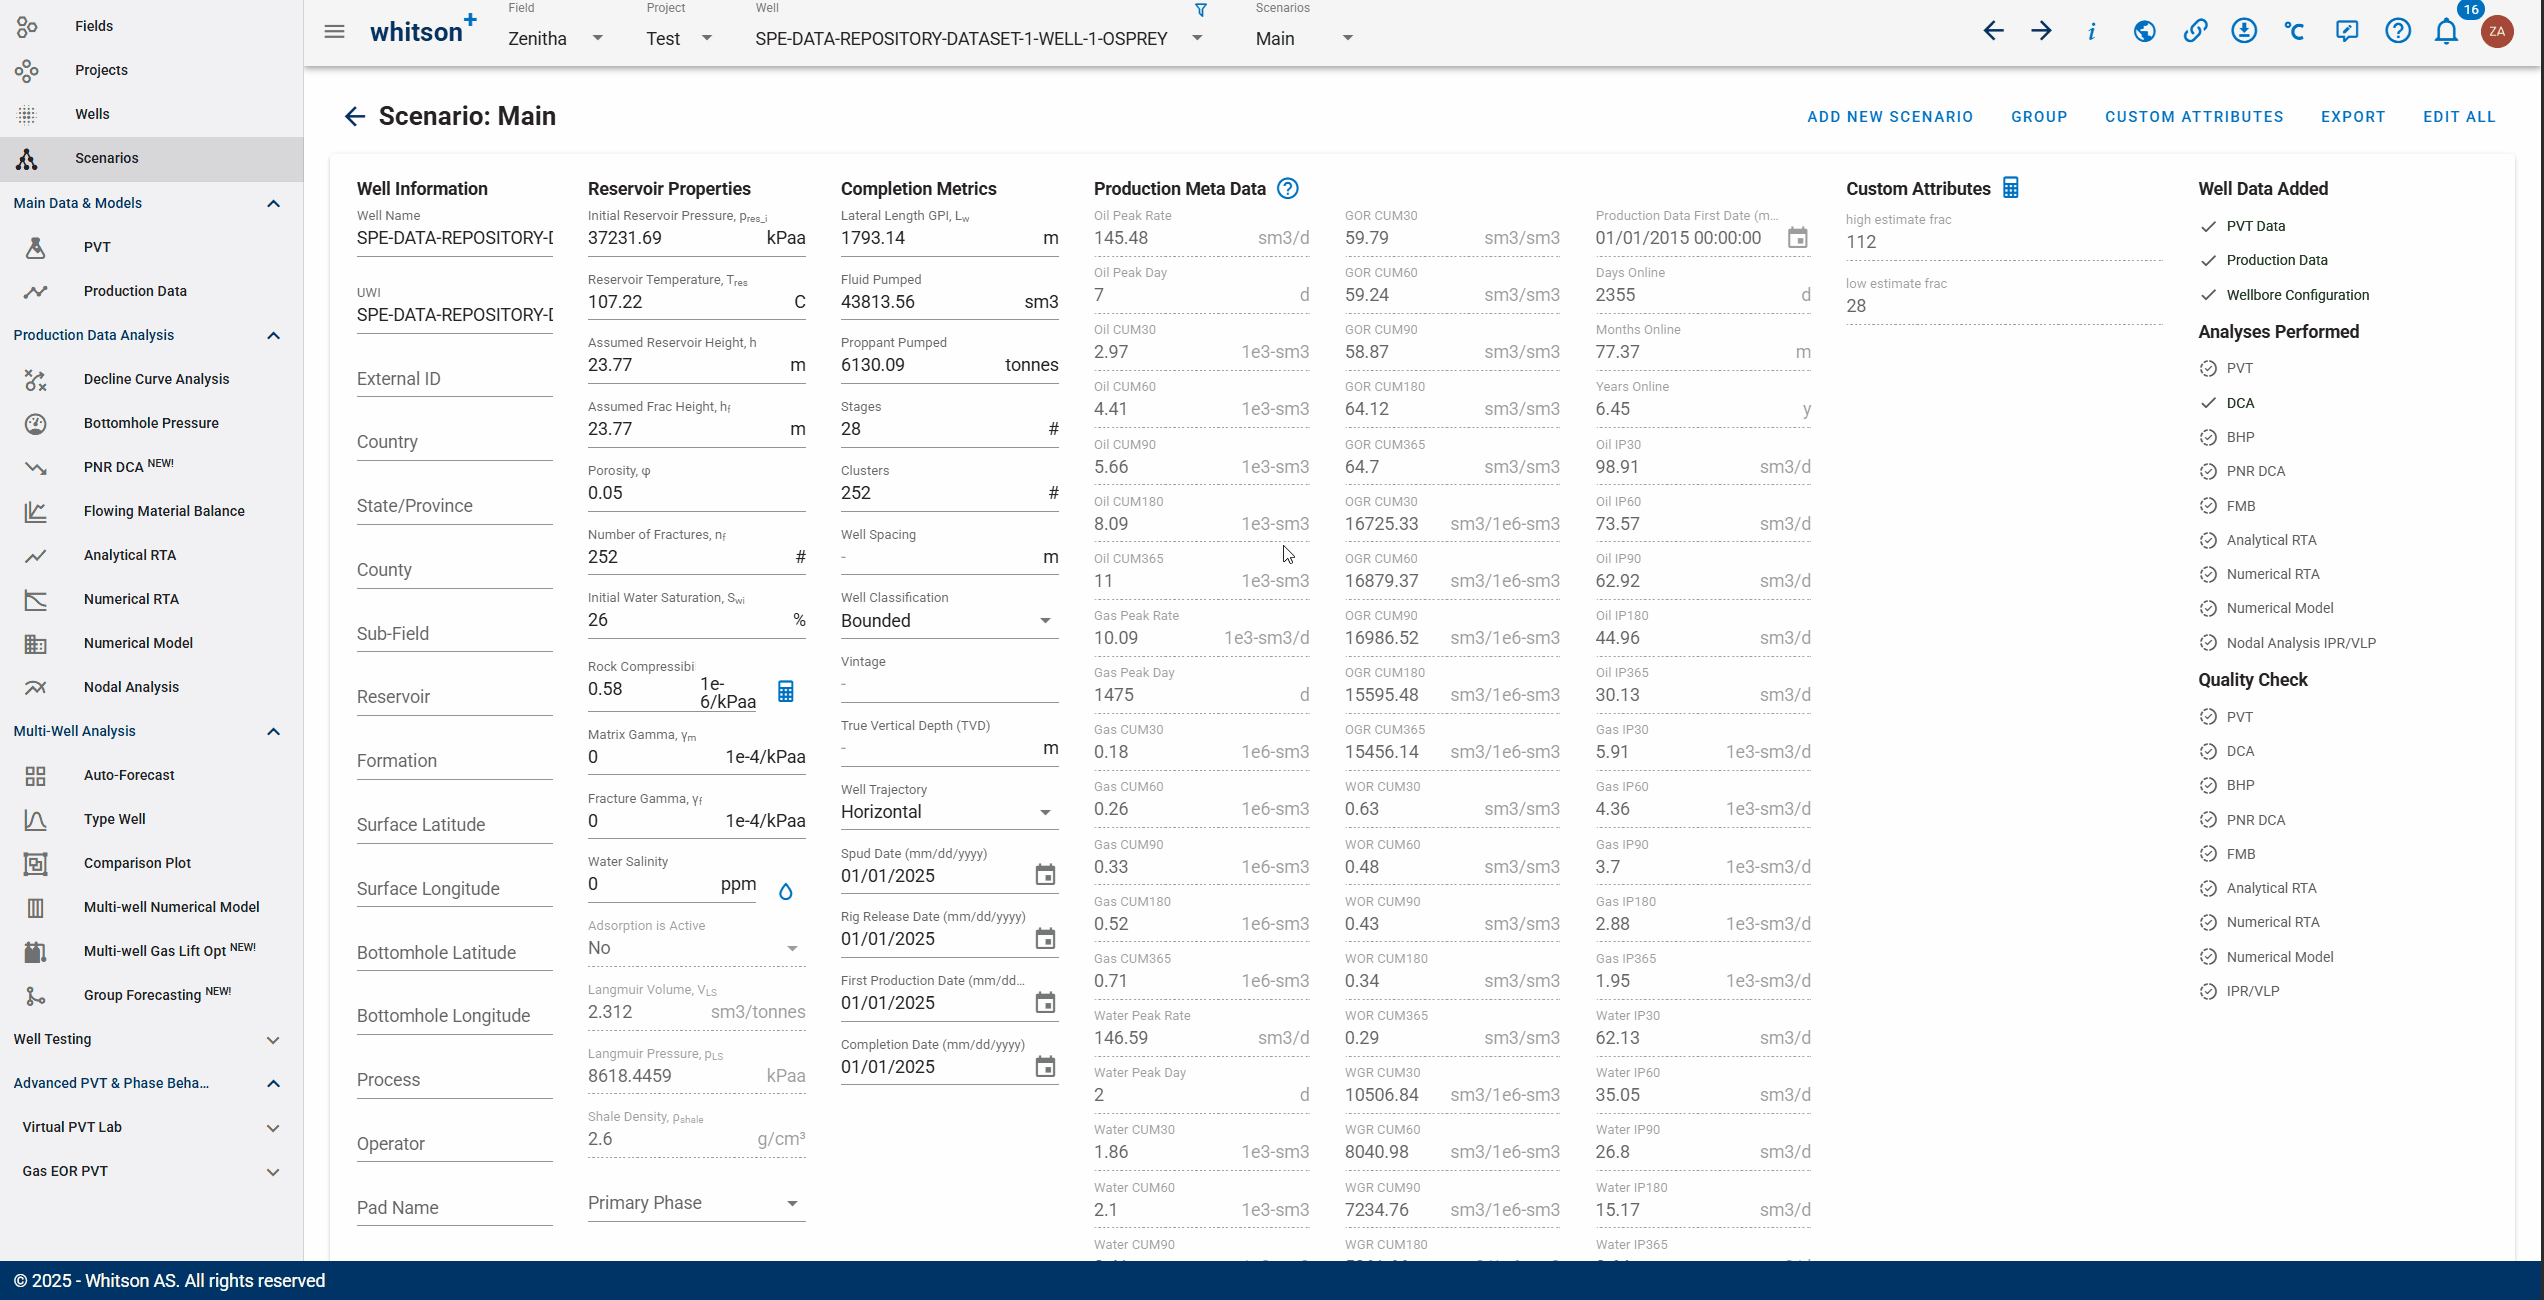
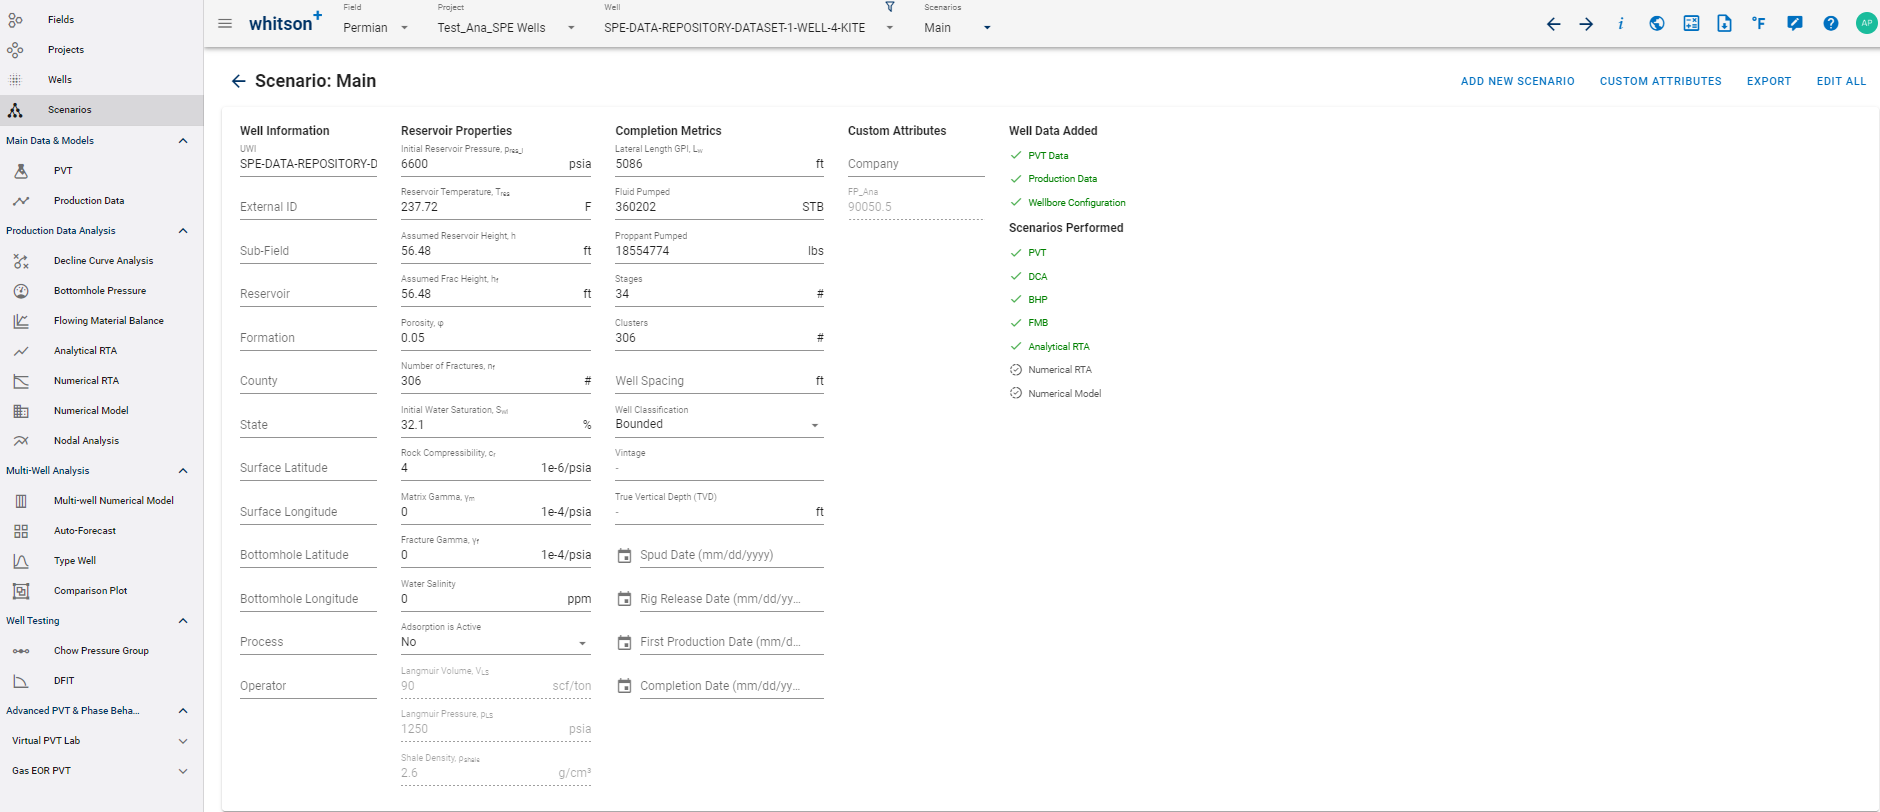
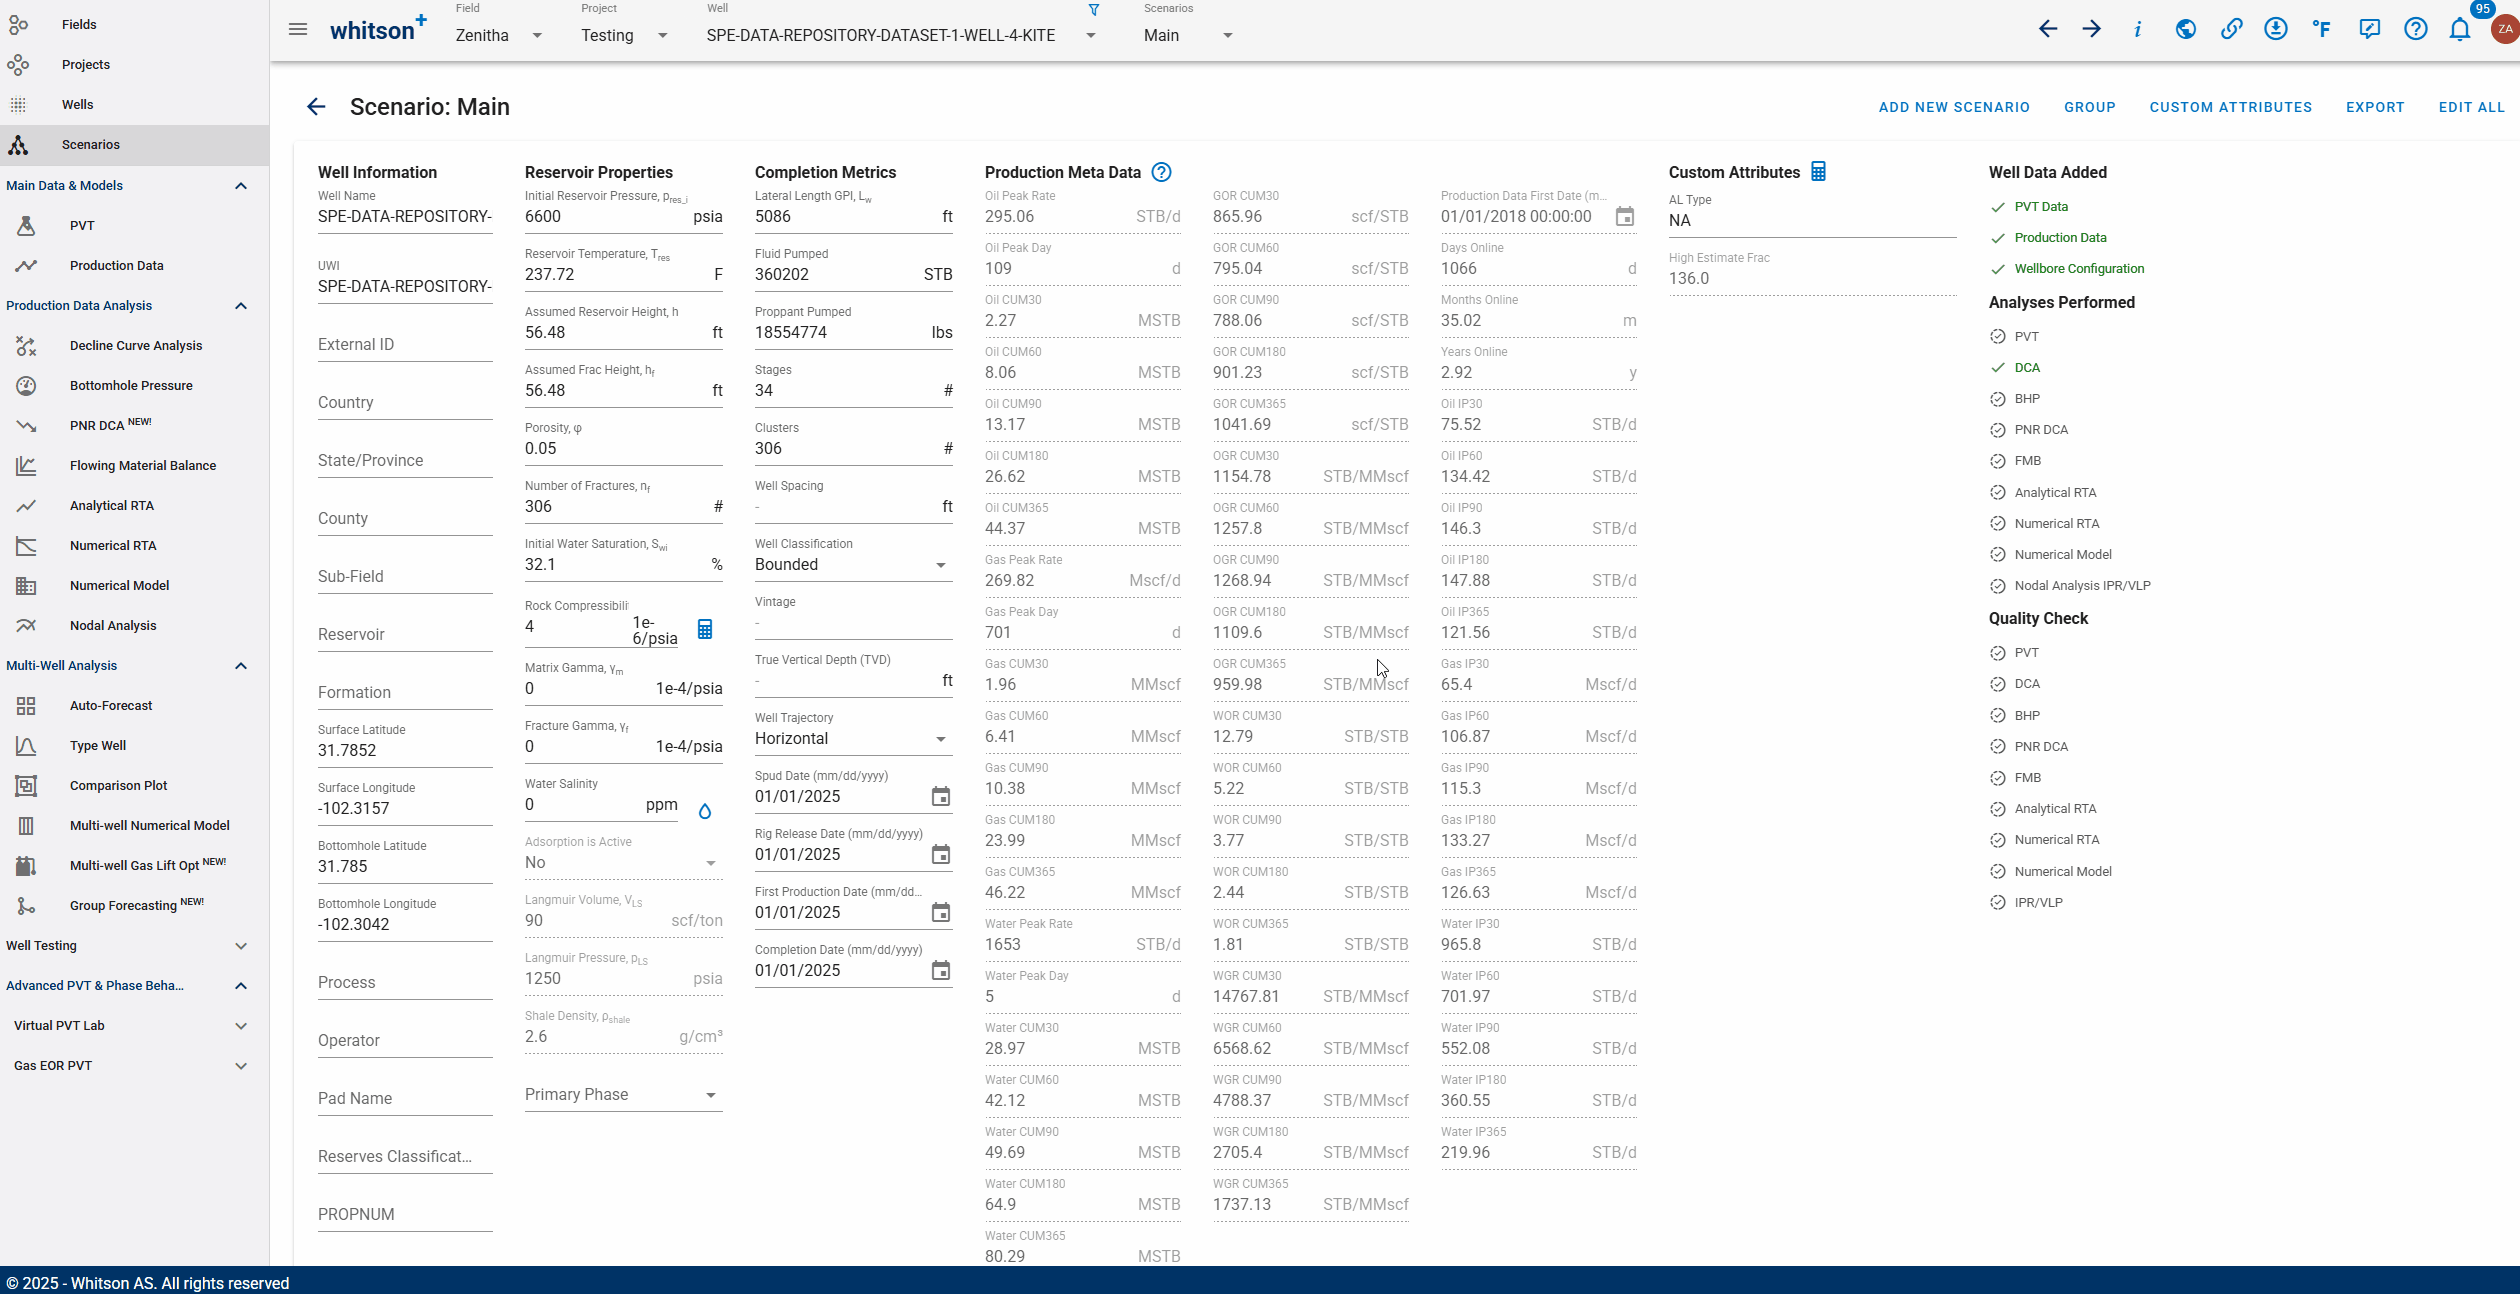
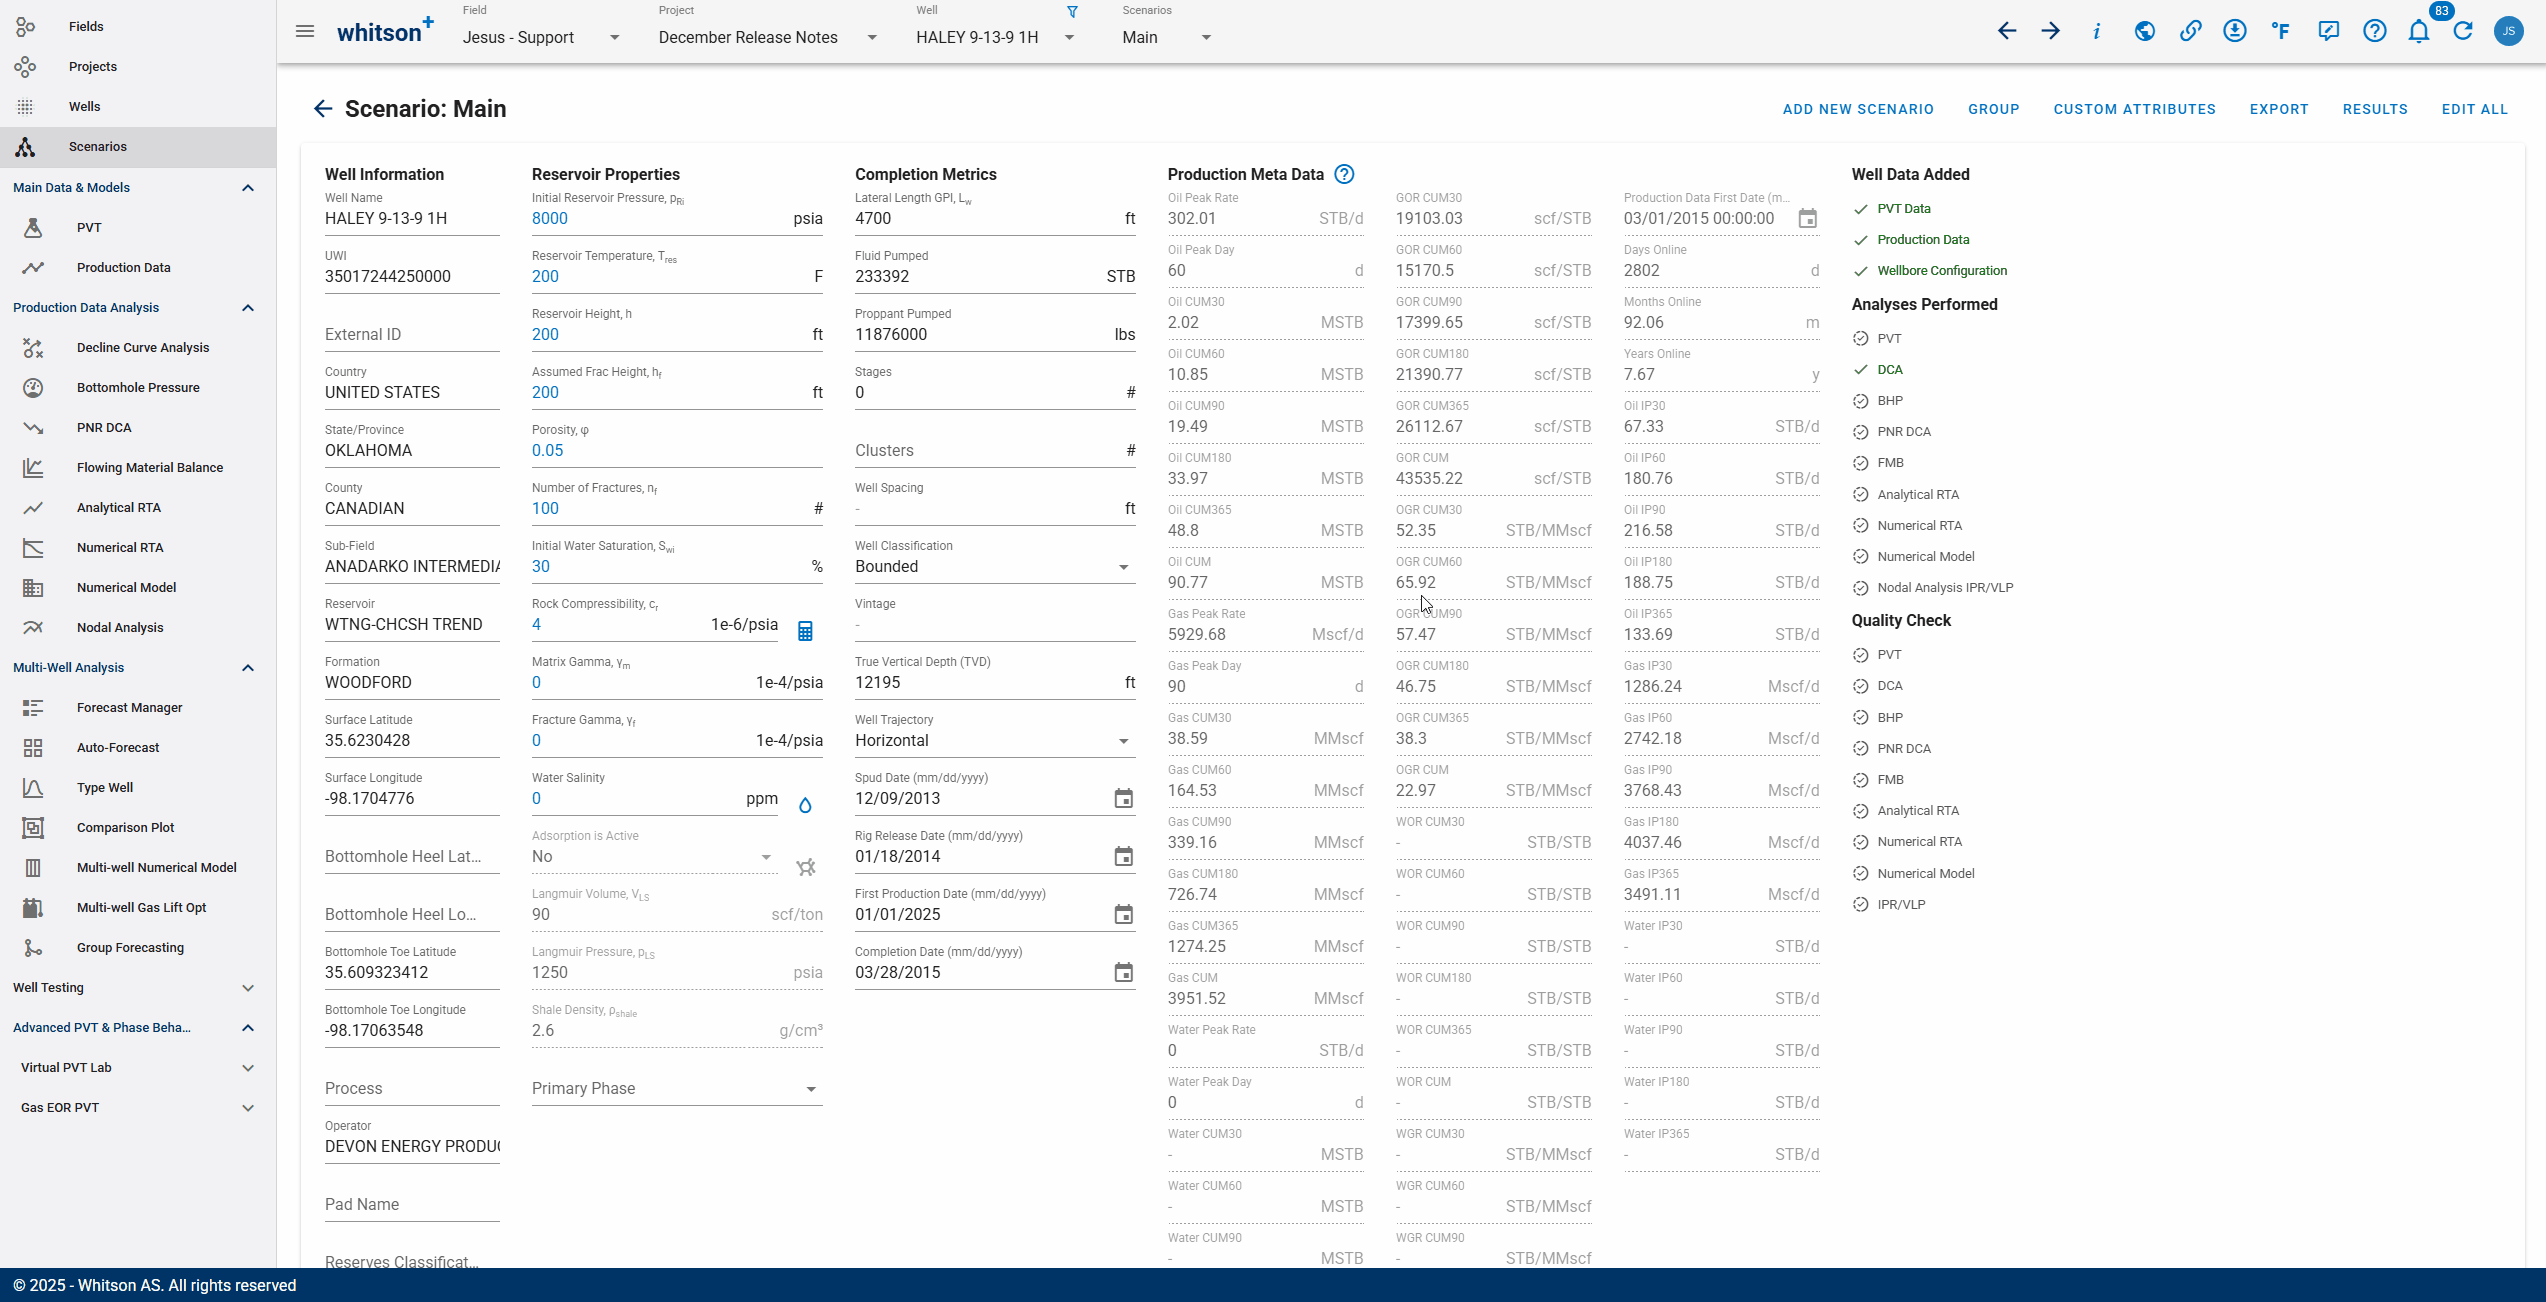
2. Property Overview

The user can change the values of well information, reservoir properties and completion metrics here. Changing any of these values will also automatically update those values for all modules in the same scenario, and vice versa.
2.1. Well Headers:
Each well (and individual scenarios) can have the following header information which can be modified independently in each scenario.
The key properties used in simulation or crucial for RTA and other calculations are highlighted below. If the property is not highlighted, it is only used for identification, classification, normalization, filtering, grouping, or coloring.
2.1.1. Well Information
- Well Name
- UWI - typically, an API number or Aries Propnum, duplicates are allowed.
- External ID - Checked for uniqueness, no duplicates allowed.
- Country
- State/Province
- County
- Sub-Field
- Reservoir
- Formation
- Lat/Long location
- Process - You can set up surface processes such as multi-stage separation with a name. This field shows the named surface process in use for the well.
- Operator
- Pad Name
- Reserves Classification
- PROPNUM
- Type Well Area
Additional information on location data
whitson+ allows you to add the surface and bottomhole latitude and longitude coordinates to populate the GIS maps for the project. This is not super crucial but is very useful as it allows you to view wells spatially on the map and color them by various other well header information associated with these wells. The location information is also very useful for the type well feature, which incorporates a GIS map to visualize the wells used as input for the type well.
NAD83 vs. NAD27 datums for location data: Use NAD83, which is more accurate. The difference is typically only a few feet, which is more than sufficient for the resolution required here.
- Epoch: NAD27 was established in 1927, while NAD83 was established in 1983. This means that the reference points and measurements for NAD27 were based on surveys conducted before 1927, whereas NAD83 was based on more modern surveys and technology available in 1983.
- Datum Definition: NAD27 was based on the Clarke 1866 ellipsoid, which was the best available representation of the Earth's shape at the time. NAD83 is based on the GRS80 ellipsoid, which is a more accurate representation of the Earth's shape and is compatible with GPS technology.
- Coordinate Accuracy: NAD83 offers higher accuracy than NAD27 because it incorporates more precise surveying techniques and technologies.
- Datum Shift: There is a noticeable difference between coordinates referenced to NAD27 and NAD83. This difference varies by location but is generally several meters.
- Usage: While NAD27 was widely used in older maps, surveys, and legal documents, NAD83 has largely replaced it for modern applications because of its improved accuracy and GPS compatibility.
2.1.2. Reservoir Properties
- Initial Reservoir Pressure, \(p_{Ri}\)
- Reservoir Temperature, \(T_{res}\)
- Assumed Reservoir Height, h
- Assumed Frac Height, \(h_f\)
- Porosity, φ
- Number of Fractures, \(n_{f}\) - Used as entered, if you want to account for efficiency, you will have to factor that in and enter the value here.
- Initial Water Saturation, \(S_{wi}\)
- Rock Compressibility, \(c_r\)
- Matrix and Fracture Gamma, γm and γf - For pressure dependent permeability adjustments.
- Water Salinity - Impacts the density of the produced fluid, hence bottomhole pressure calculation, especially for salinity greater than 100,000 ppm.
- Adsorption is Active- Adsorption is only used for Dry Gas wells.
- Langmuir Volume, \(V_{LS}\)
- Langmuir Pressure, \(p_{LS}\)
- Shale density, \(ρ _{shale}\)
- Primary Phase- Oil/Gas/Water
"Additional information on rock (formation) compressibility"
When is it less importantThe rock compressibility will be less important for systems with gas in the system. Gas compressibility dominates the total compressibility for gassy systems. It will be more important for low GOR oils and water systems, for instance, since the governing equation for total compressibility is as follows: \begin{equation} c_t = c_gS_g + c_oS_o + c_wS_w + c_r \end{equation} When is it very important
One place it's been found to be important to account for is in Vaca Muerta, in which super low GOR systems (300 scf/STB) can produce above psat for a long period of time. This is the closest thing to single-phase oil flow, from what we've seen at least. A common correlation
This is a common correlation to estimate rock compressibility (Hall correlation). \begin{equation} c_f = 1.87 * 10^{-6} \phi^{-0.415} \end{equation} Where is it used?
The rock compressibility is an input to FMB, RTA and numerical models, but typically considered of secondary importance. Measurements
It can be measured in the lab using a triaxial compression test. Typically the petrophysicists provide this number if our clients don't use the defaults in the software.
2.1.3. Completion Properties
- Lateral Length, \(L_{W}\)
- Fluid Pumped
- Proppant Pumped
- Stages
- Clusters
- Well Spacing
- Well Classification - Bounded/Unbounded
- Vintage - The year the well was put on production (POP) or turned in line (TIL).
- True Vertical Depth (TVD) - Maximum TVD of the well - not used in calculations but used for filtering, classification, or color by.
- Well Trajectory - Horizontal/Vertical/Directional
- Important Dates - Well spud date, rig release date, first production date, completion date.
2.2. Defaults in whitson+
When no values are specified for the reservoir properties, the software will automatically set the default values listed below.
| Property | Default Value |
|---|---|
| Initial Reservoir Pressure (psia) | 8000 |
| Reservoir Temperature (F) | 200 |
| Assumed Reservoir Height (ft) | 200 |
| Assumed Frac Height (ft) | 200 |
| Porosity | 0.05 |
| Number of Fractures (#) | 100 |
| Initial Water Saturation (%) | 30 |
| Rock Compressibility (e-6/psia) | 4 |
| Matrix Gamma (e-4/psia) | 0 |
| Fracture Gamma (e-4/psia) | 0 |
| Water Salinity (ppm) | 0 |
| Adsorption is active | No |
| Lateral Length GPI (ft) | 5280 |
3. Module Overview
The status of well data being added and analyses being performed is summarized on the right side of the screen with different colored checkmarks. The user can also jump to the corresponding module by clicking on the module name under Well Data Added or Analyses Performed.
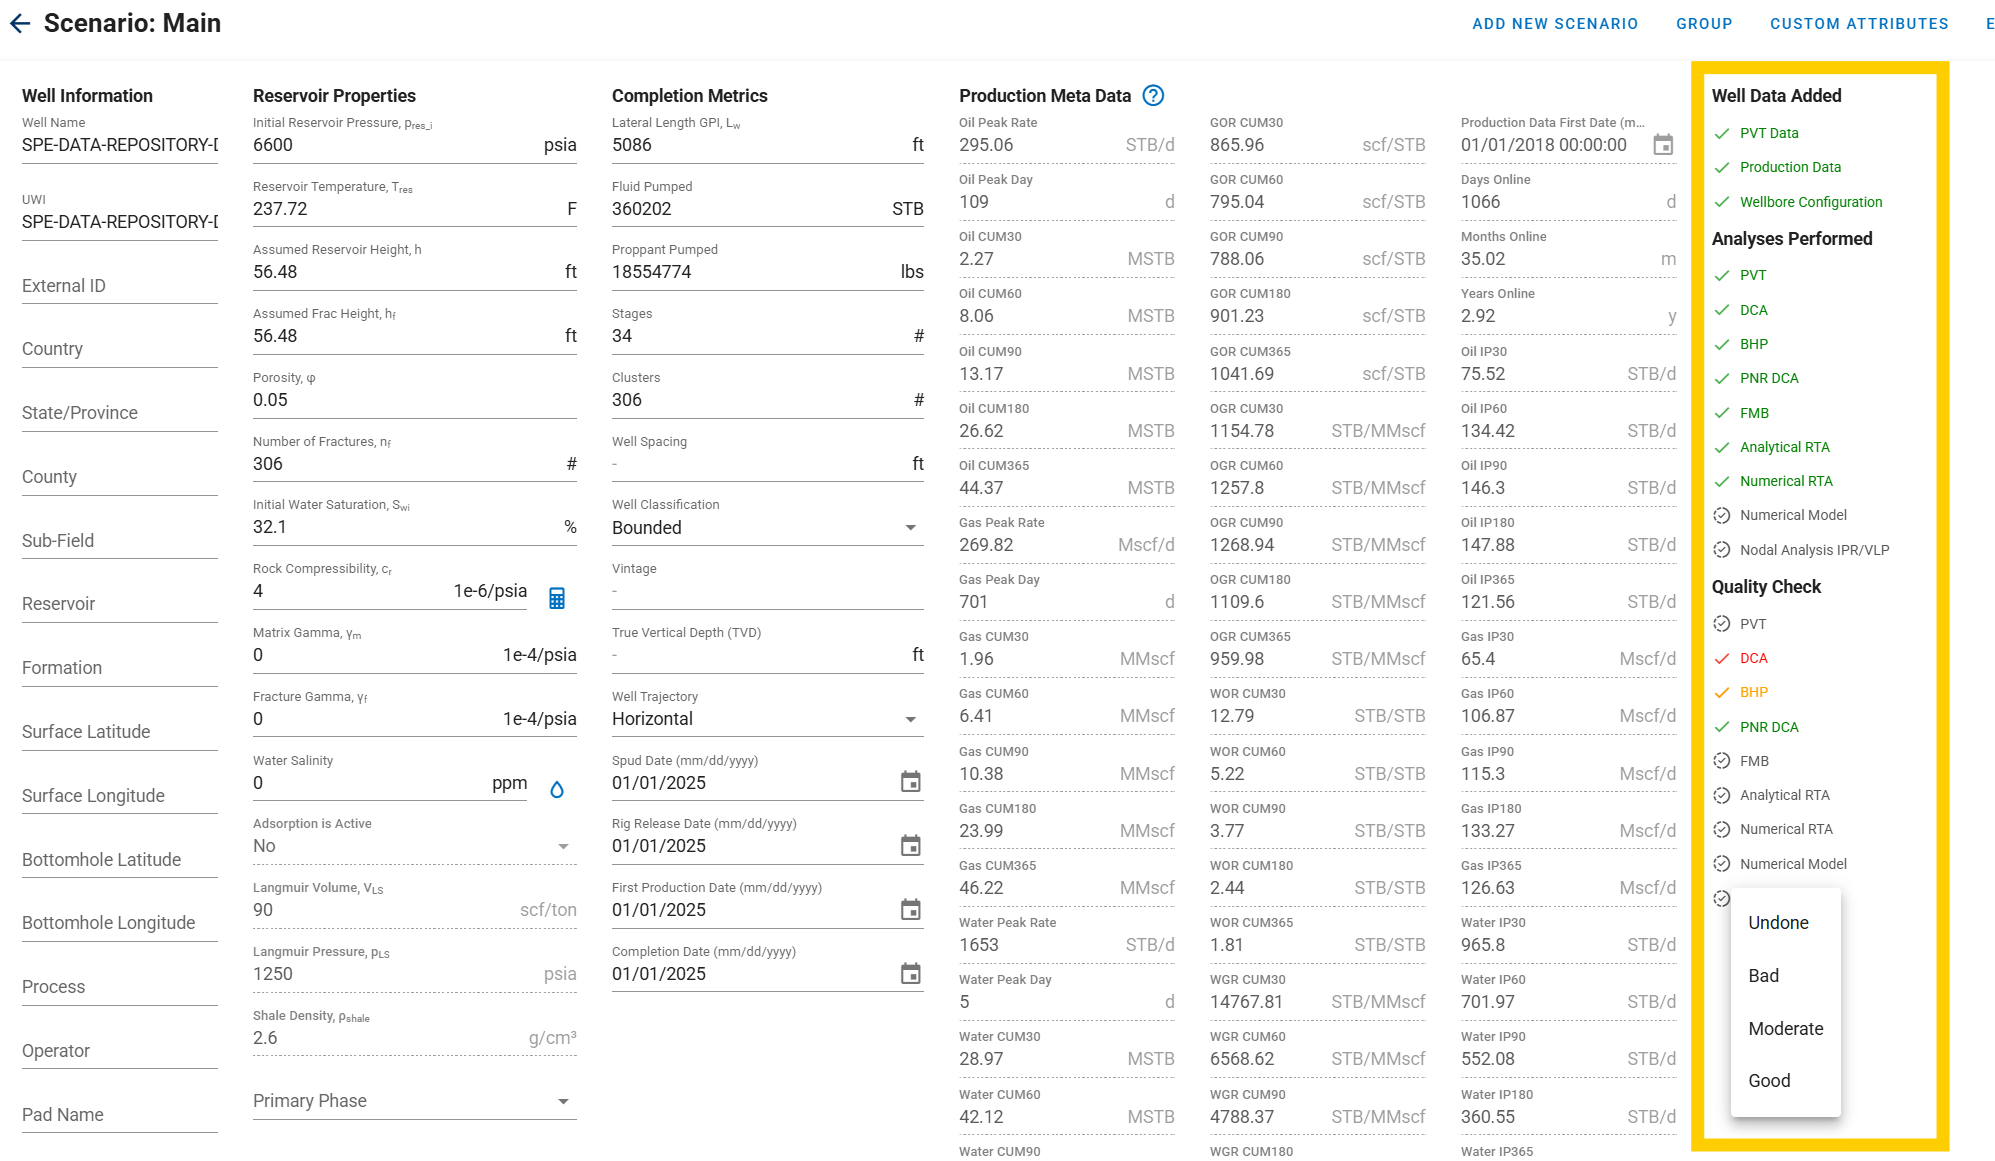
The section located at the top right of the interface provides a quick summary of the well’s progress in terms of data input, analysis, and quality verification.
3.1. Well Data Added
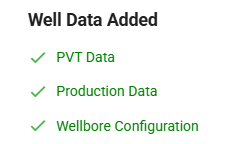
This section displays whether the essential input data has been provided. A green check mark indicates that the data has been successfully added, while a grey check mark indicates it has not yet been entered.
The data in this section include:
- PVT Data
- Production Data
- Wellbore Configuration
Clicking on any item will navigate the user directly to the respective module.
3.2. Analyses Performed
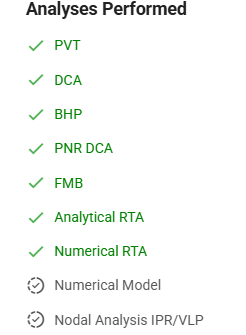
This section lists the analyses that can be performed once the necessary data is available. Similar to the above, a green check mark means the analysis has been completed, while a grey check mark shows it is pending.
Modules under this section include:
- PVT
- DCA
- BHP
- PNR DCA
- FMB
- Analytical RTA
- Numerical RTA
- Numerical Model
- Nodal Analysis (IPR/VLP)
Clicking on any item will navigate the user directly to the respective module.
3.3. Quality Check
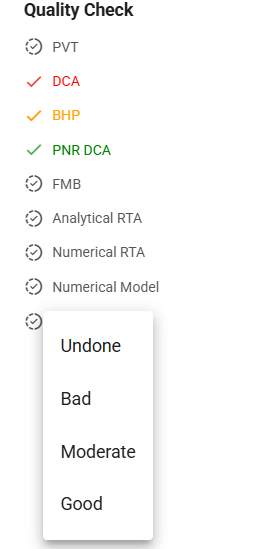
This section allows users to evaluate the quality of the work completed in each analysis module. The quality for each module can be labeled as:
- Undone (grey check mark)
- In Progress (blue check mark)
- Bad (red check mark)
- Moderate (yellow check mark)
- Good (green check mark)
Quality checks are available for all the modules as mentioned above. The Quality Check section allows users to evaluate and document the quality of the work performed in each module. This ensures that analyses are reliable and meet internal standards.
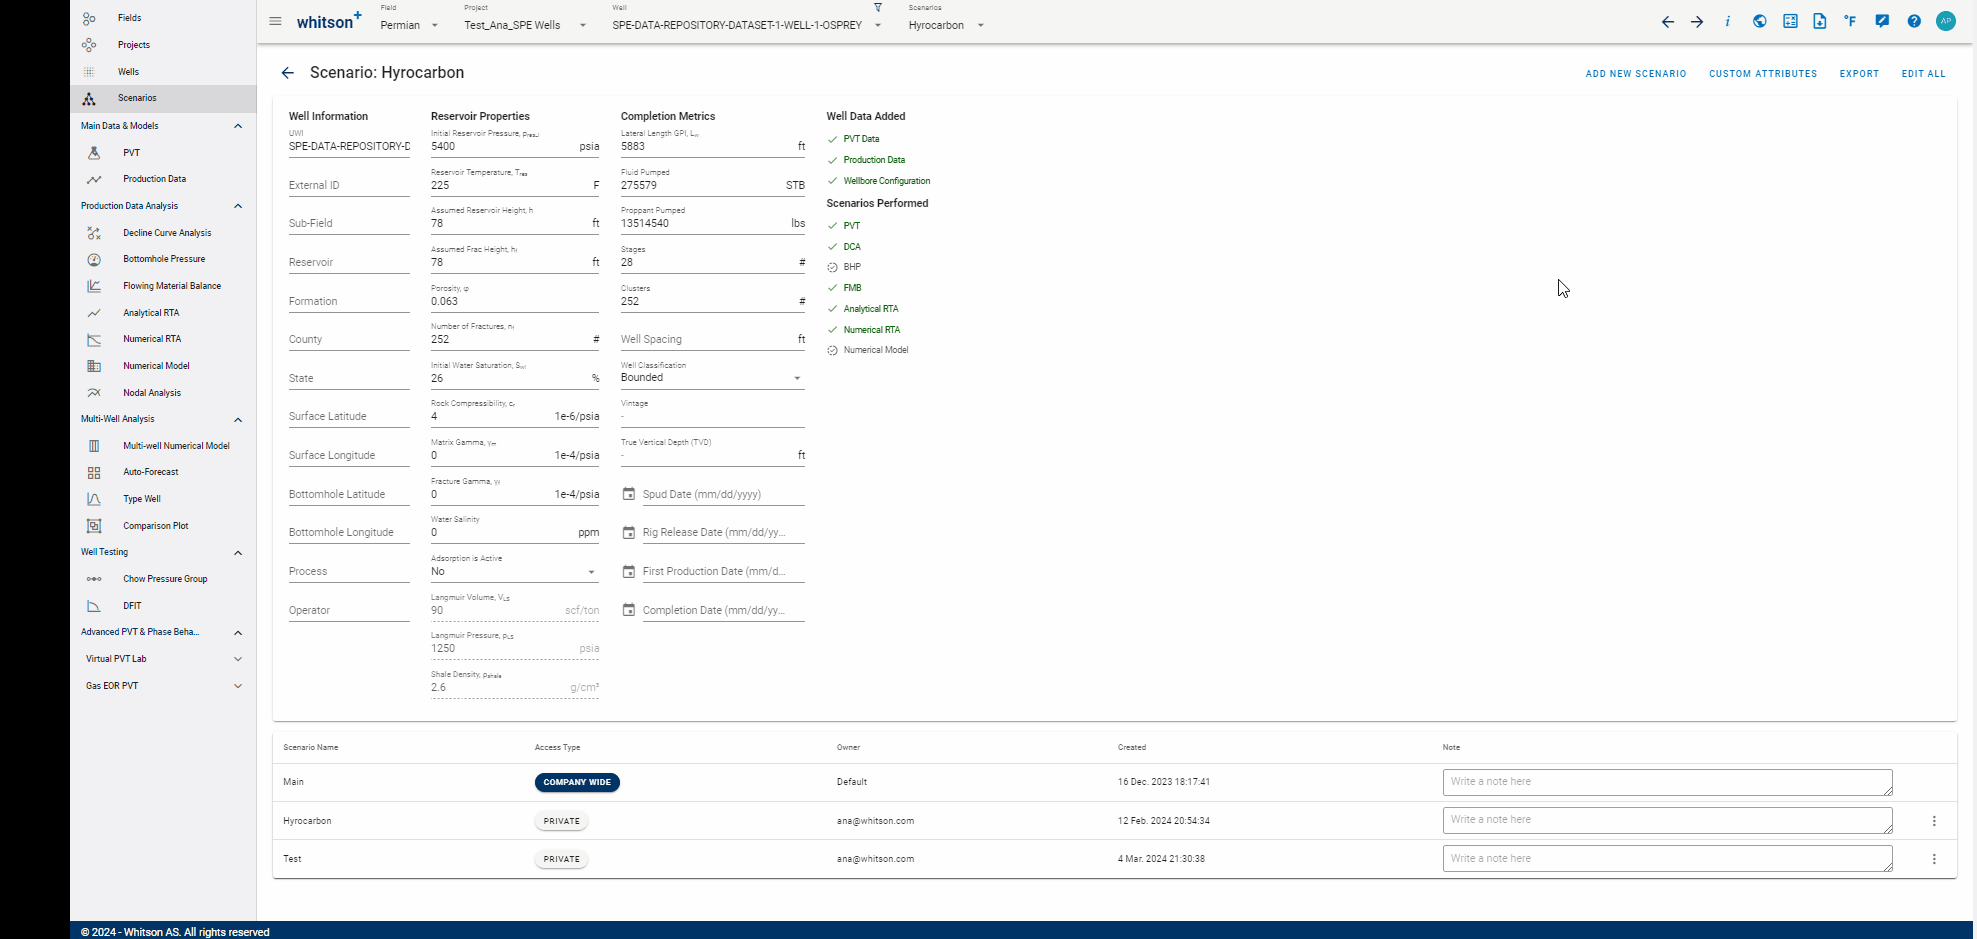
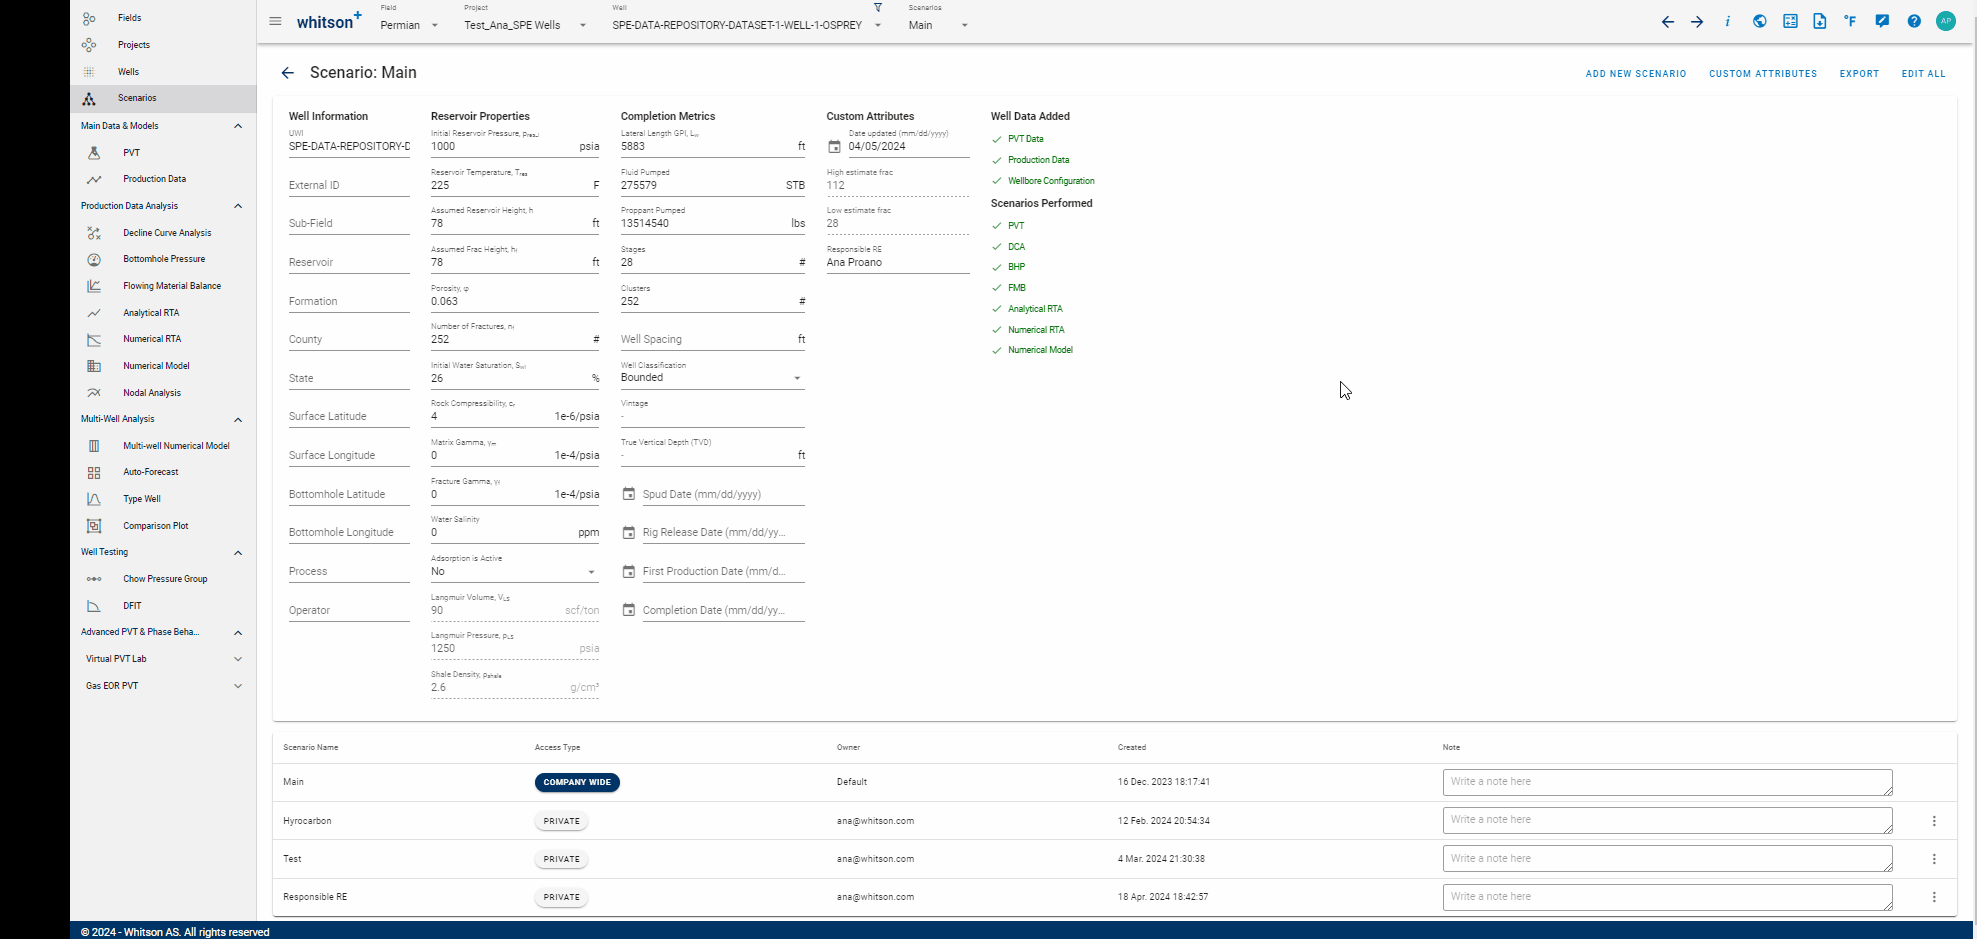
4. Scenario Overview
The first scenario performed after adding the well will automatically be placed in the Main scenario. Additionally, the user can create a new scenario for the same well with or without changing any of its properties.
There are two alternative ways for the user to add a new scenario to same well:
Option 1
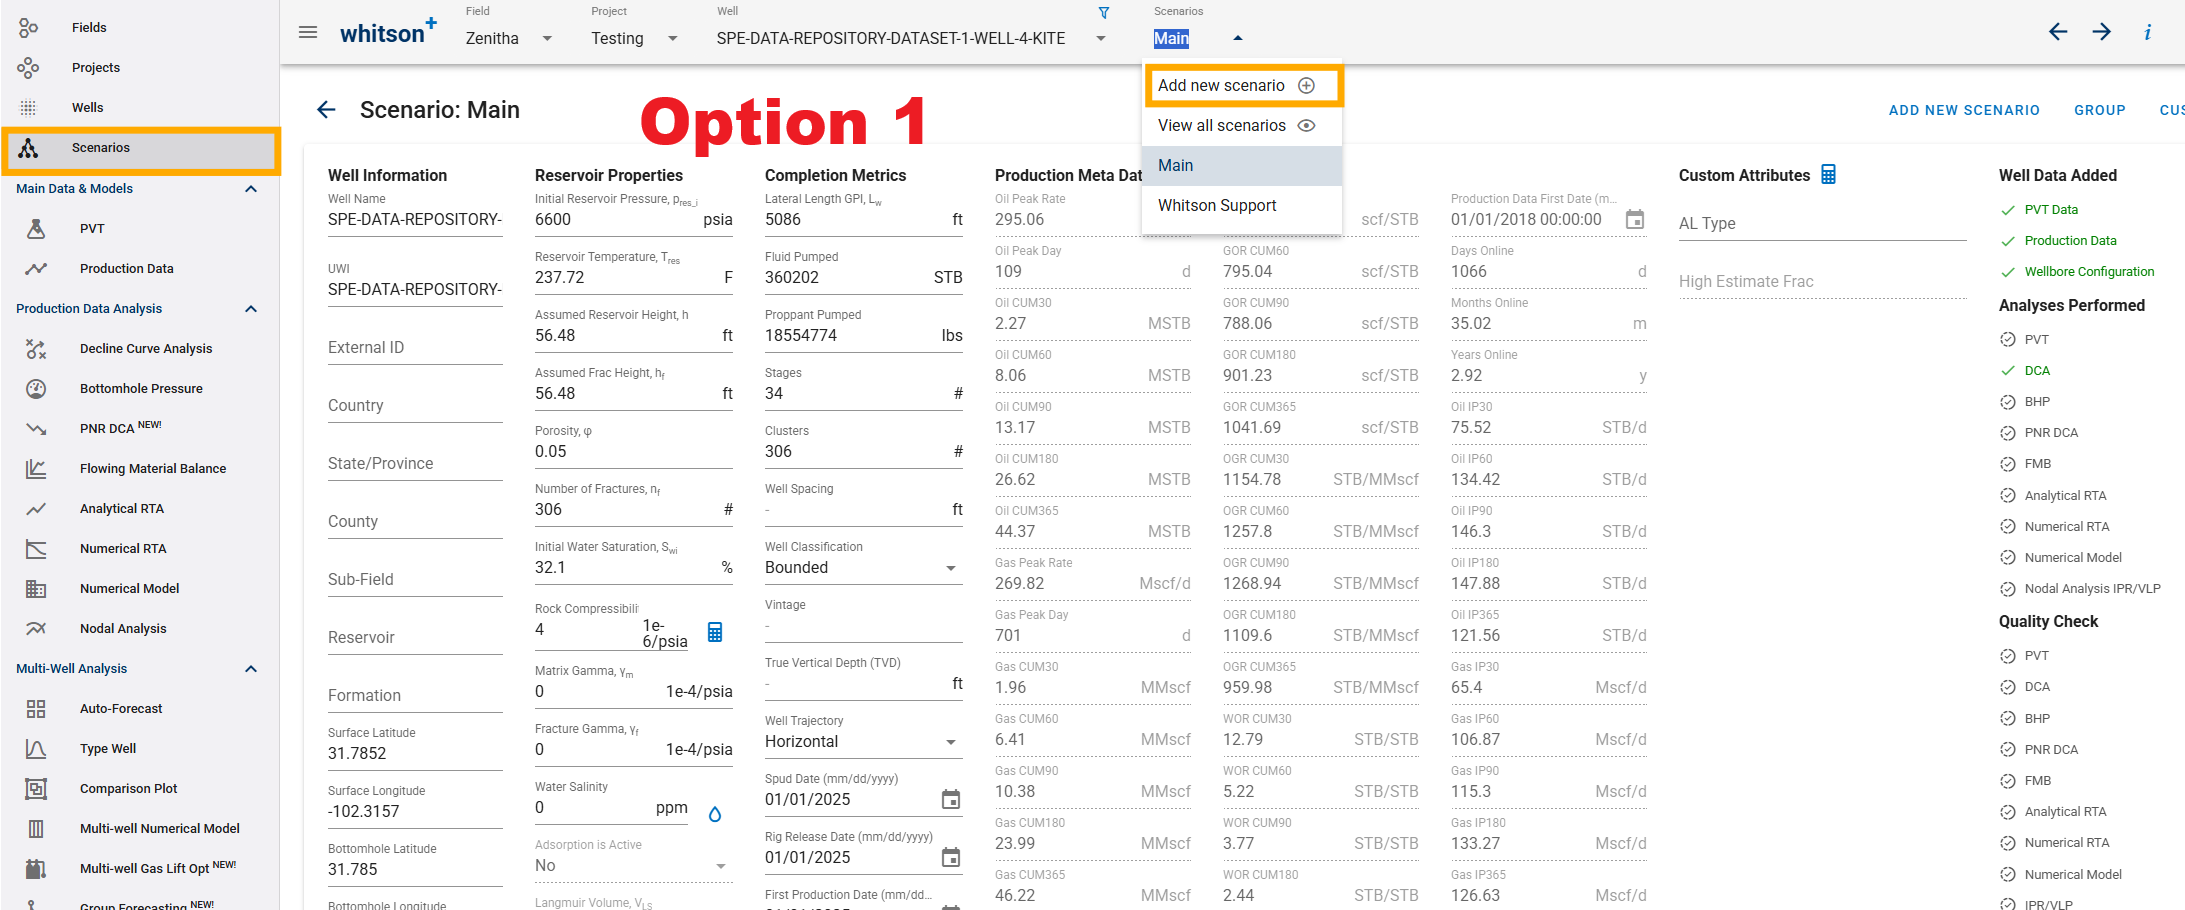
- Click the Scenarios dropdown menu on top of the page (next to Well Name).
- Click Add new scenario.
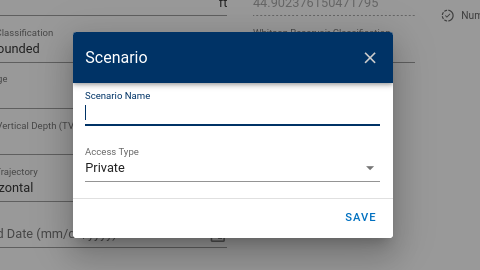
- Add a new scenario name and click SAVE.
- This method allows the user to add a new scenario while on the module page. It will then be added to this scenario overview page automatically.
Option 2
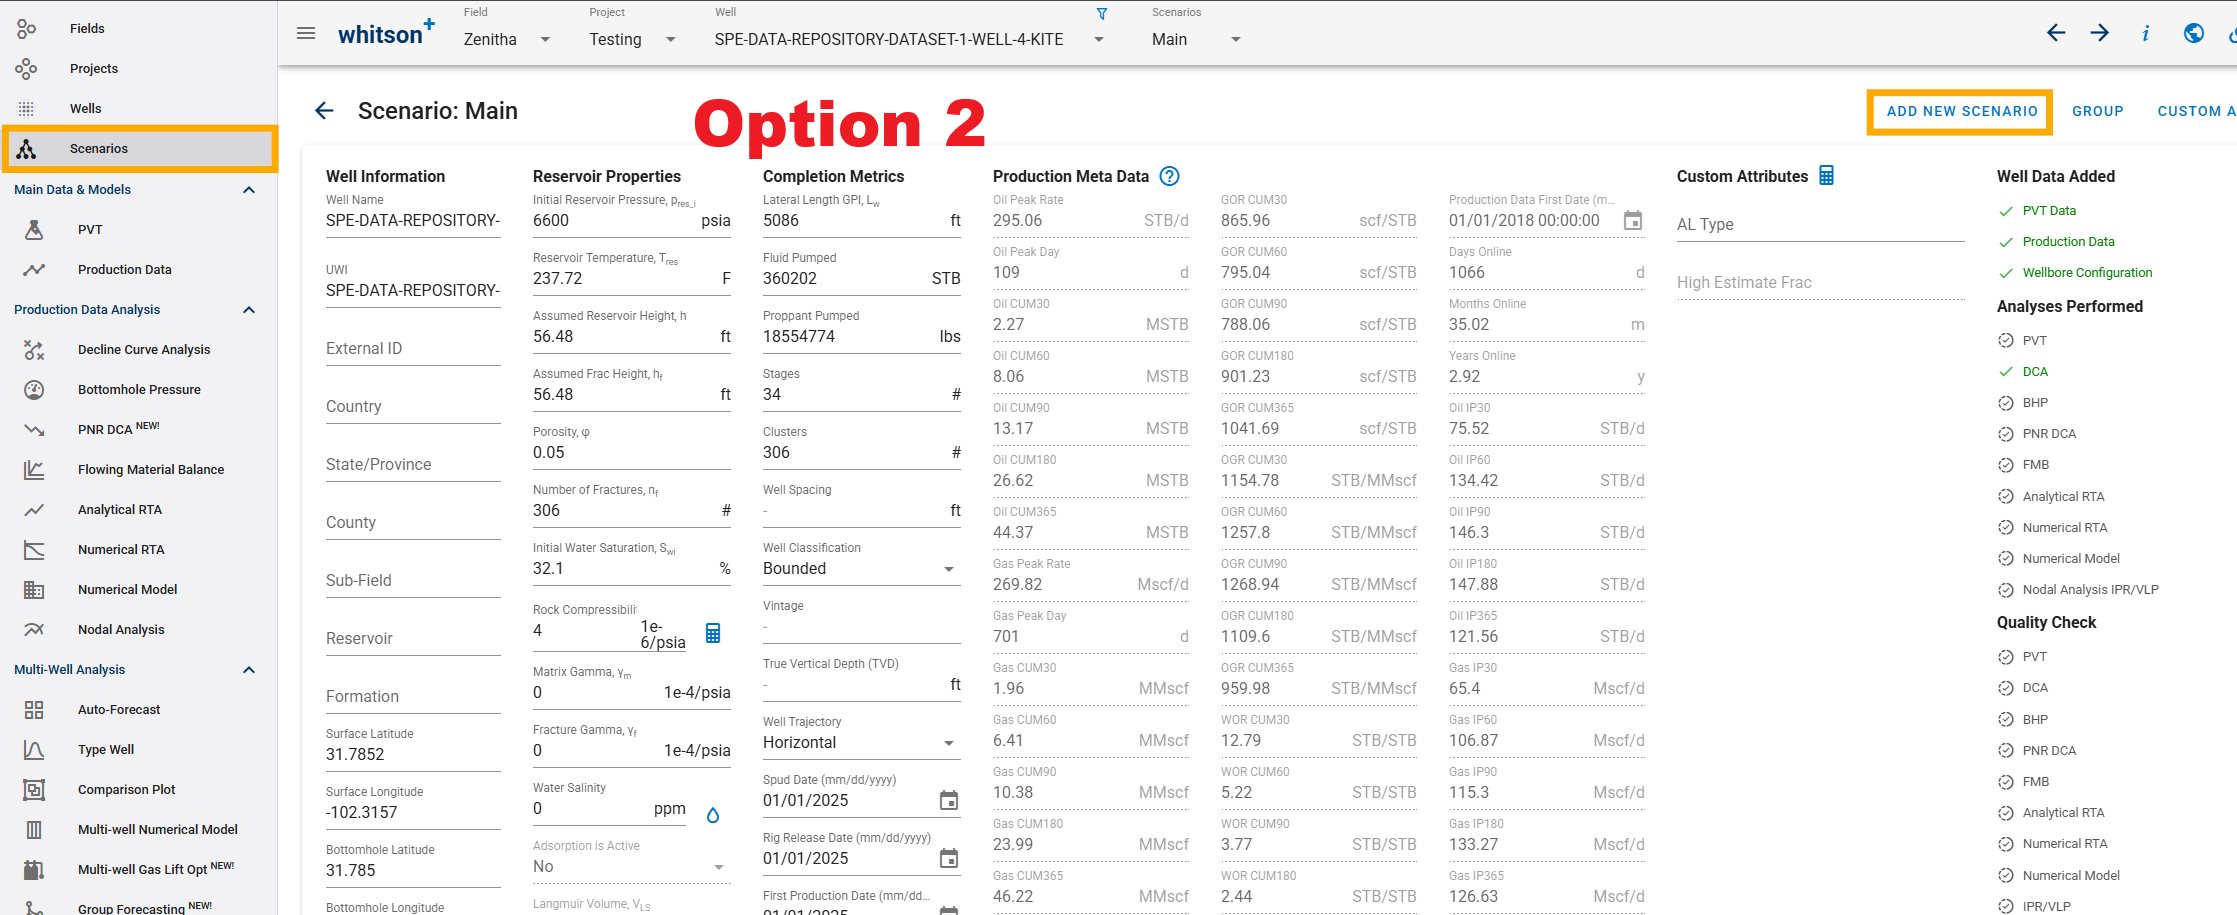
- Click ADD NEW SCENARIO.
- Add a new scenario name and click SAVE.
Users can view all created scenarios as shown below. This redirects the user to the Scenarios page.
Additionally, we have added an option to specify the access type when creating a new scenario. Once you set the access type, it will remember your preference for future scenario creations.
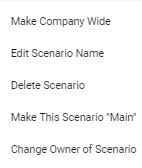
Choose which scenario to see and work with from the Scenarios dropdown menu. To edit each scenario, click the vertical ellipsis to the right of the scenario row.
Analysis Performed vs. Scenario Count
The Analyses Performed on the Scenarios page provides a comprehensive overview of the specific analyses completed for a given well and scenario. This includes PVT, DCA, BHP, FMB, Analytical RTA, Numerical RTA, Numerical Model, and Nodal Analysis IPR/VLP.
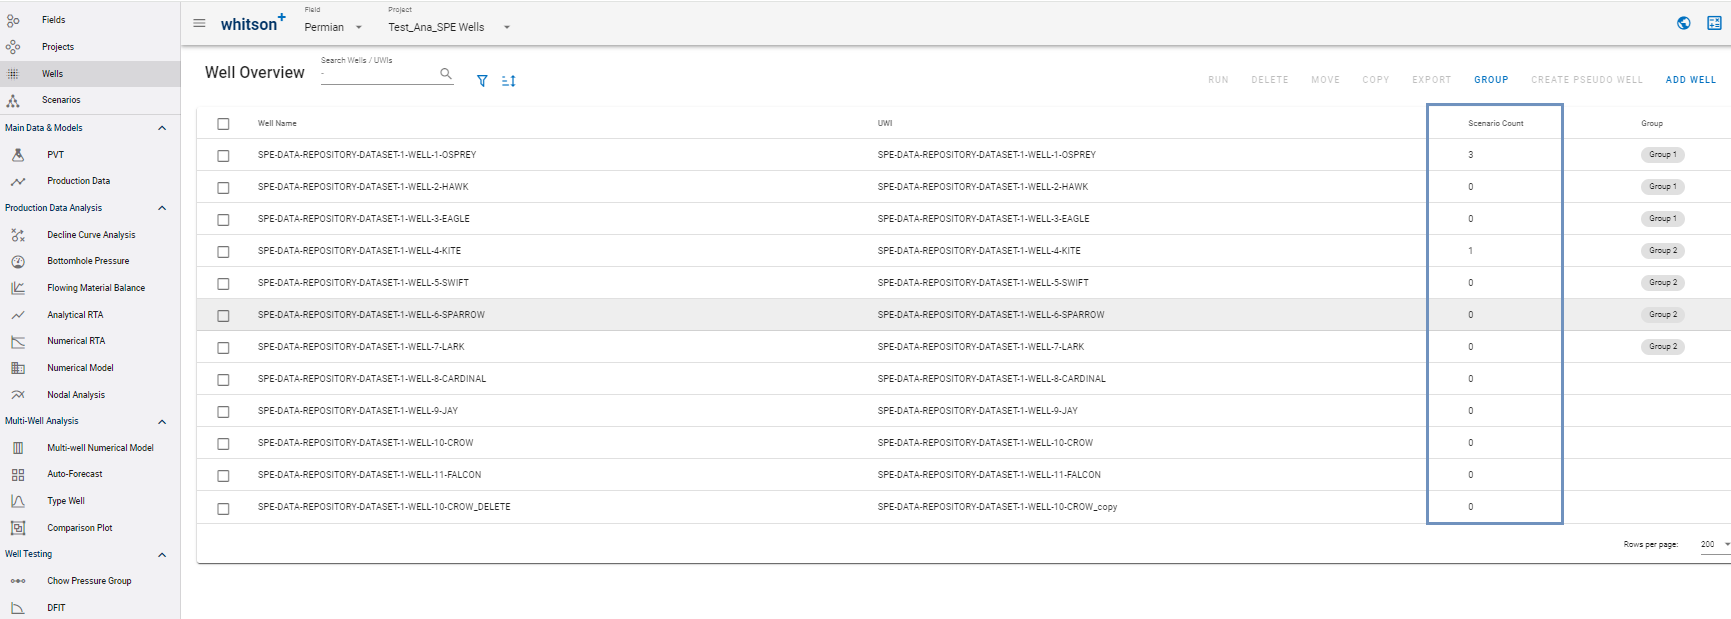
The Scenario Count refers to the scenarios that users add for a specific well. A scenario essentially duplicates a well, thereby sharing production data while maintaining separate parameters and analyses. This allows users the flexibility to evaluate each scenario independently. Scenario count can be seen on the Well Overview page. It is worth noting that every well comes with a default scenario called Main, which is not included in the scenario count displayed in the software as shown in the figure below.
5. Custom Attributes
The CUSTOM ATTRIBUTES button in the top-right corner of the scenario page provides the following options:
- Add Attribute: To add new attribute(s)
- Calculate Attributes: To re-calculate all custom attributes
- Manage Attributes: To edit and/or delete attribute(s)
- Copy Custom Attributes: To copy attributes from one field (same or different) to another project.
5.1. Add Attribute
- Click on CUSTOM ATTRIBUTES.
- Select Add Attribute.
- Type an attribute name as desired.
- Choose Attribute Type; it can be Text, Date, Number, or Boolean.
- Fill in the empty fields as desired.
- Click SAVE.
- All steps are shown in the .gif above.
5.2. Calculate Attributes
- Click CUSTOM ATTRIBUTES.
- Click Calculate Attributes
- This will automatically calculate all attributes where the Attribute Value is set to Calculated. This option will only appear if there are calculated attributes present.
- Press Ctrl + Shift + R or click the Hard Refresh button to see the custom attributes recalculated with the most recent values.
5.3. Manage Custom Attributes
- Click CUSTOM ATTRIBUTES.
- Select Manage Attributes
- You can EDIT or DELETE Attributes from here.
- All steps are shown in the .gif above.
5.3.1. Custom Attribute Folders
Each user can create their own custom attribute folders to keep custom attributes organized and easier to manage within projects.
5.4. Copy Custom Attribute
- Click CUSTOM ATTRIBUTES
- Select Copy Custom Attributes
- In the Field for copied attributes dropdown, select the field to which the attributes will be copied.
- Select the project where you want the custom attributes to be copied in the Project for copied attributes
- Select the specific attributes you want to copy.
- Refer to the GIF above for a step-by-step visual guide.
6. Export
To export information of the well, click EXPORT at the top right of the page. The following data is included in the exported file:
- Well Data - Property Overview
- Surface Process
- Production Data
- Well Data - Composition
- Deviation Survey Data
- Wellbore Data
Note that the exported properties correspond to the selected scenario.
7. Edit All
The properties listed on this page can be mass edited by clicking the EDIT ALL button at the top right of the page.
8. Discover Searchable Dropdown Menus
In whitson+ the dropdown menus are searchable. Just start typing the well name to find it. There's no need to search for an exact match; you can simply search for "24-8H," for example, to find all matching results. See the .gif below.