whitson+ - Auto-Forecast & Type Well Certification
1. Introduction
Complete the steps outlined below to become an DCA & Type Well certified whitson+ user. It includes performing auto-forecast and type well creation. Those certified have the software skills necessary to complete most type well evaluation projects in tight unconventionals.
Need help?
Send an e-mail to support@whitson.com.
1.1. Before Starting
Make sure you have watched these three videos in the Getting Started part of the manual (click here).
- Login (1 min)
- Overview of important basics (3 min 30 sec)
- Zoom Plots (3 min)
1.2. Create a Project
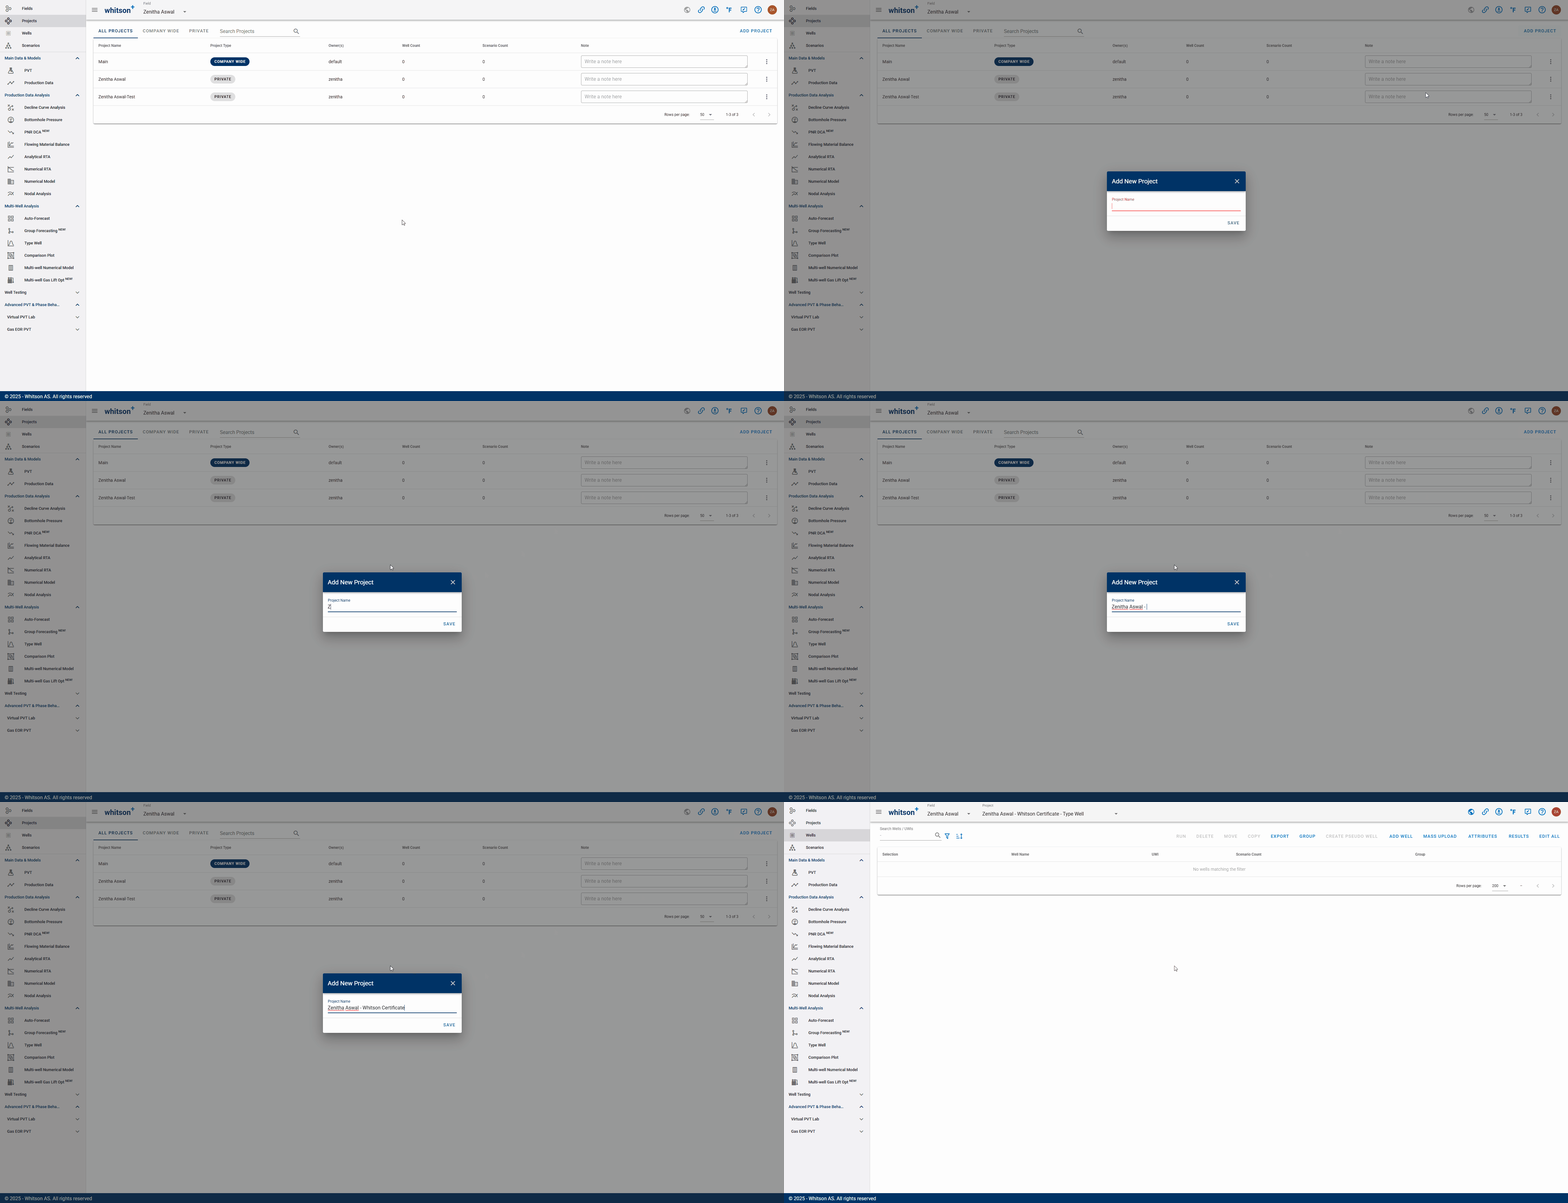
- Go to the Projects module in the navigation panel.
- Click ADD PROJECT up to the right.
- Name the project "Your Name - whitson Certificate - Type Well".
- Click SAVE.
- All steps are shown in the .gif above.
1.3. Upload the Data
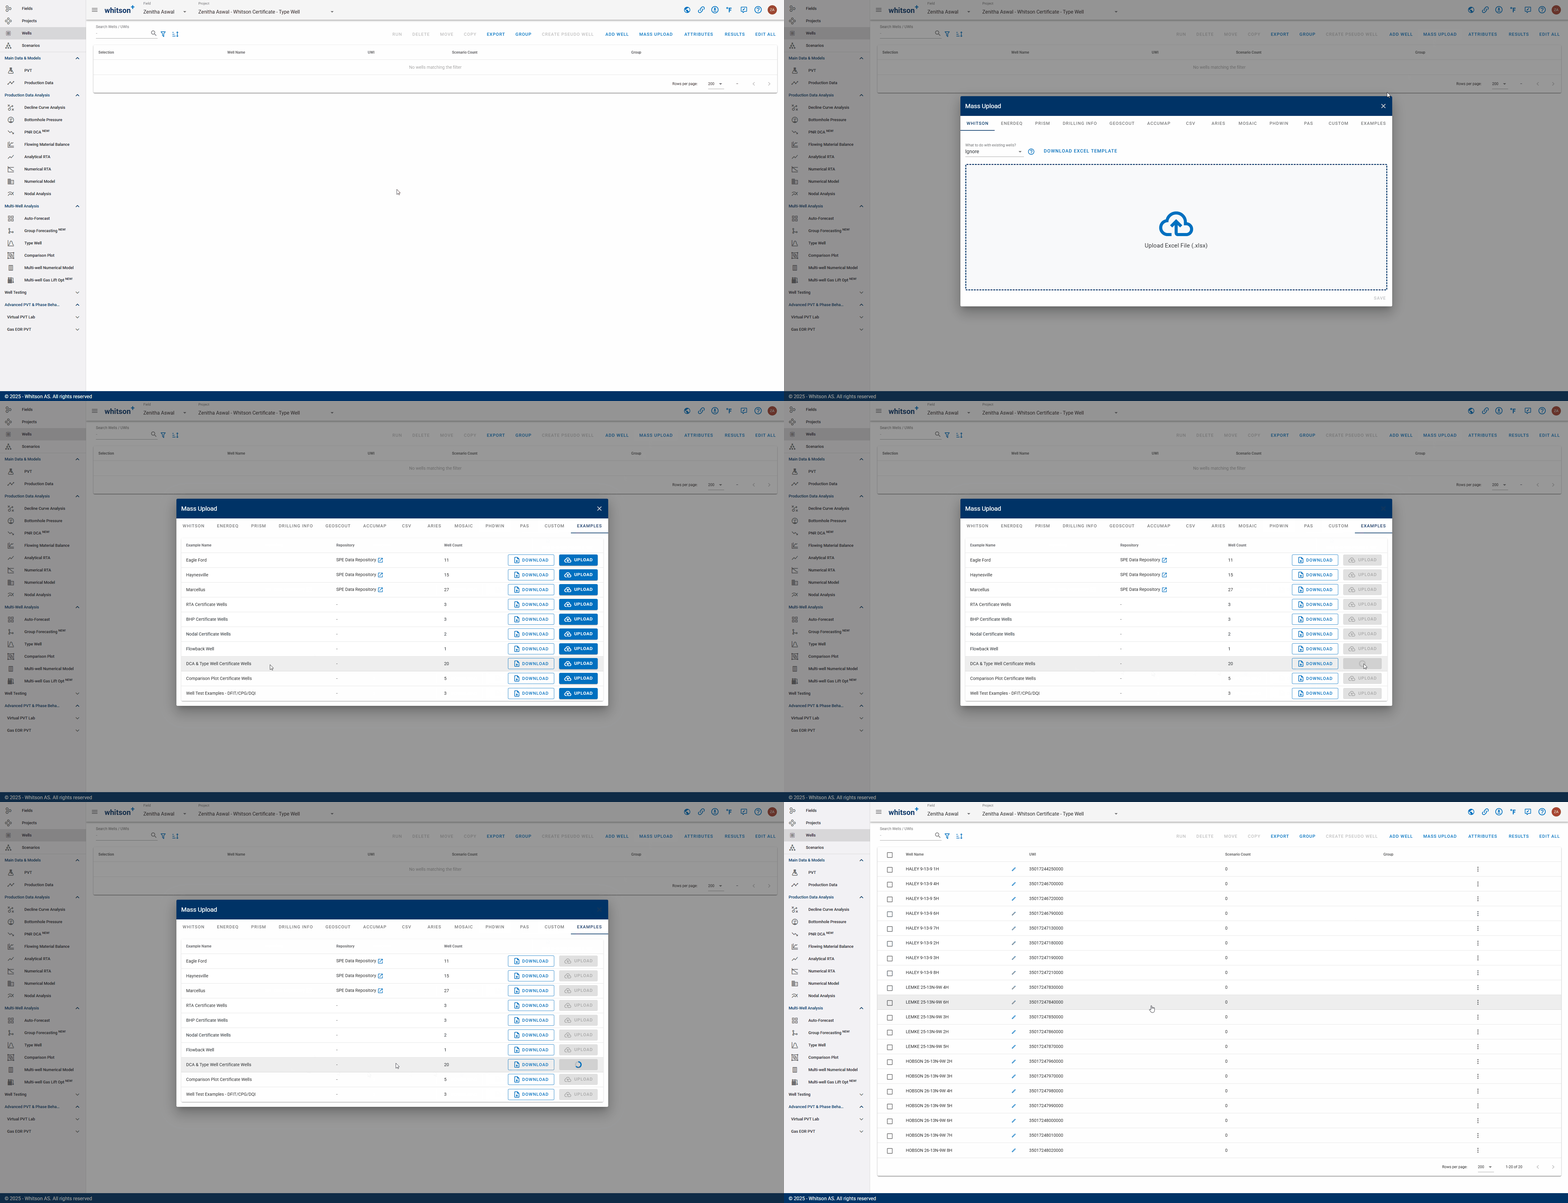
- Click MASS UPLOAD up to the right.
- In the pop-up window, select EXAMPLES
- Search for DCA & Type Well Certificate Wells and click UPLOAD
- All the data will be uploaded into the project. You can then close the Mass Upload pop-up window.
- All steps are shown in the .gif above.
2. Auto-Forecast
2.1. Create an Auto-Forecast
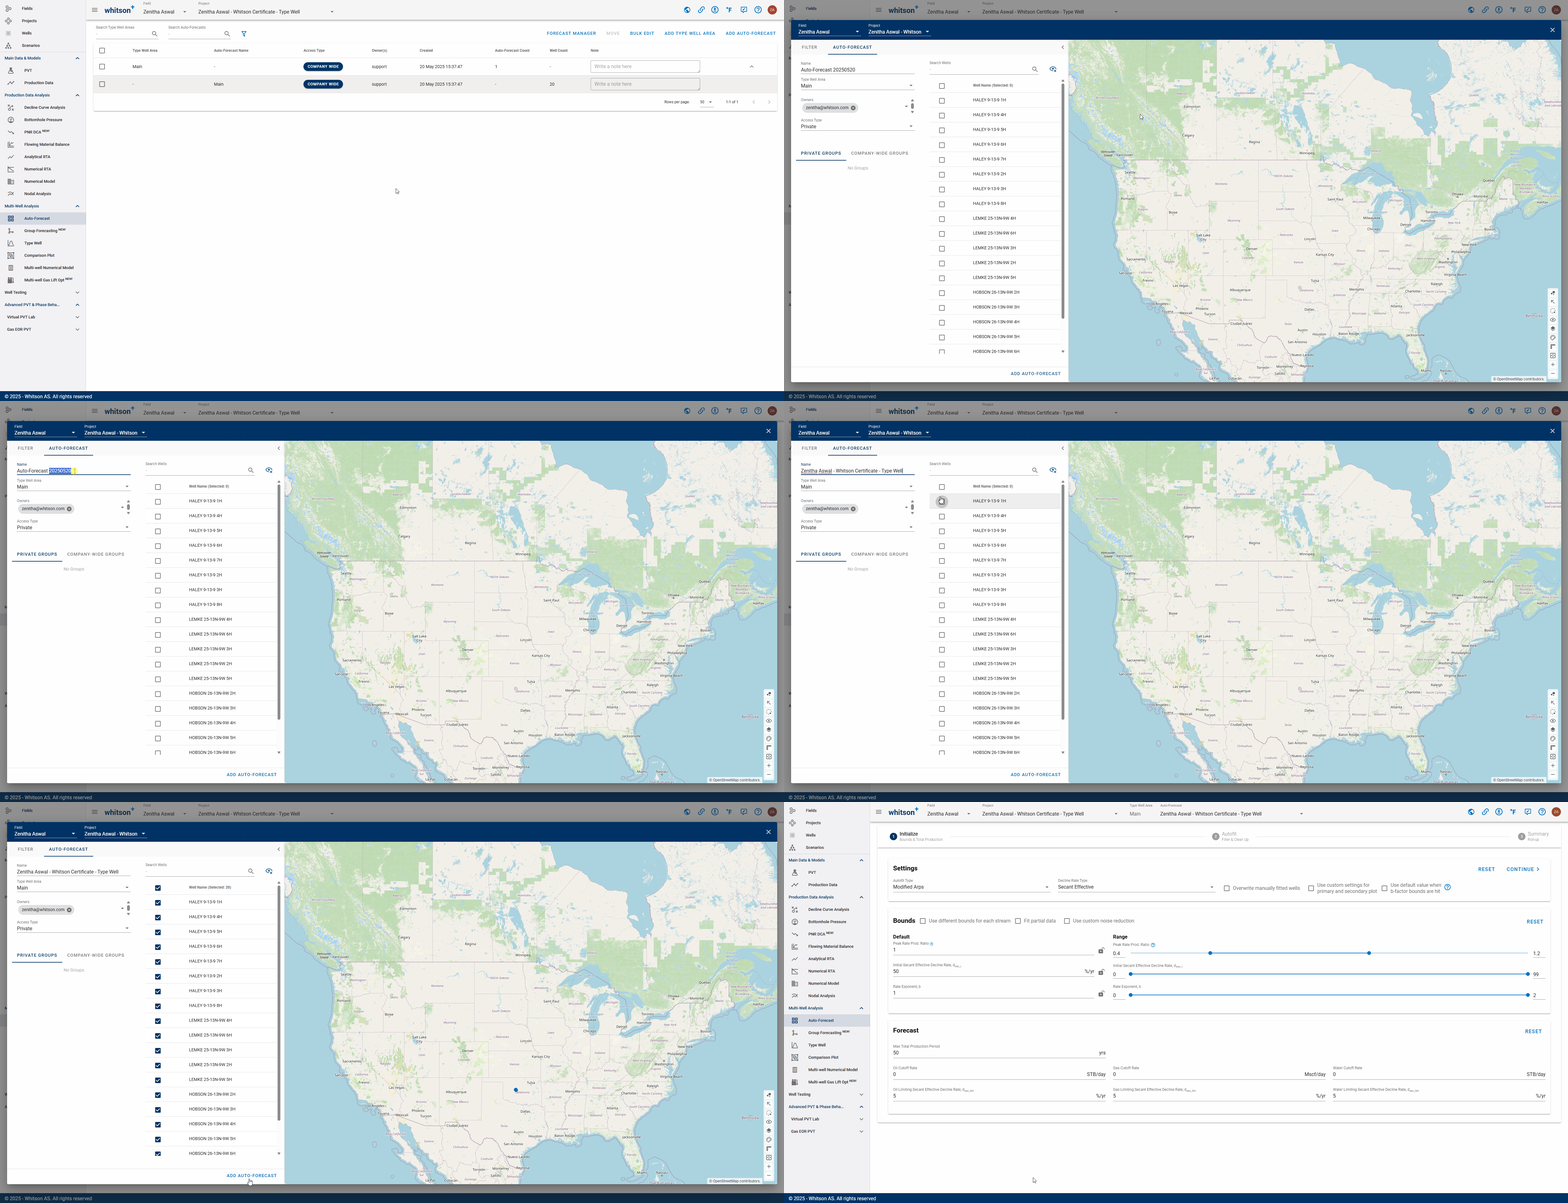
- Click Auto-Forecast in the navigation panel.
- To the upper right, click ADD AUTO-FORECAST.
- Provide a name and select all the wells by clicking the check box at the top of the well list (left of Well Name).
- Click ADD AUTO-FORECAST to the lower right.
You can store multiple auto-forecasts per project
This page gives you an overview of the created auto-forecasts, when they were created, who created them and what wells went into creating them.
2.2. Initialize Auto-Forecast
The gif below shows the settings and functionalities available to create an autoforecast.
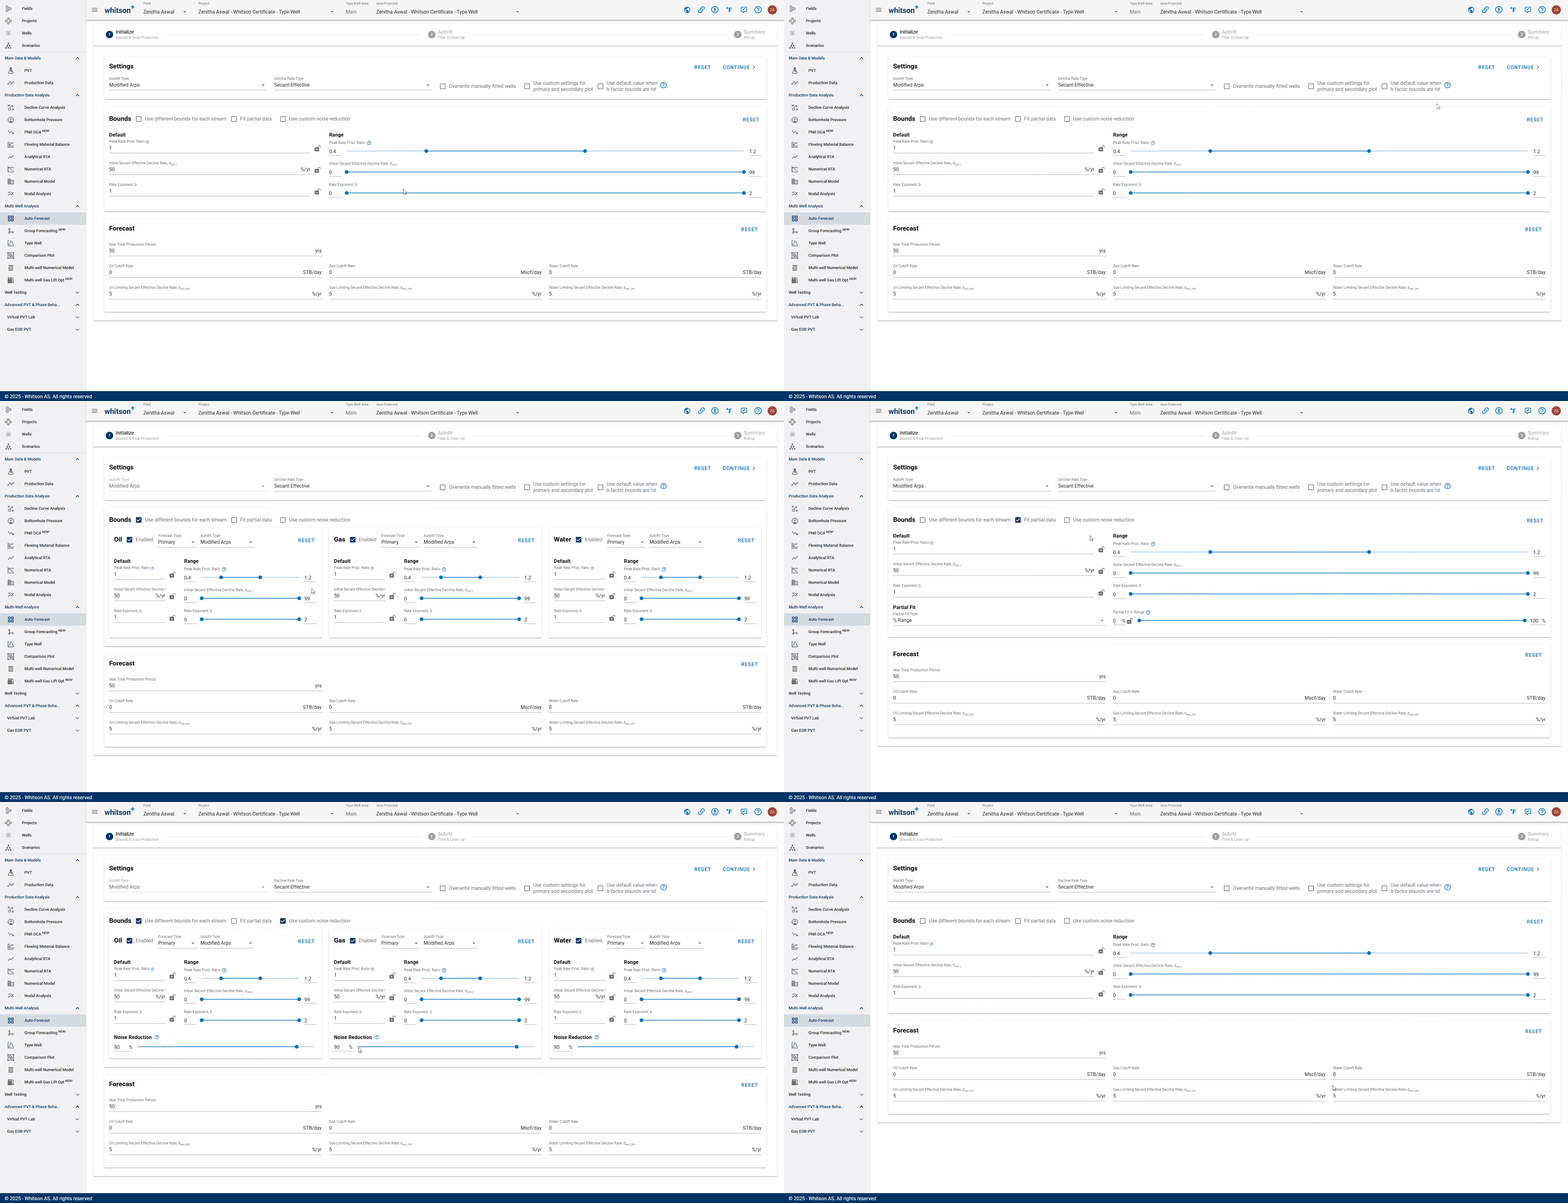
For more information about Autofit Type (Other Segment Types), see here
For more information about the Decline Rate Type, see here
Initialize the Auto-Forecast run using the ranges provided in the picture below.
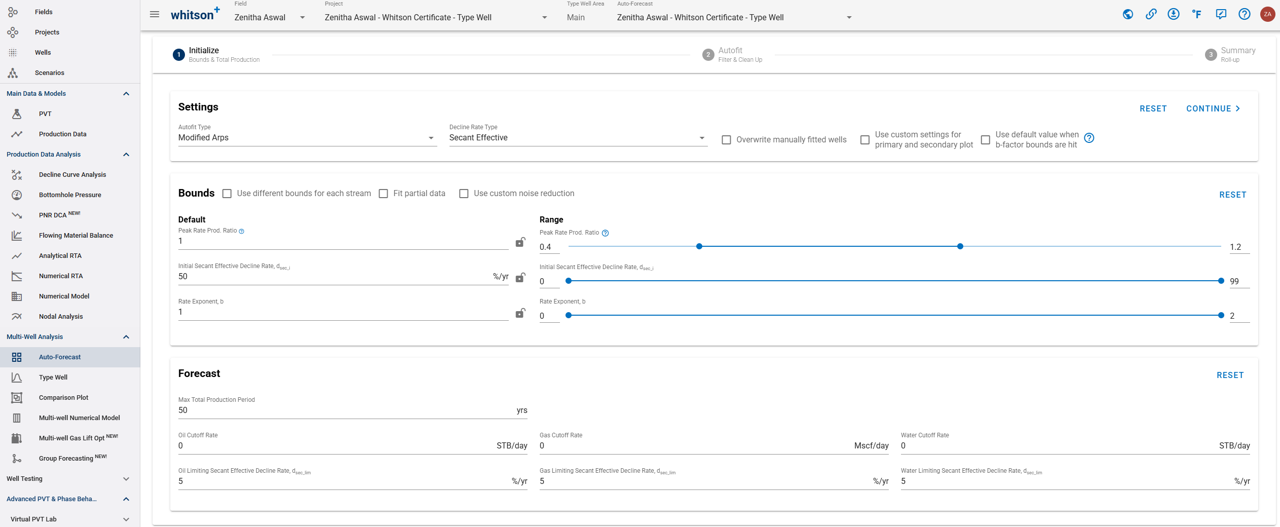
What is the Peak Rate Prod. Ratio?
This is a parameter constraining the \(q_i\) values being fit into the DCA equation, and it is defined as a ratio of the peak rate. As an example, if you have a given well where the maximum oil production in history is 1000 STB/d, having an "peak rate production ratio" between 0.8 and 1.2 means we are allowing the initial rate in DCA to be between 800 STB/d and 1200 STB/d. It is basically a generic way to specify the range for \(q_i\), for a large number of wells, and all the different phases (oil, gas and water) in one go.
2.3. Autofit All Wells
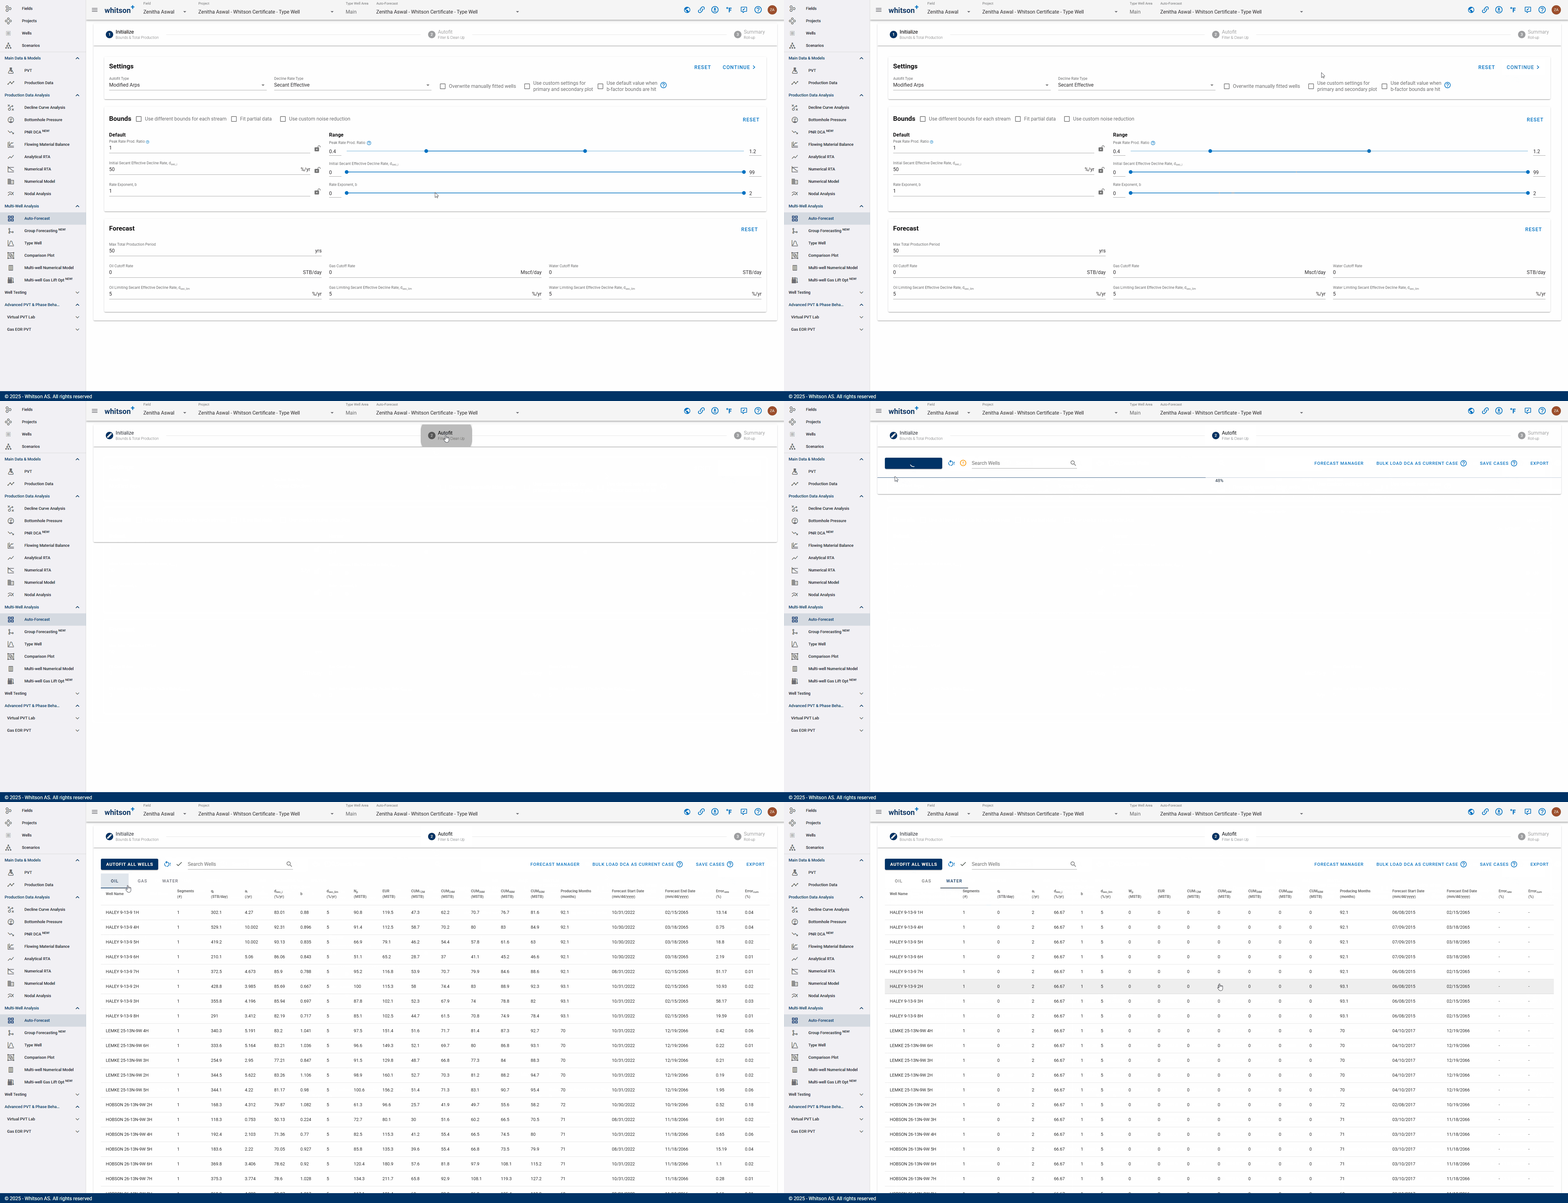
- Click CONTINUE to the top right, or the second step in the stepper (2. Autofit).
- Click AUTOFIT ALL WELLS to the top left.
- The summary for each stream can be seen by clicking the tab OIL | GAS | WATER.
How does the default autofit work?
For each stream, the timestep associated with the peak rate, is found. Thereafter a regression fit of the \(q_i\).
2.4. Sort Auto-Forecast Summary
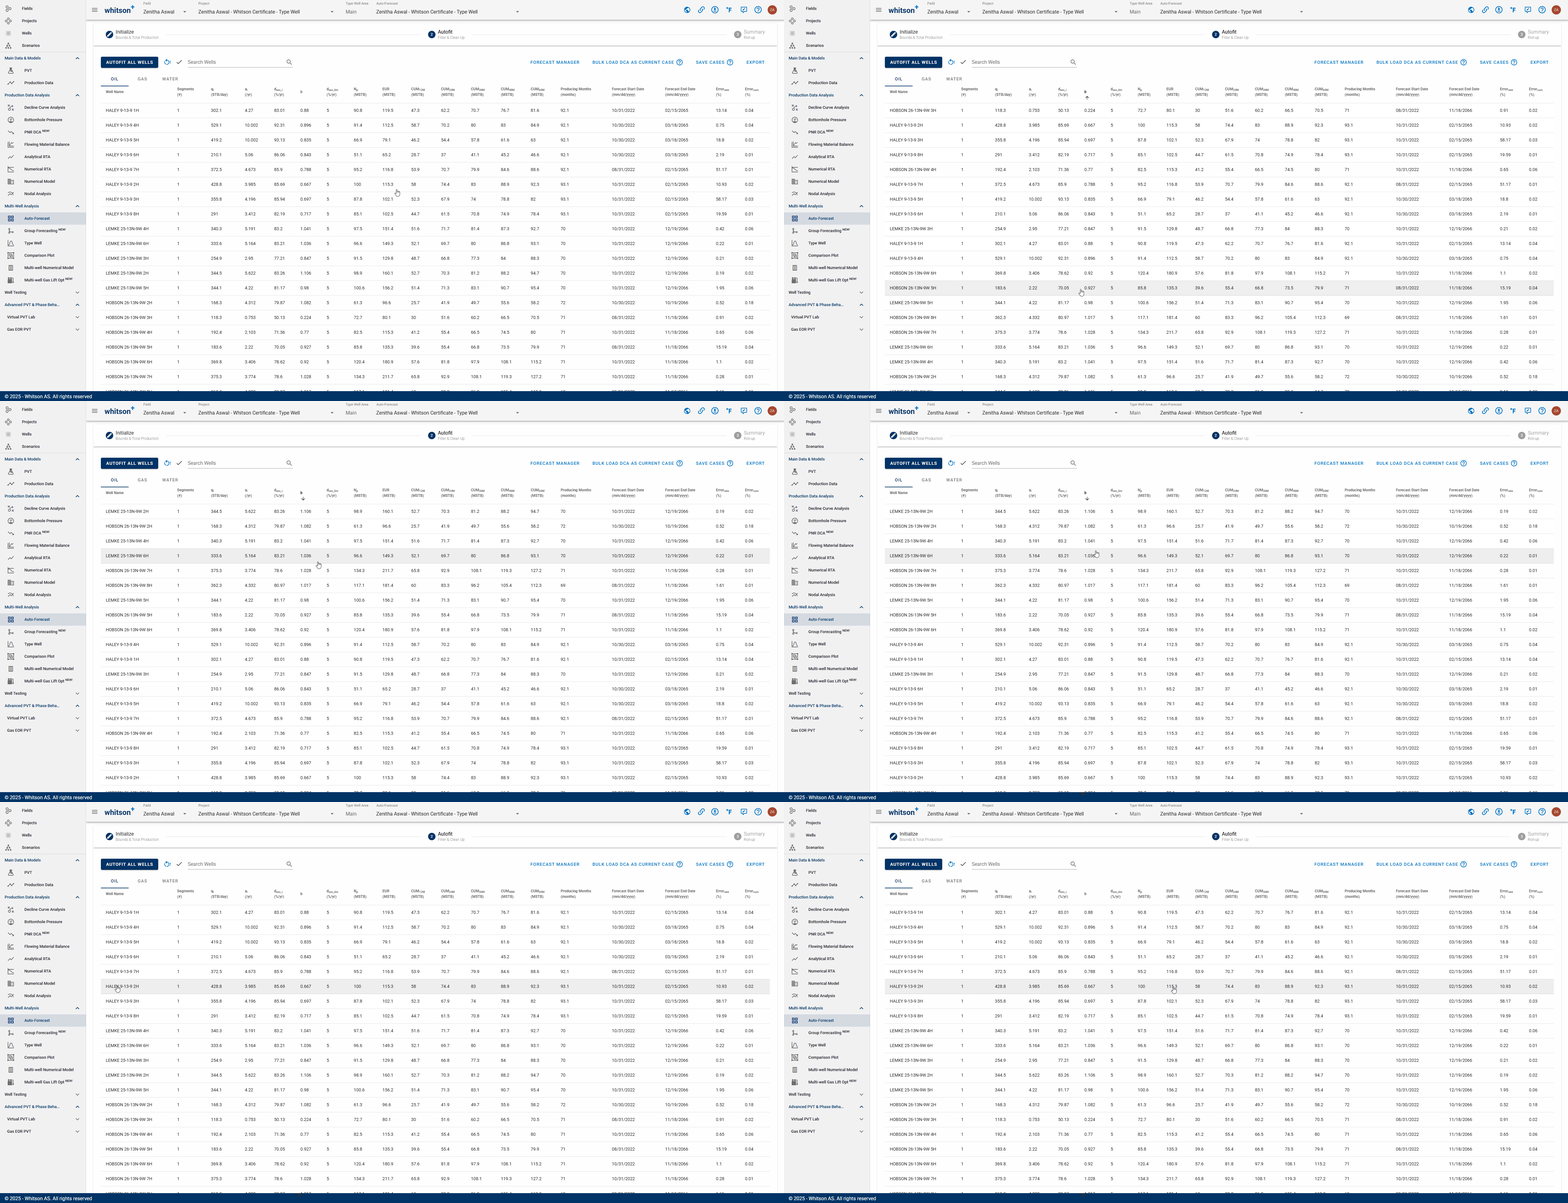
You can sort the rows by clicking the table headers.
Click the \(b\)-factor header. You are now sorting the table based on b-factor.
- First click will sort it from minimun to maximum (ascending order).
- Click it again and it will sort it from maximum to mininum (descending order).
- Click it a last time and you'll get back to the unsorted list.
Why sort the results?
If you have a large number of wells, it can be helpful to quickly sort the wells by e.g. error and manually alter those large error fits only.
2.5. Manually Check Fits
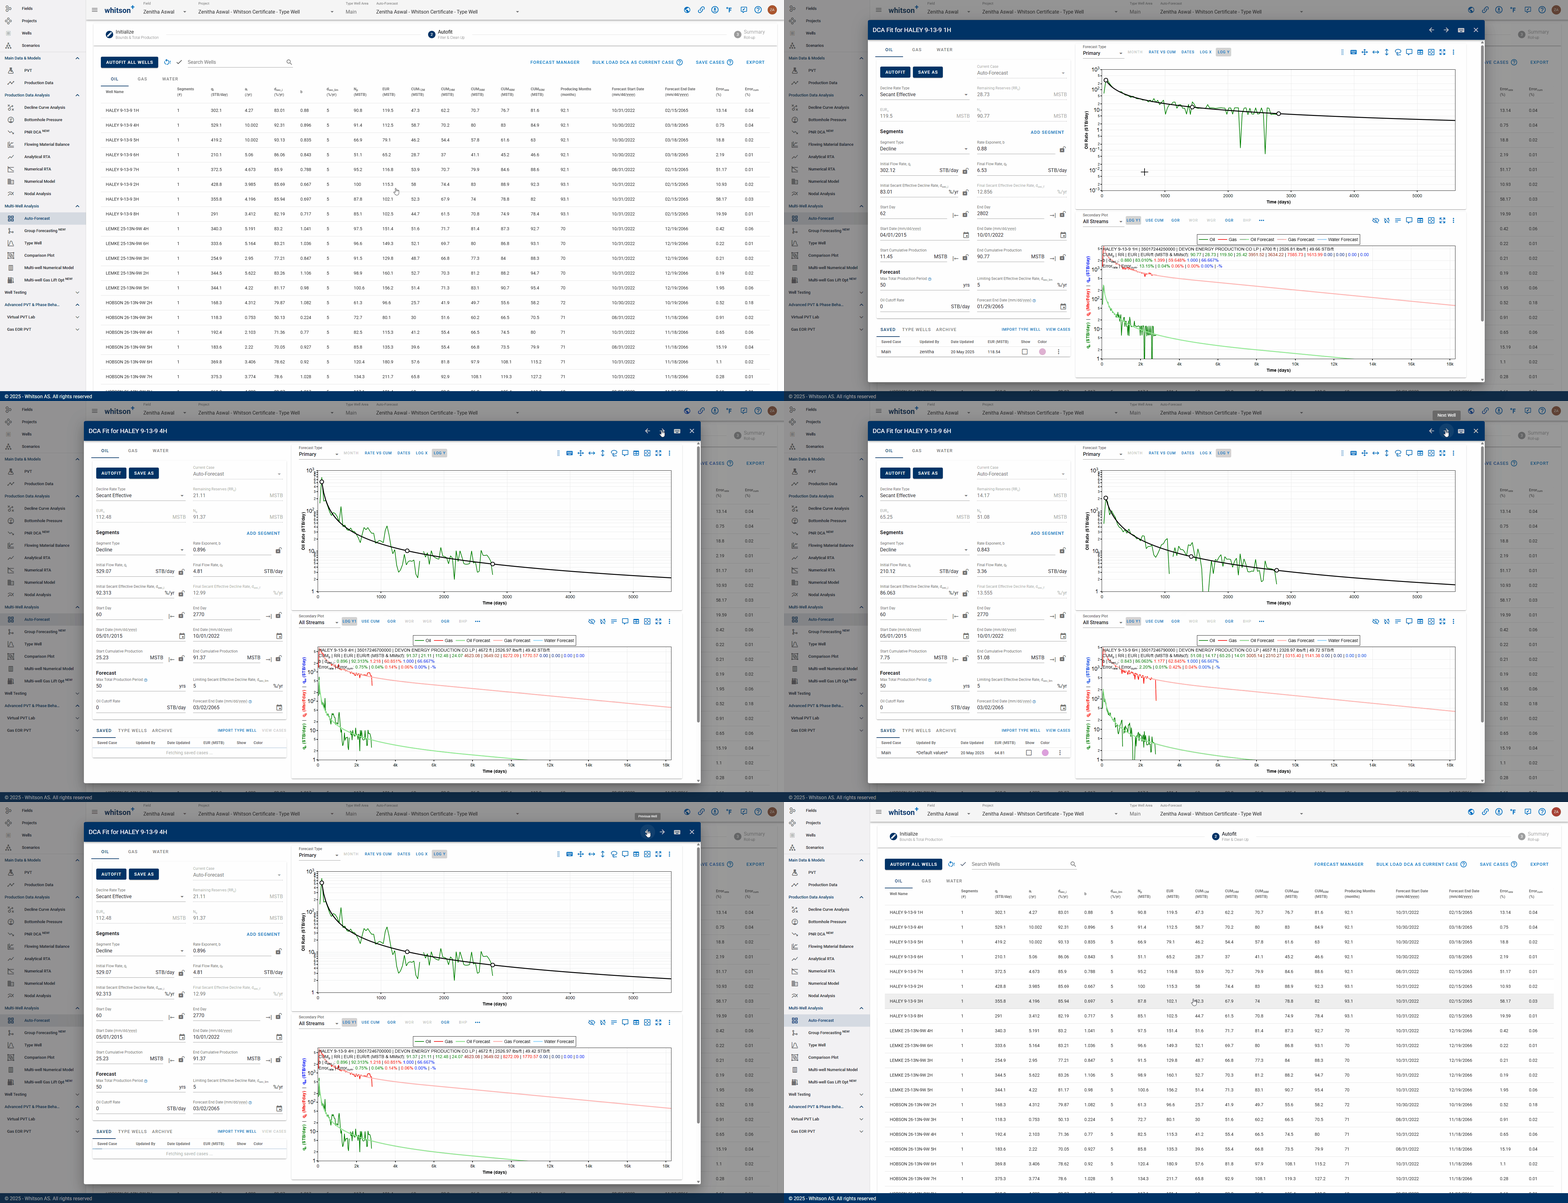
You can manually check and adjust each fit by clicking the row in the table.
- Click the row. A window showing the single-well DCA fit will appear.
- Use the right arrow (→) and left arrow (←) at the top right of the DCA Fit window to navigate to the next or previous well, respectively. Alternatively, you can use your keyboard: press Page Down to move to the next well and Page Up to go to the previous well.
What does the DCA \(b\)-factor represent?
DCA fits can be tied to physical parameters as long as the fit is done while the flowing bottomhole pressure is constant (or about constant). The \(b\)-factor represent recovery efficiency. A low \(b\)-factor indicates a low recovery efficiency. A high \(b\)-factor indicates a high recovery efficiency.
2.6. How to Adjust the DCA Manually?
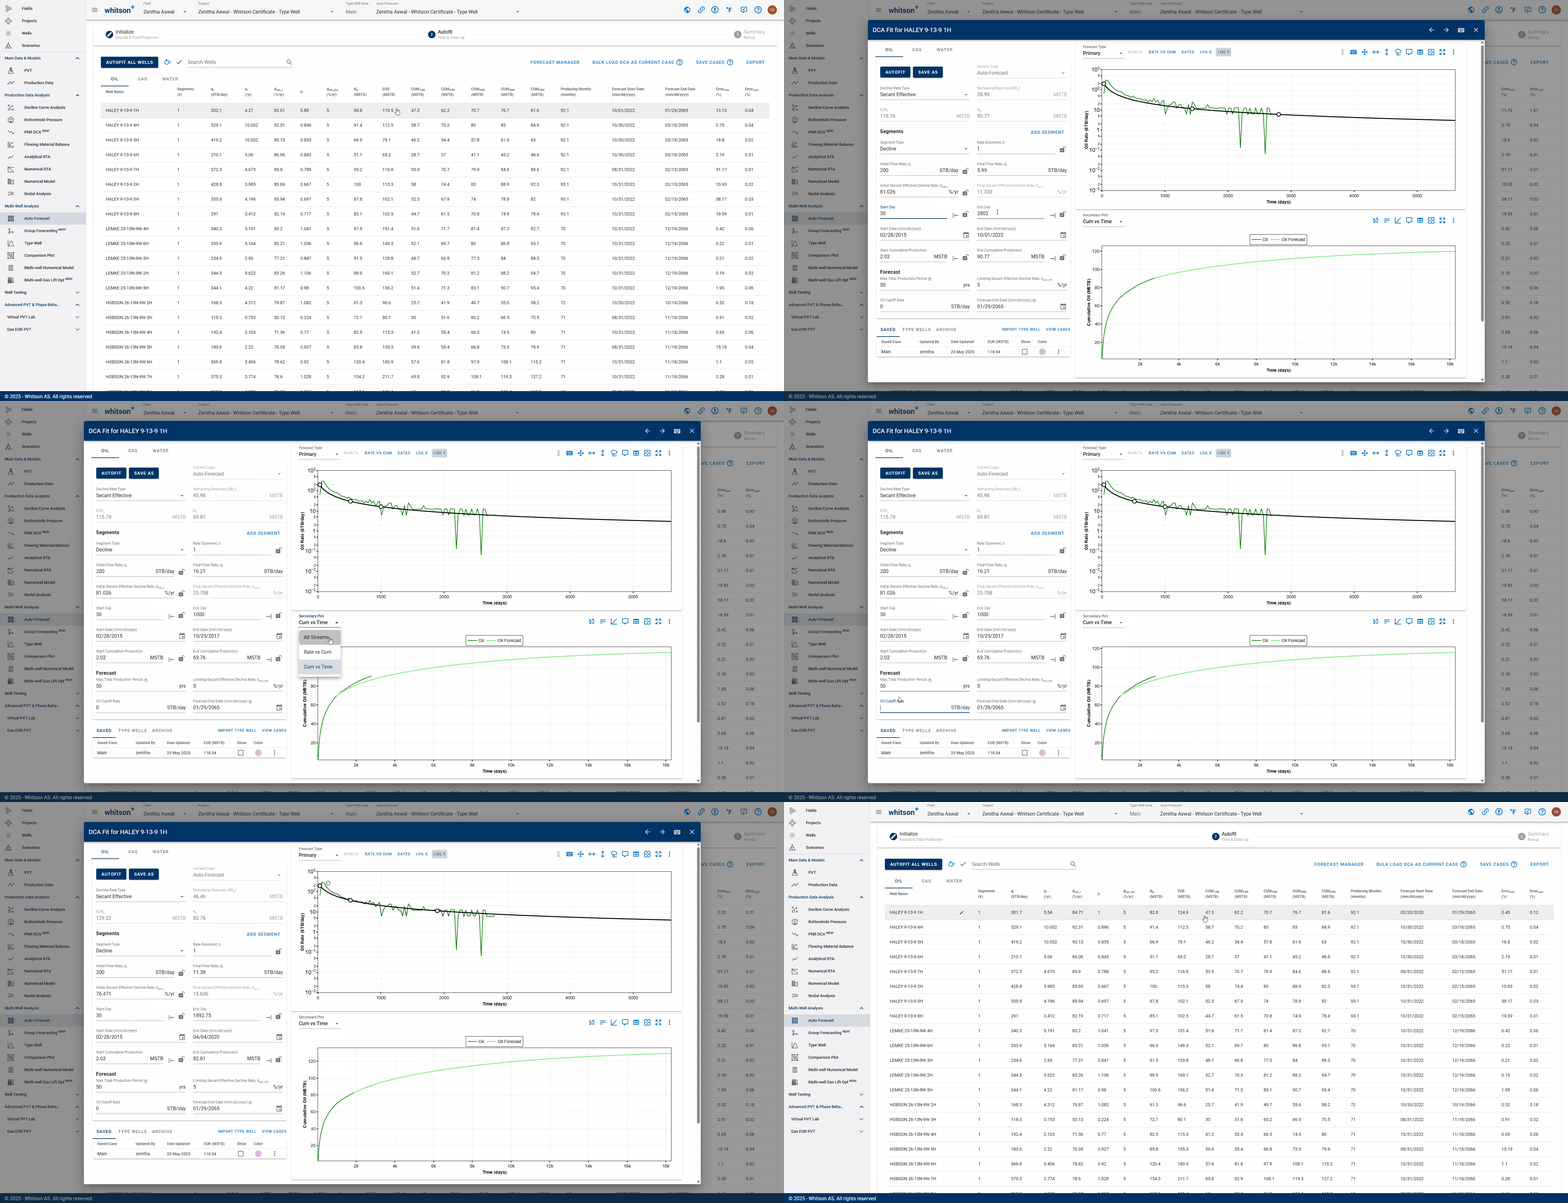
- Values can be changed by typing.
- The fit can also be graphically edited.
- See .gif above (it's just for example purposes).
You can add multiple segments
Adding more than one DCA segment often results in a better fit to real production behavior, especially when the well transitions through different flow regimes. A single segment may miss these changes and lead to an oversimplified forecast. Know more here.
2.7. Save Cases
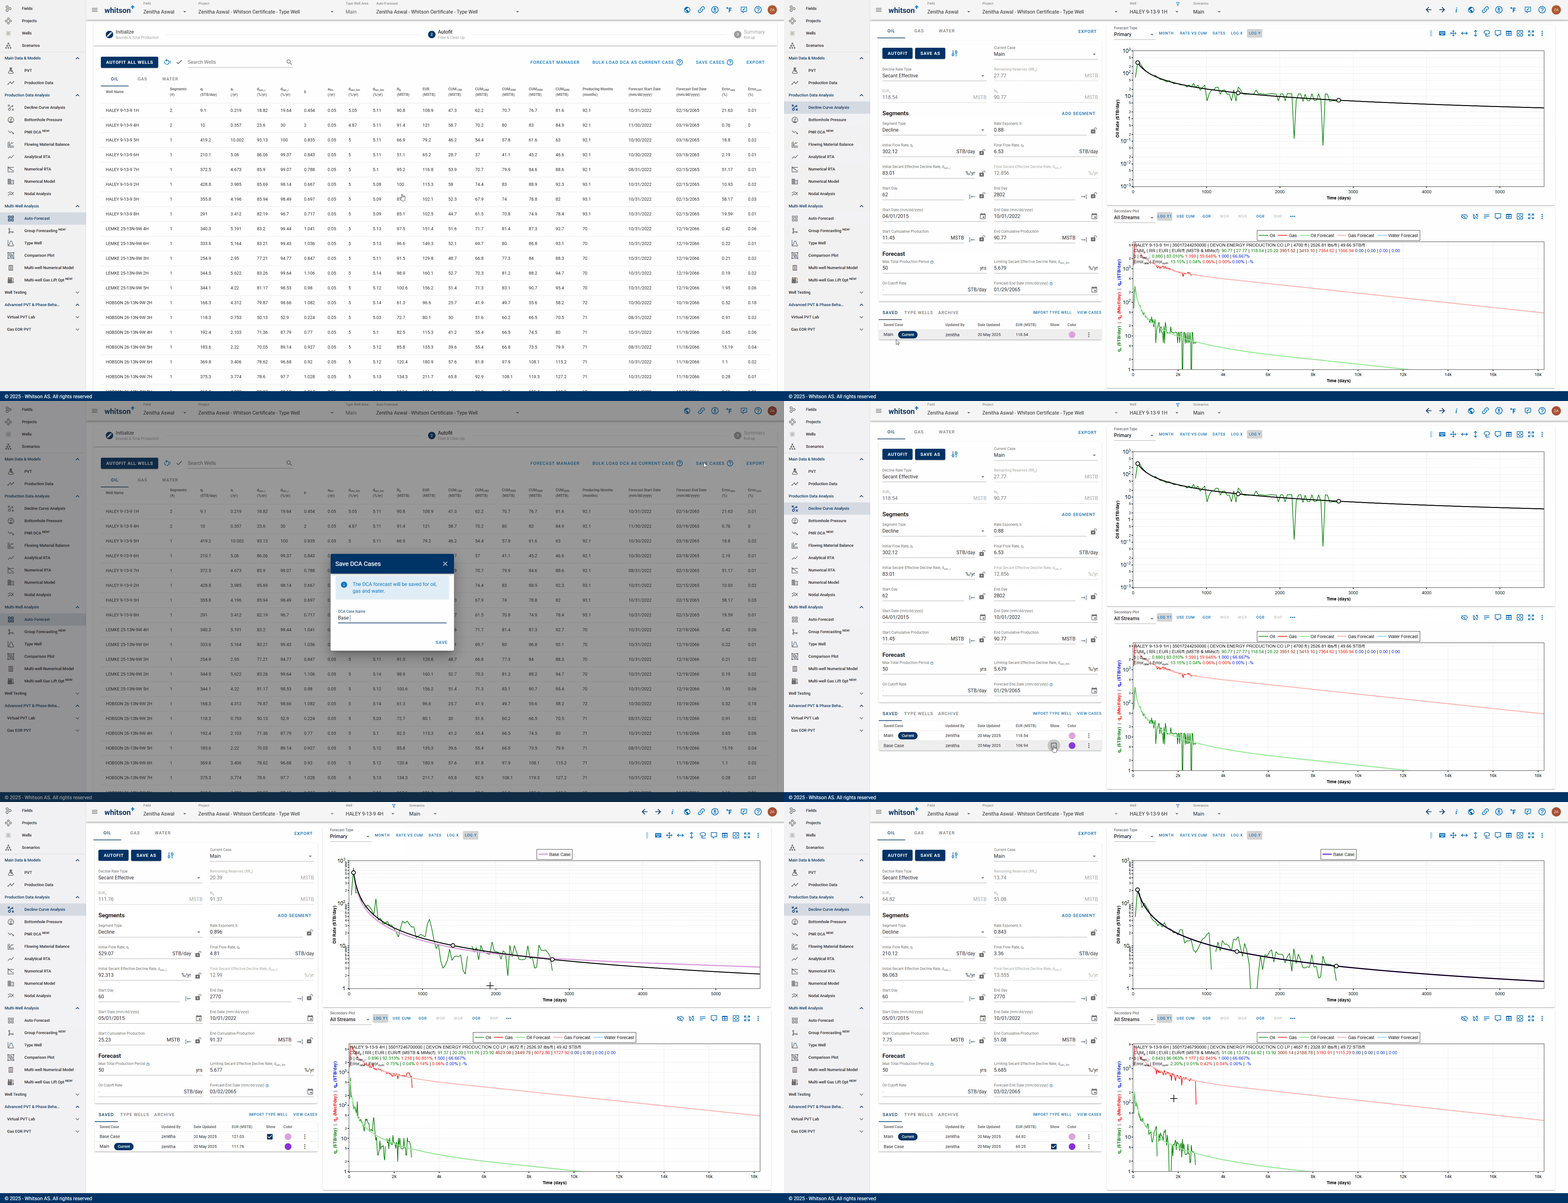
- Click SAVE CASES in the top right.
- Name the DCA forecast Base Case.
- This will save the fit for each well, for each stream.
2.8. Roll-up
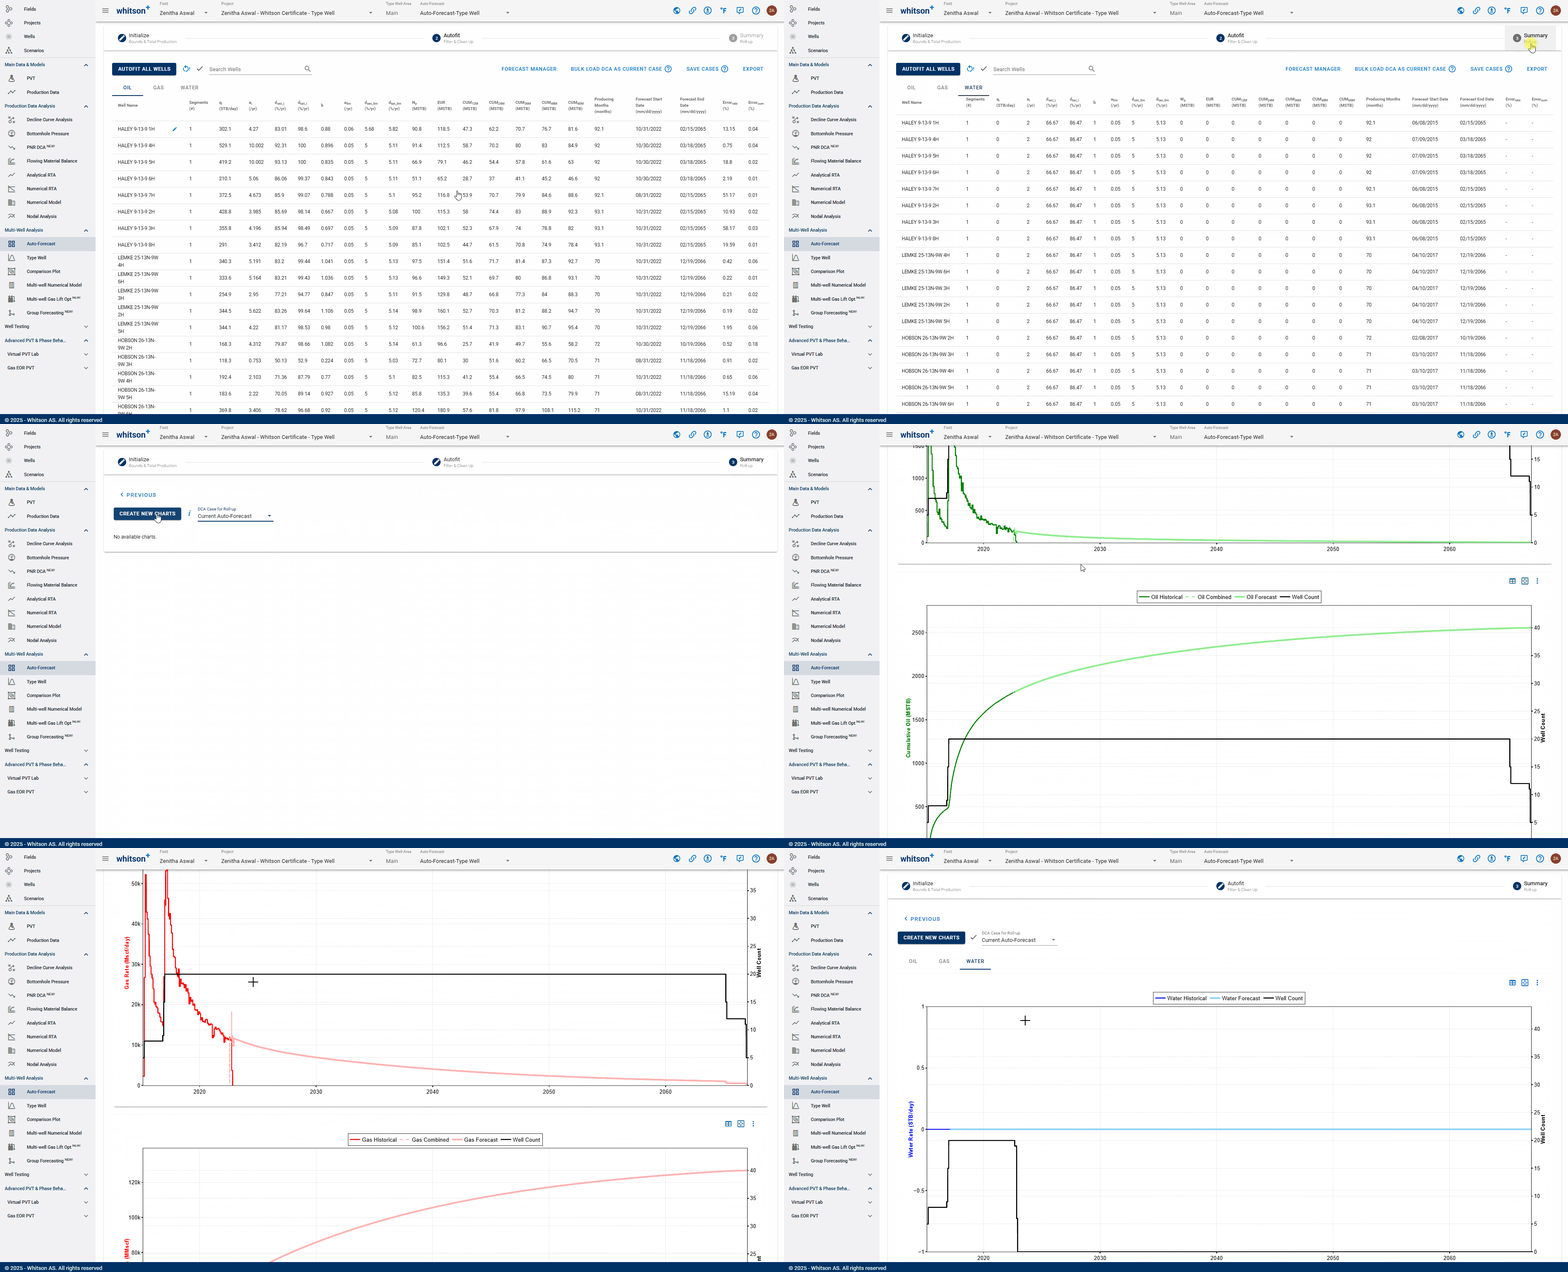
- To quality check that the overall fits are ok, a simple "roll-up" exercise can be performed on all the data.
- That is done by adding up all the rates from all the wells producing at a given time step and plotting that over time in both rate and cumulative space.
-
Here you like to visually ensure that there are no strange discontinuities when the data goes from the historical data to the forecasted part of the data.
-
Click the third step in the stepper (3. Summary).
- In the drop down menu under "DCA Case for Roll-up" select "Current Auto-Forecast""
- Click CREATE NEW CHARTS
2.9. Go Back to the Auto-Forecast Overview?
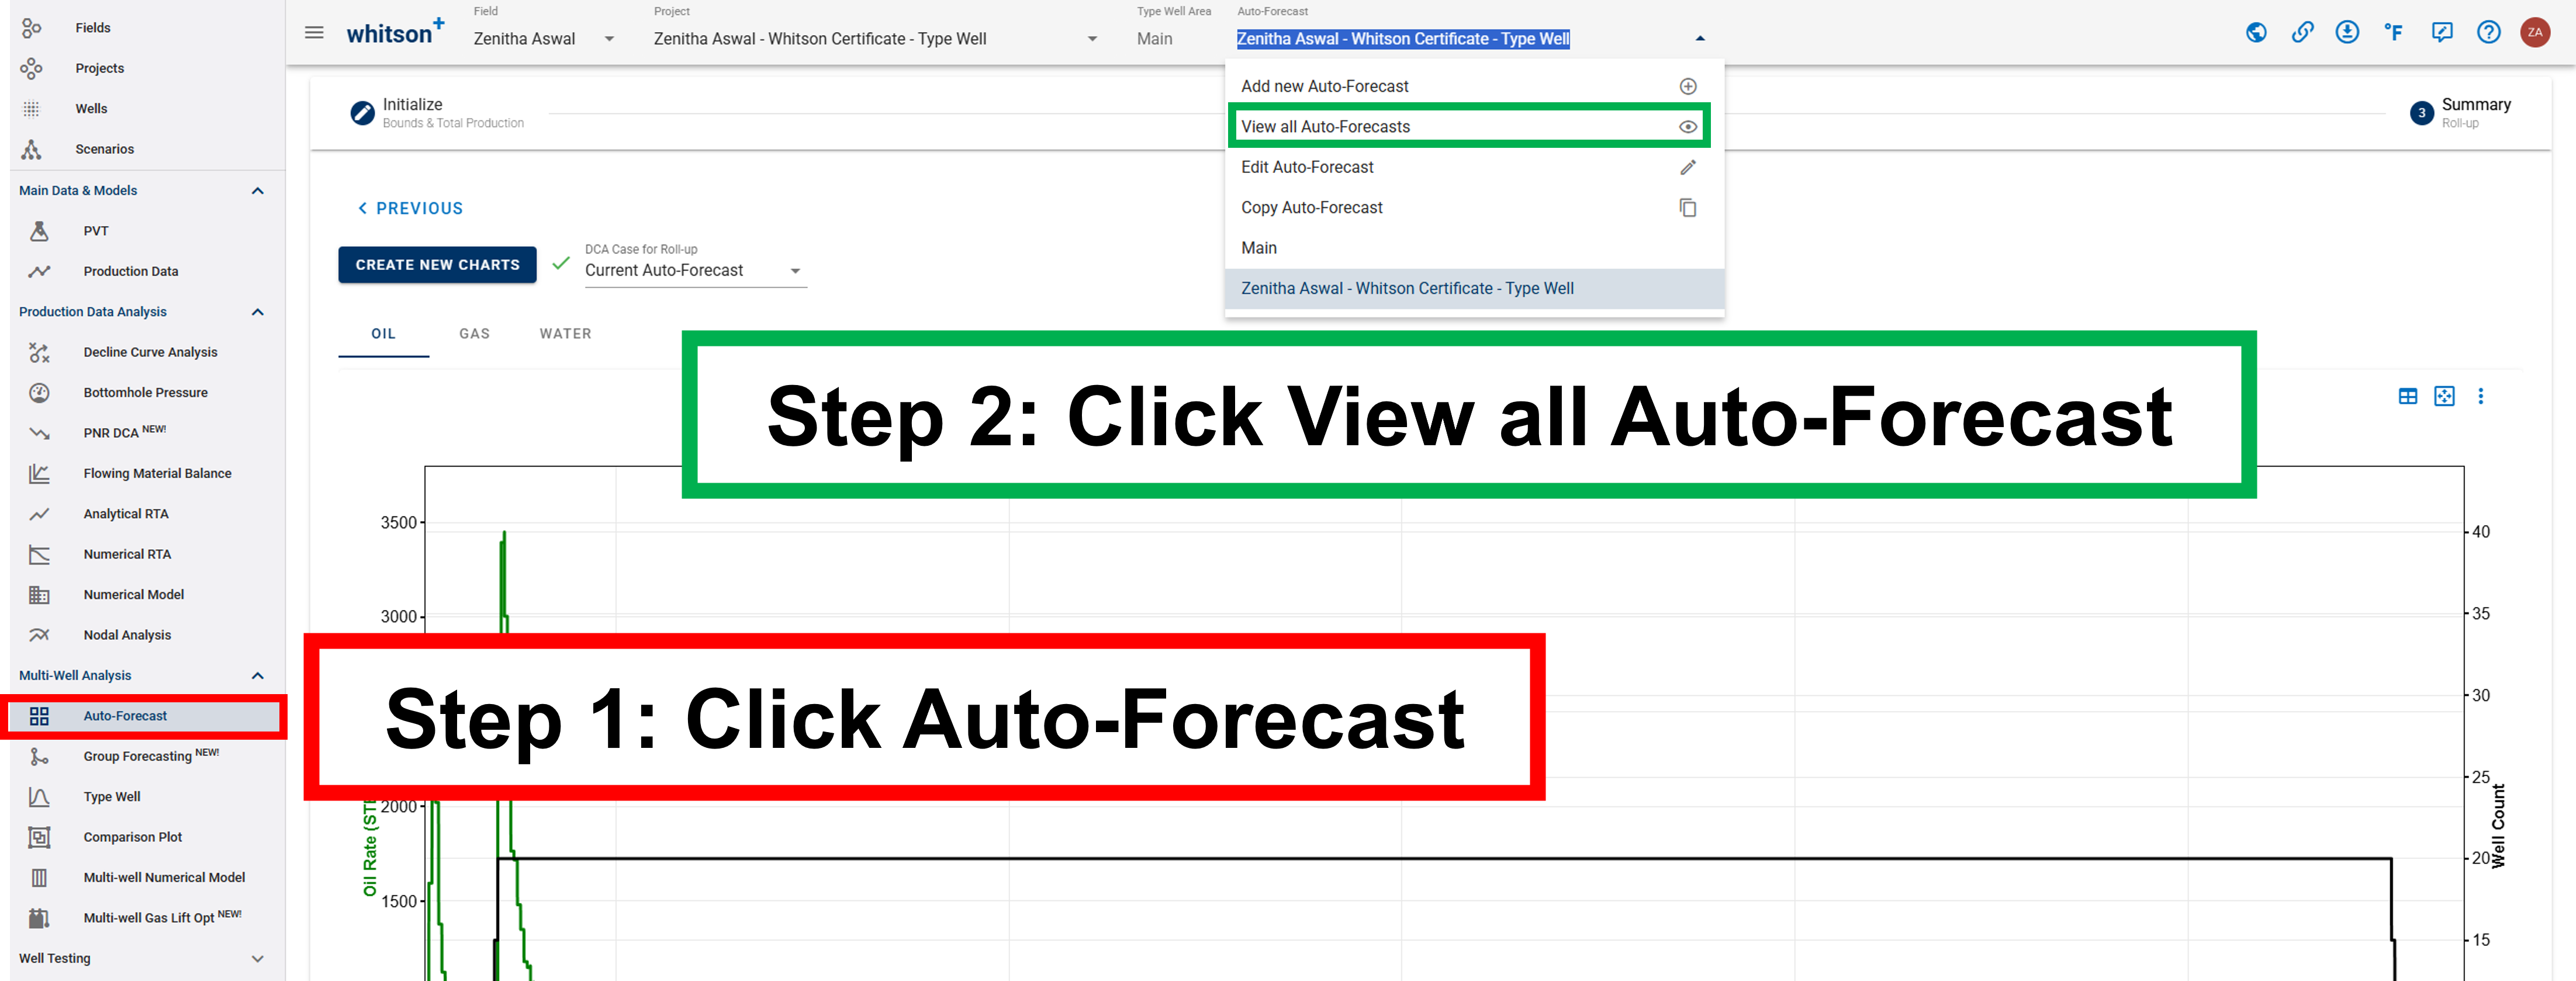
If you want to go back to the auto-forecast overview, either 1. click the Auto-Forecast tab in the navigation panel. 2. or click the Auto-Forecast menu in the top bar.
2.10. Want to Edit Auto-Forecast Well Selection?
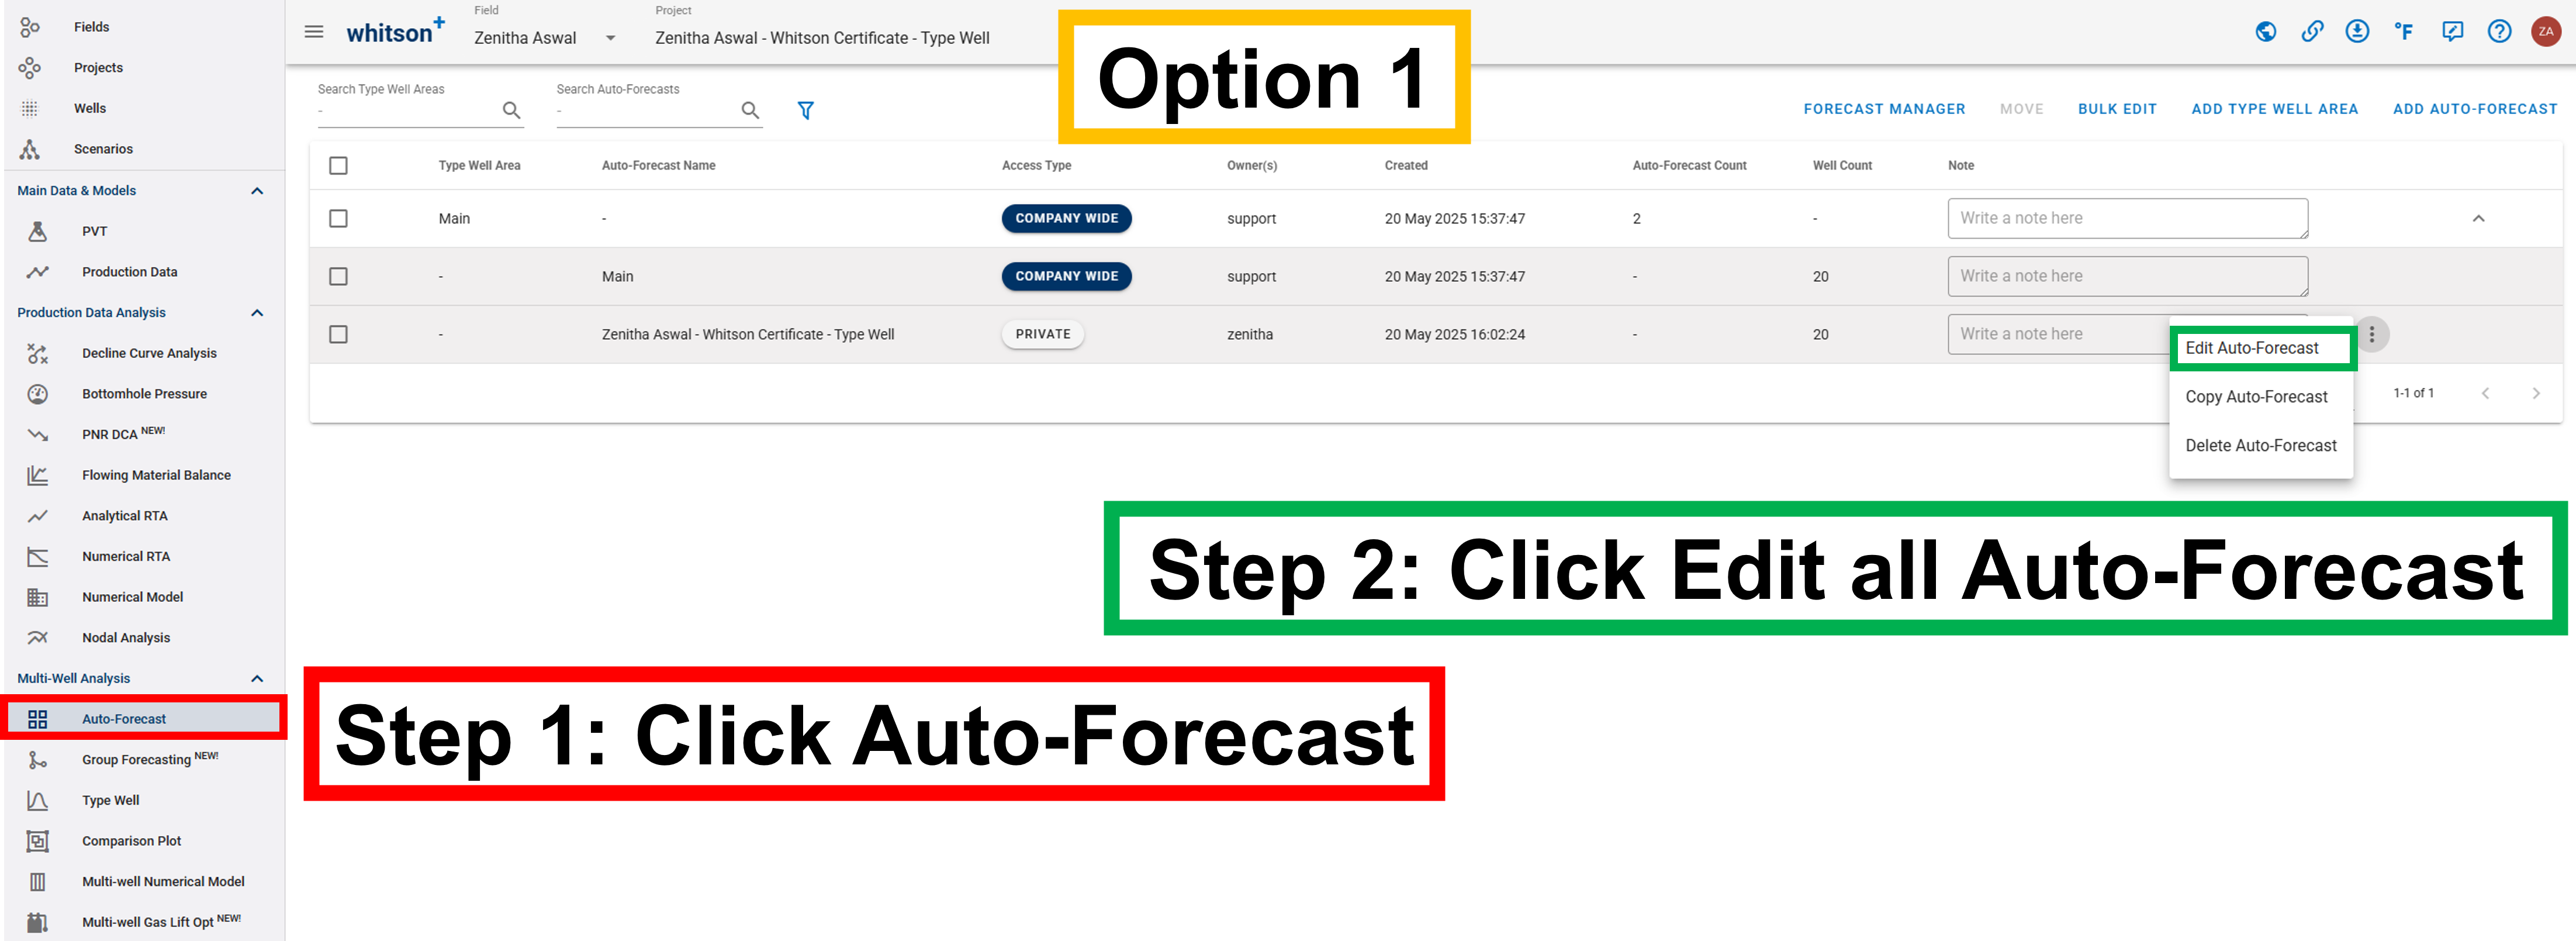

If you want to edit the well selection, either
- Click the Edit Auto-Forecast tab in the Auto-Forecast Overview.
- Or click the Edit Auto-Forecast menu in the top bar.
3. Type Well
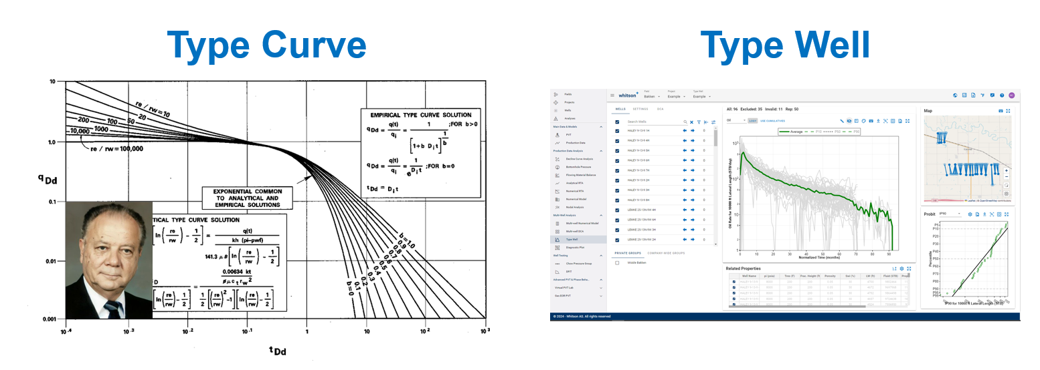
- “Type Wells” are often referred to as “Type Curves”.
- “Type Curves” refer to idealized production plots (based on equations and/or numerical simulation) to which actual production results are compared.
- “Type Wells” are based on actual well production data and represent a typical production profile for a collection of wells for a specified duration.
What is a "typical" well?
The arithmetic average of a group of wells are commonly applied to estimate a type well. That said, experts (e.g. David Fulford) would argue that a geometric mean better approximates the median. Production rates and EURs are generally distributed lognormal, accordingly averaging the logs of the associated values make a lot of intuitive sense. We have option for both in whitson+.
3.1. Create a Type Well
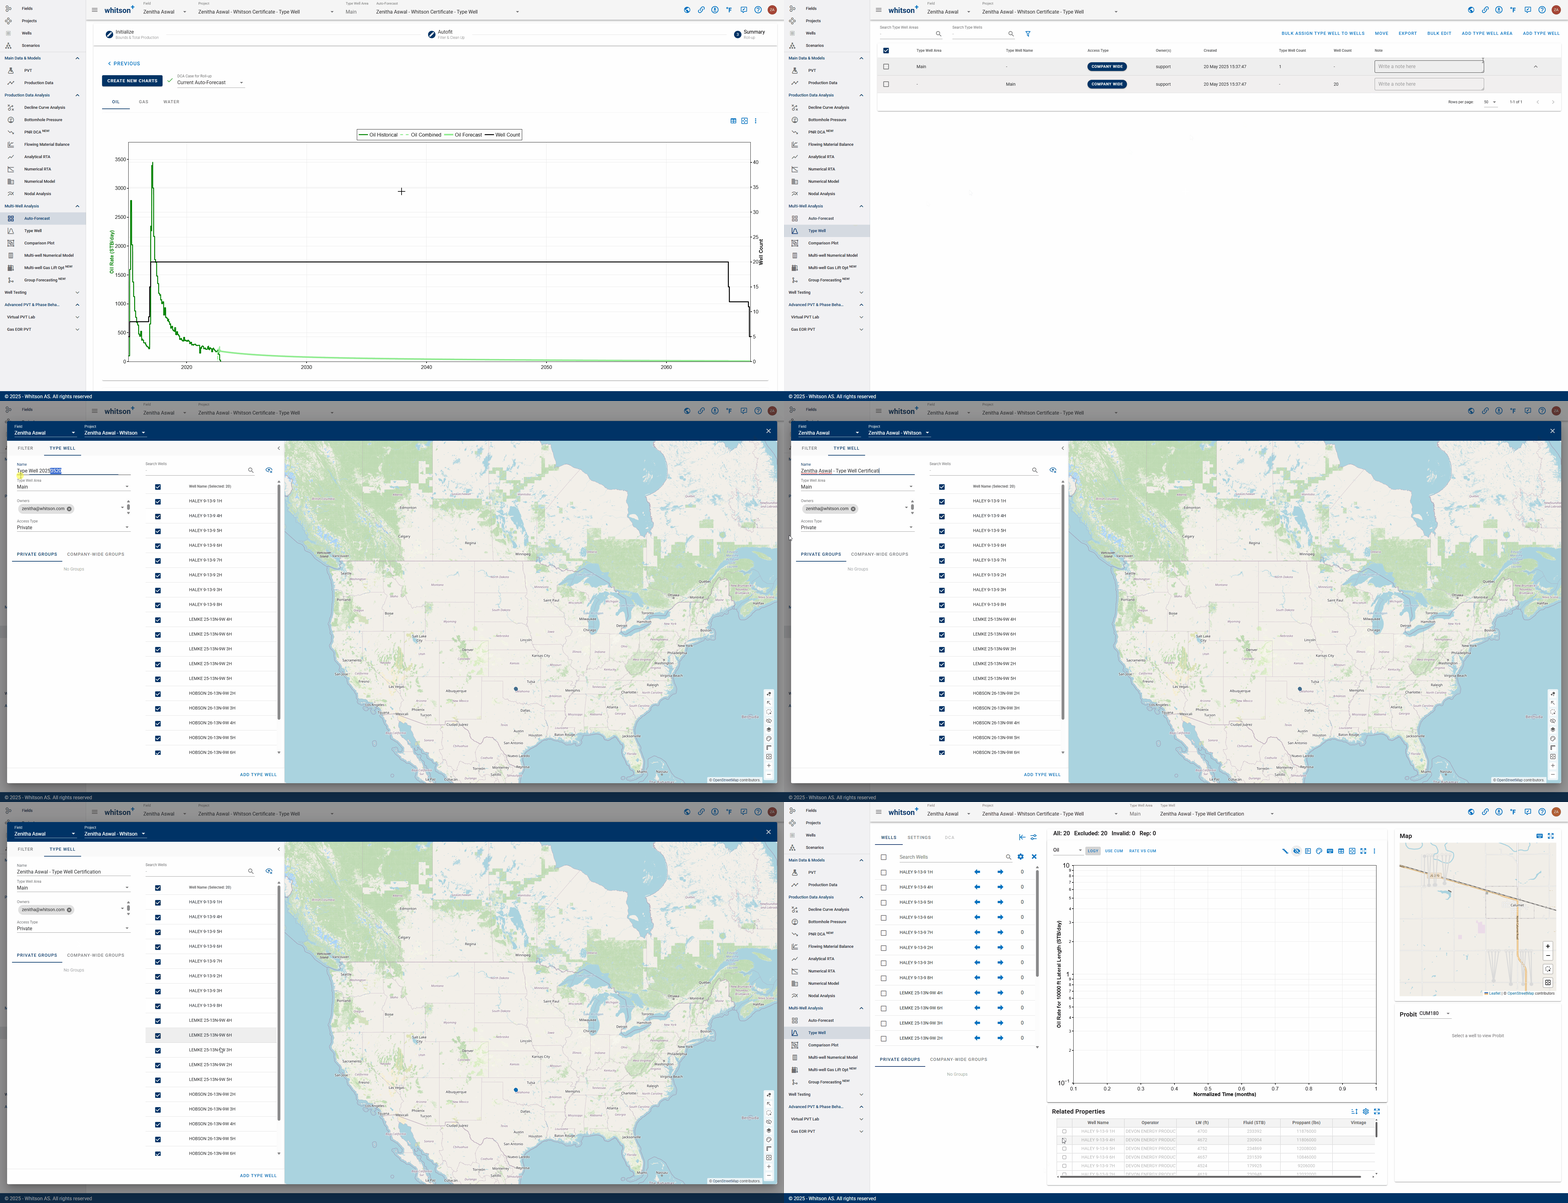
- Click Type Well in the navigation panel (just under Auto-Forecast).
- To the upper right, click ADD TYPE WELL.
- Provide a name and select all the wells by clicking the check box at the top of the well list (left of Well Name).
- Click ADD TYPE WELL to the lower right.
You can store multiple type wells per project
This page gives you an overview of the created type wells, when they were created, who created them and what wells went into creating them.
3.2. Select Wells
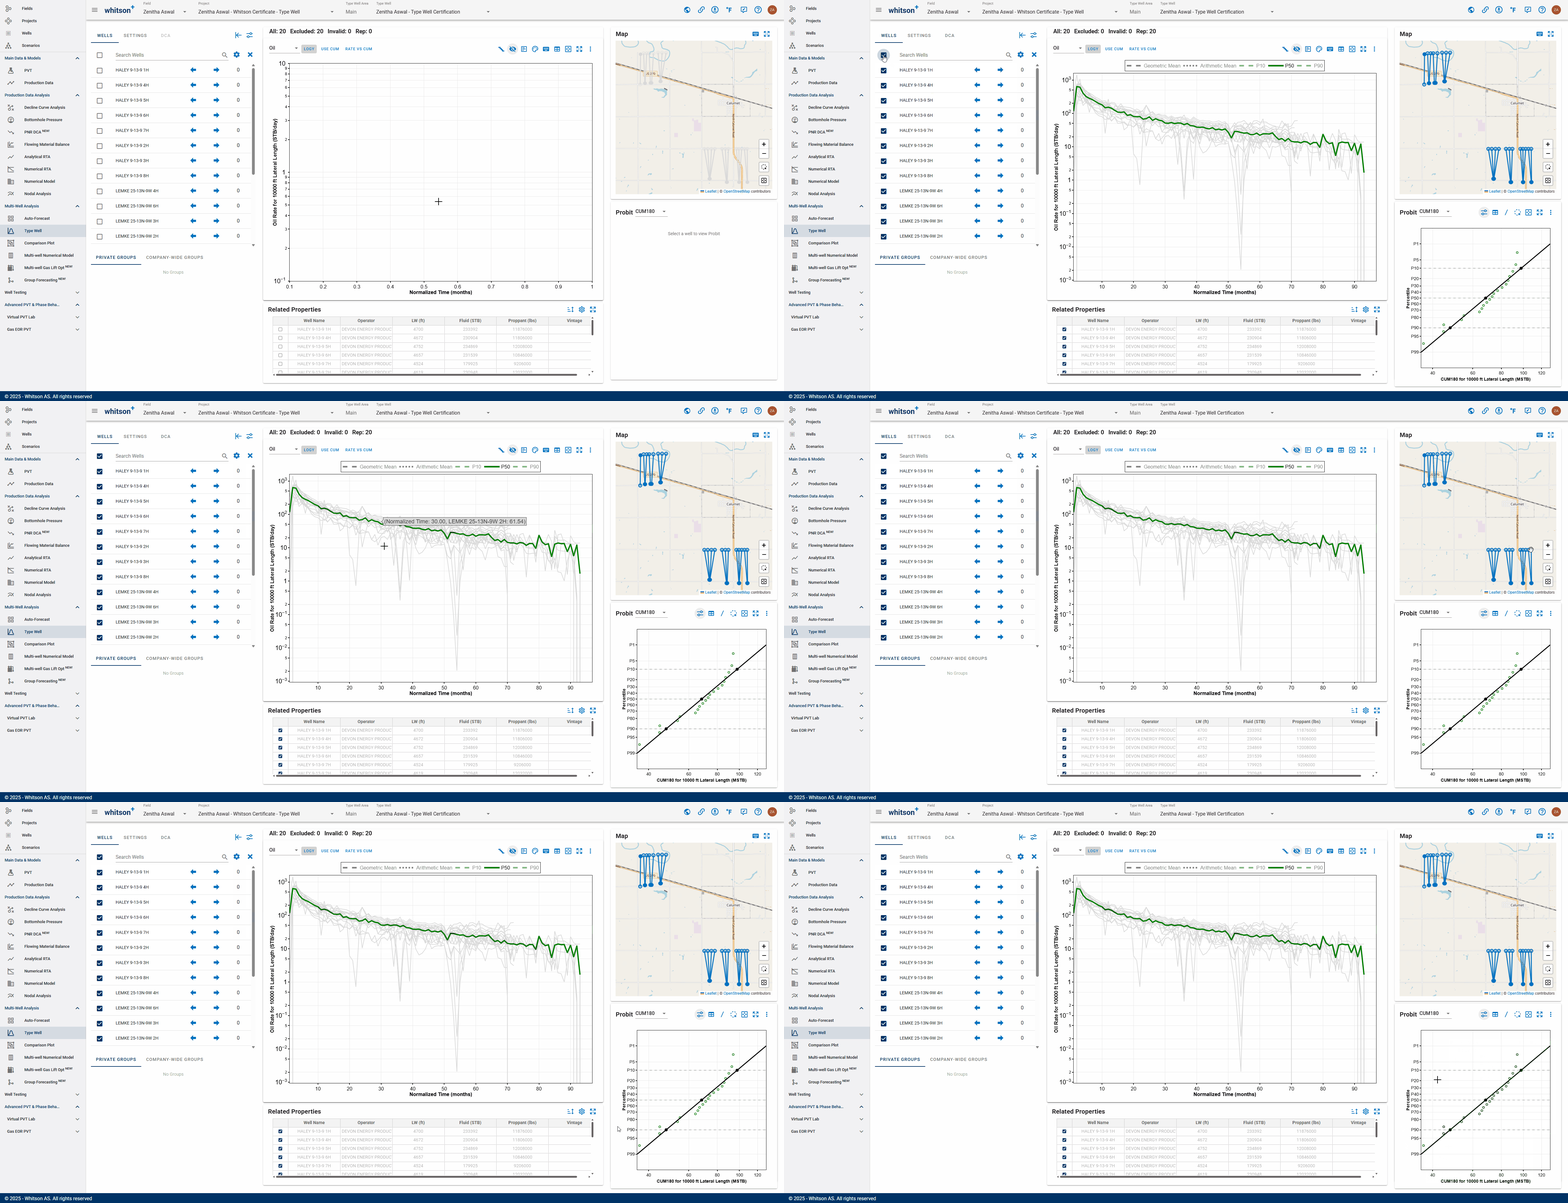
Click the check-box next to search wells.
3.3. Normalization
Normalization restructures data to improve comparability.
3.3.1. Start Time Alignment
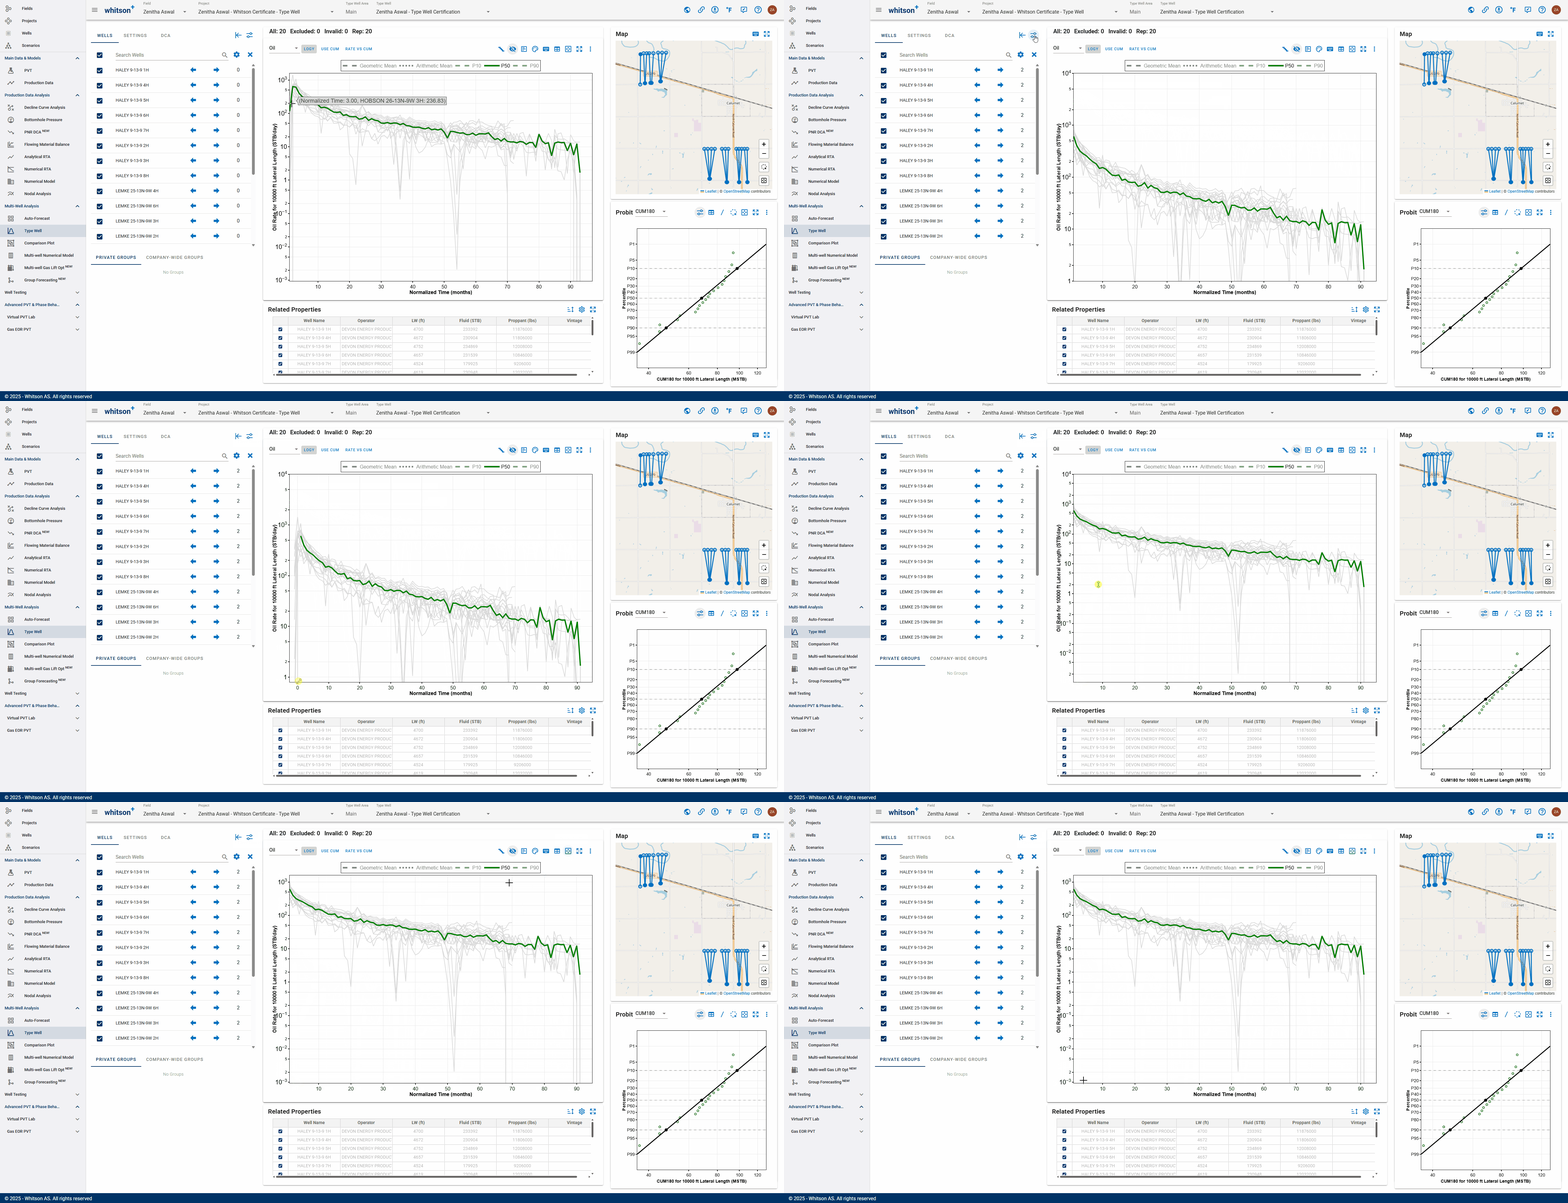
In this example, we'll set the start at peak rate. See .gif above.
Time Alignment
Time Align on First Production
- Strength: on larger well sets, communicates the production profile considering time to peak.
- Weakness: may not accurately reflect production decline behavior.
Time Align on Peak Rate Date
- Strength: more accurately reflects production behavior.
- Weakness: excludes ramp up time which might have a small impact on EUR but is important to first year revenue projection.
3.3.2. Condensing Time
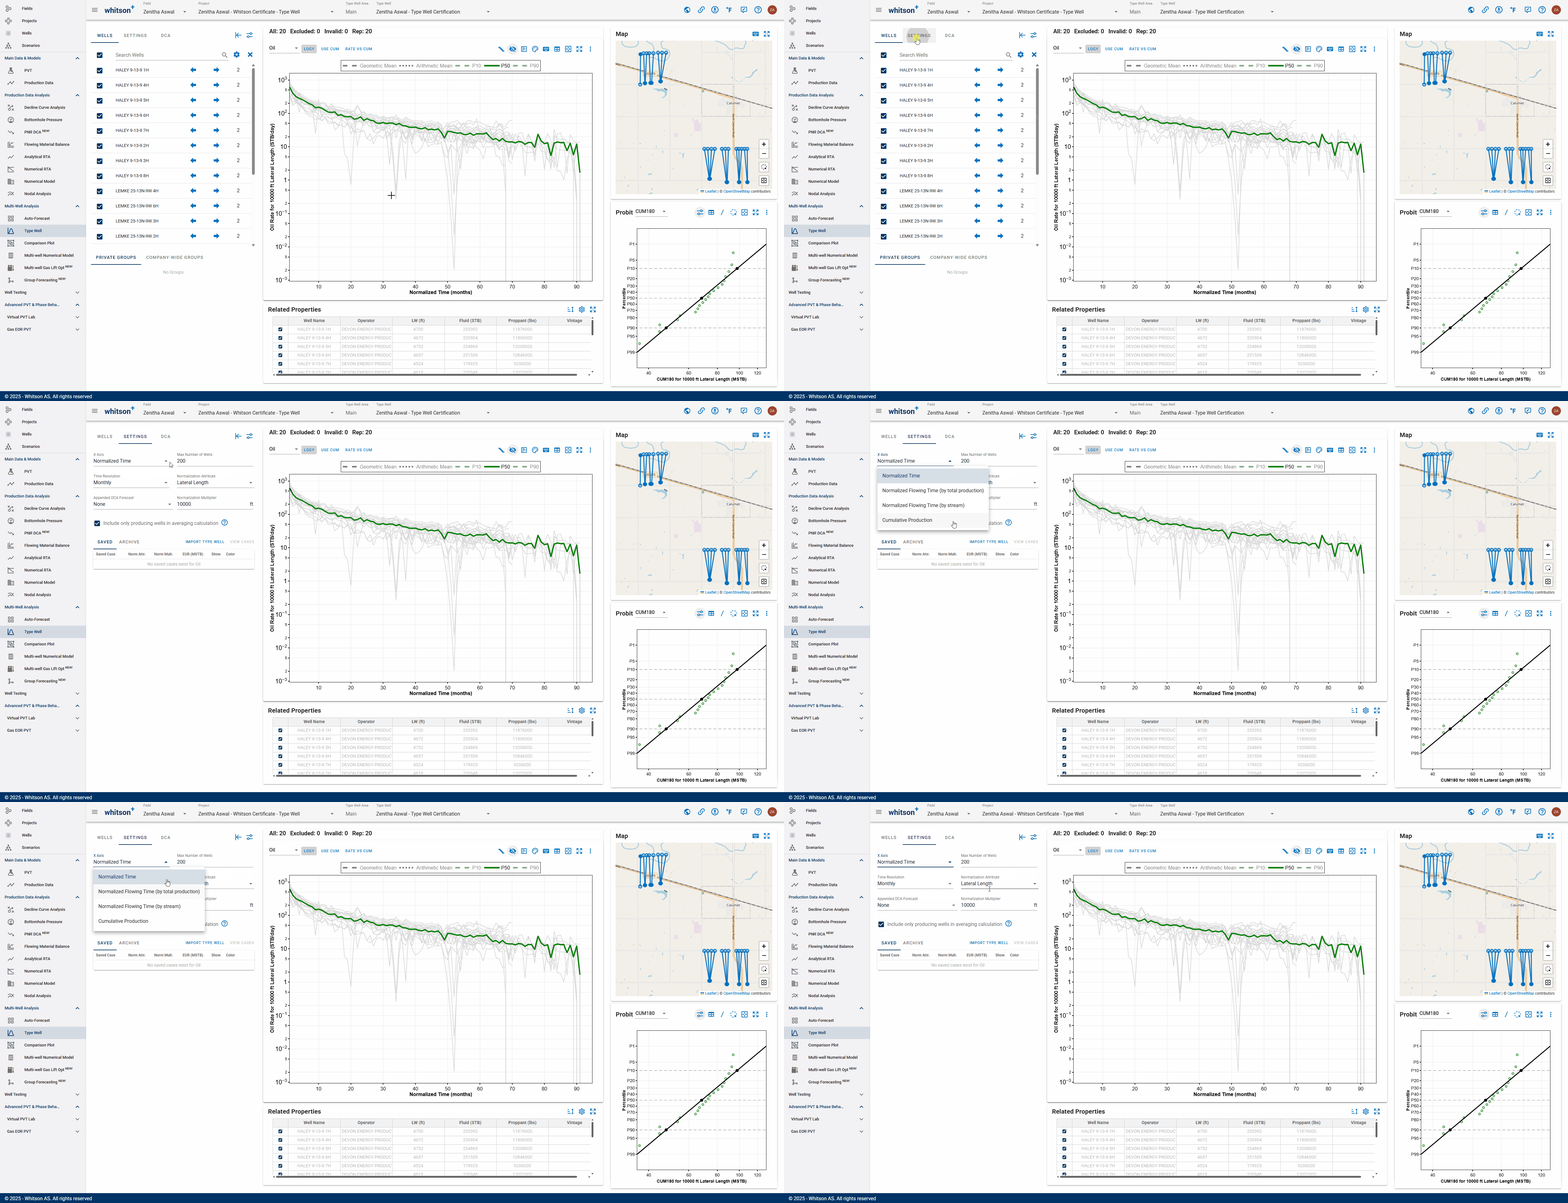
- Click the SETTINGS tab at the top left.
- Select the Normalized Time from the X Axis drop down menu.
- In this example, we'll just keep the default Normalized Time. That said, ensure you read and understand the different options mentioned below.
There are 4 different x-axis time options available
- Normalized Time: aligns time to first production.
- Normalized Flowing Time (by total production): considers only time steps with active oil, gas, or water production, excluding periods with no production (all rates must be 0).
- Normalized Flowing Time (by stream): considers only time steps when the rate of the chosen stream (oil, gas, or water) is non-zero, excluding periods with zero flow in the selected stream.
- Cumulative Production: plots the cumulative production on the x-axis.
3.3.3. Dimensional Normalization
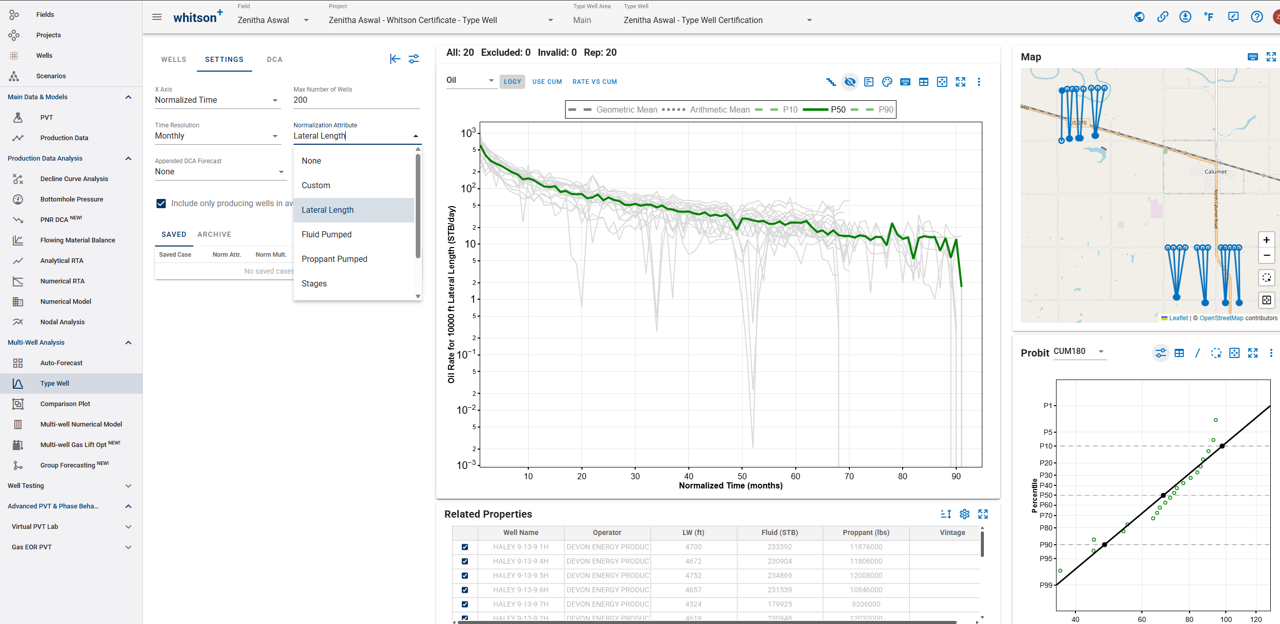
Dimensional normalization puts wells into a meaningful comparative context.
It's common to normalize to lateral length, which we'll also do in this example. By default all new type wells are normalised by lateral length with a multiplier of 10,000.
Non-linear Normalization
It's also possible to perform non-linear normalization in the software, but we'll not cover that in this example. Contact support@whitson.com if you'd like to know more.
3.4. Averaging Method
There are two options for calculating the average:
- The geometric mean represents the central tendency of a set of values using the product of all values, with the n-th root taken (where n is the number of values).
- The arithmetic mean is the average of a set of values, calculated by summing up all values and dividing by the total count.
Both the Geometric Mean and Arithmetic Mean are calculated by default. However, their series are initially hidden on the plot. You can easily view them by selecting them.
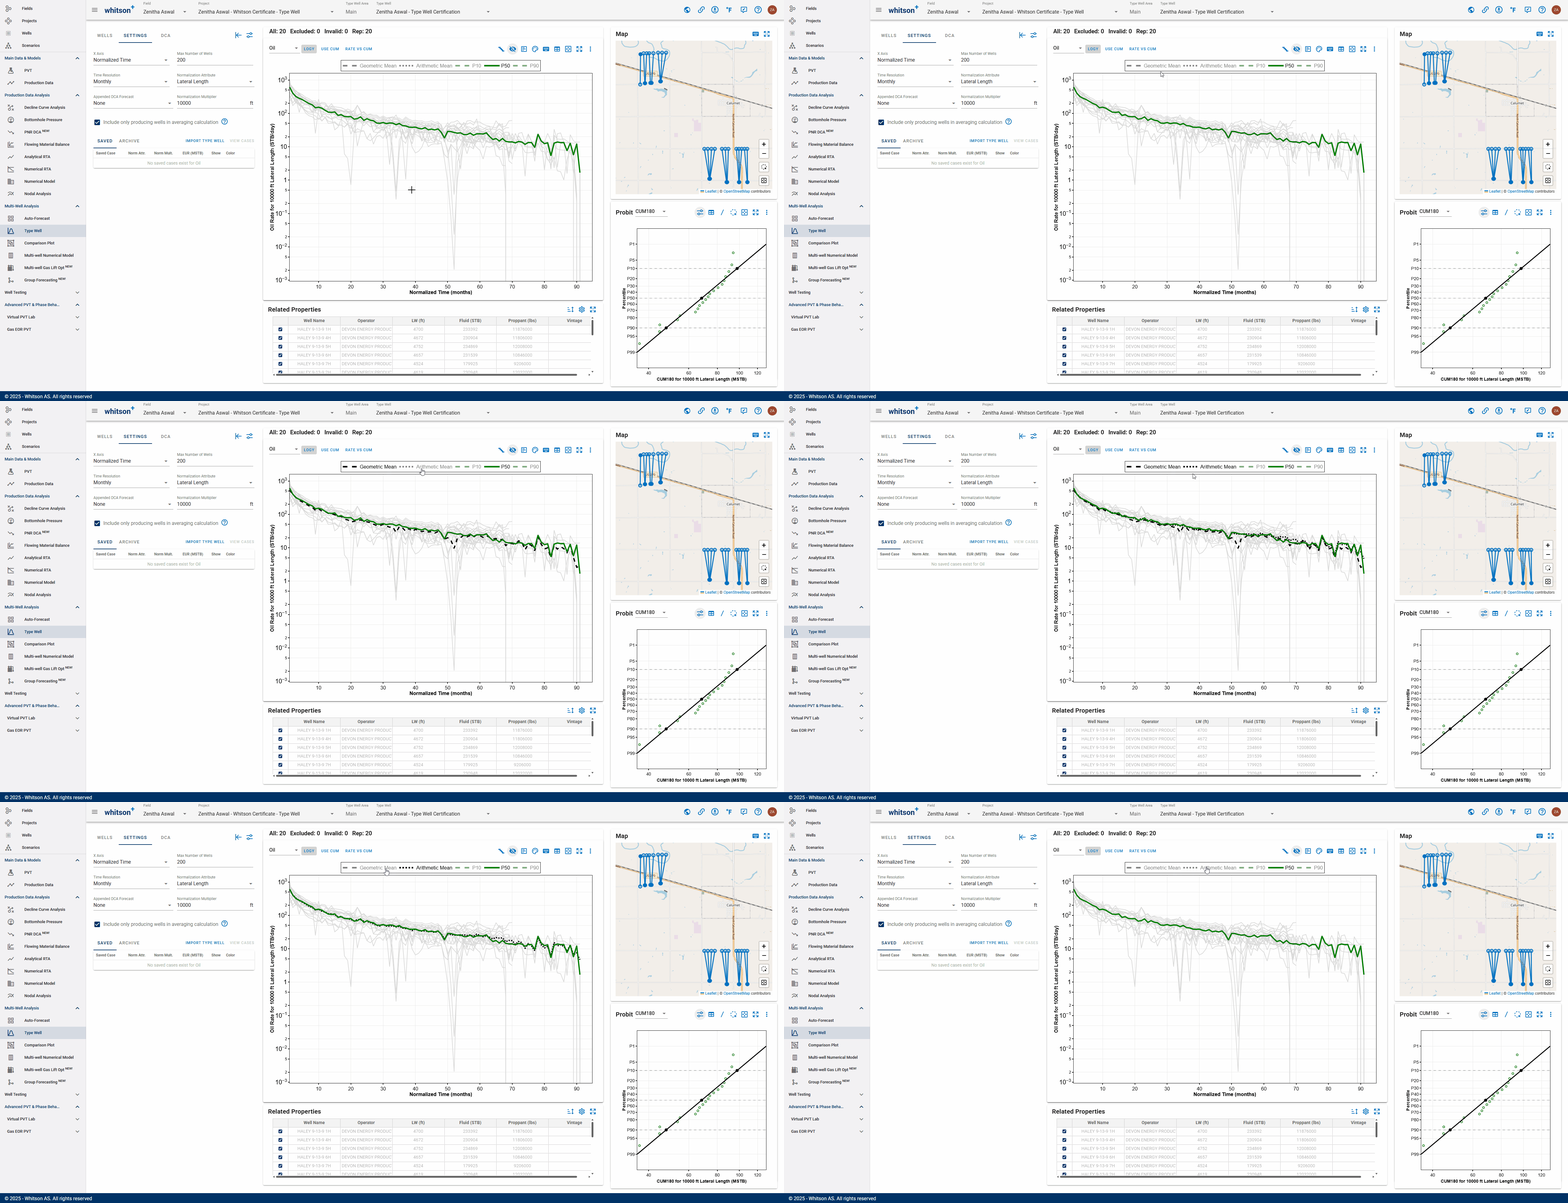
Geometric Mean
“The geometric mean better approximates the median. Medians are more predictive for the outcome of a small number of samples (in this case, drilled wells), as well as being much more robust to outliers. Since production rates and EURs are generally distributed lognormal, an average of the logs of values makes a lot of intuitive sense.“
- David Fulford
3.5. Overview of Plot Options
Watch the video above to get an overview of the different plot options.
3.6 Forecast the Average vs. Average the Forecasts
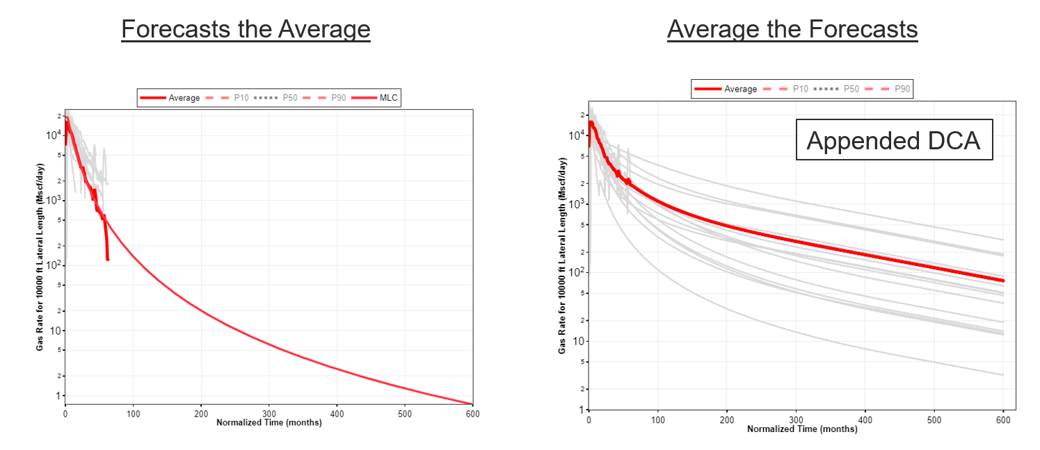
You can either Forecast the Average or Average the Forecast. In this example we'll append the forecasts.
3.6.1. What's the Difference?
Forecast the Average
- Apply a decline to the truncated type well to obtain a full life profile of EUR
- Time effective, but does not provide distribution of EURs
Average the Forecasts
- Time consuming without auto forecast option
- Useful for statistical evaluation and P10/P90 quantification of EUR
3.6.2. Append a DCA Forecast
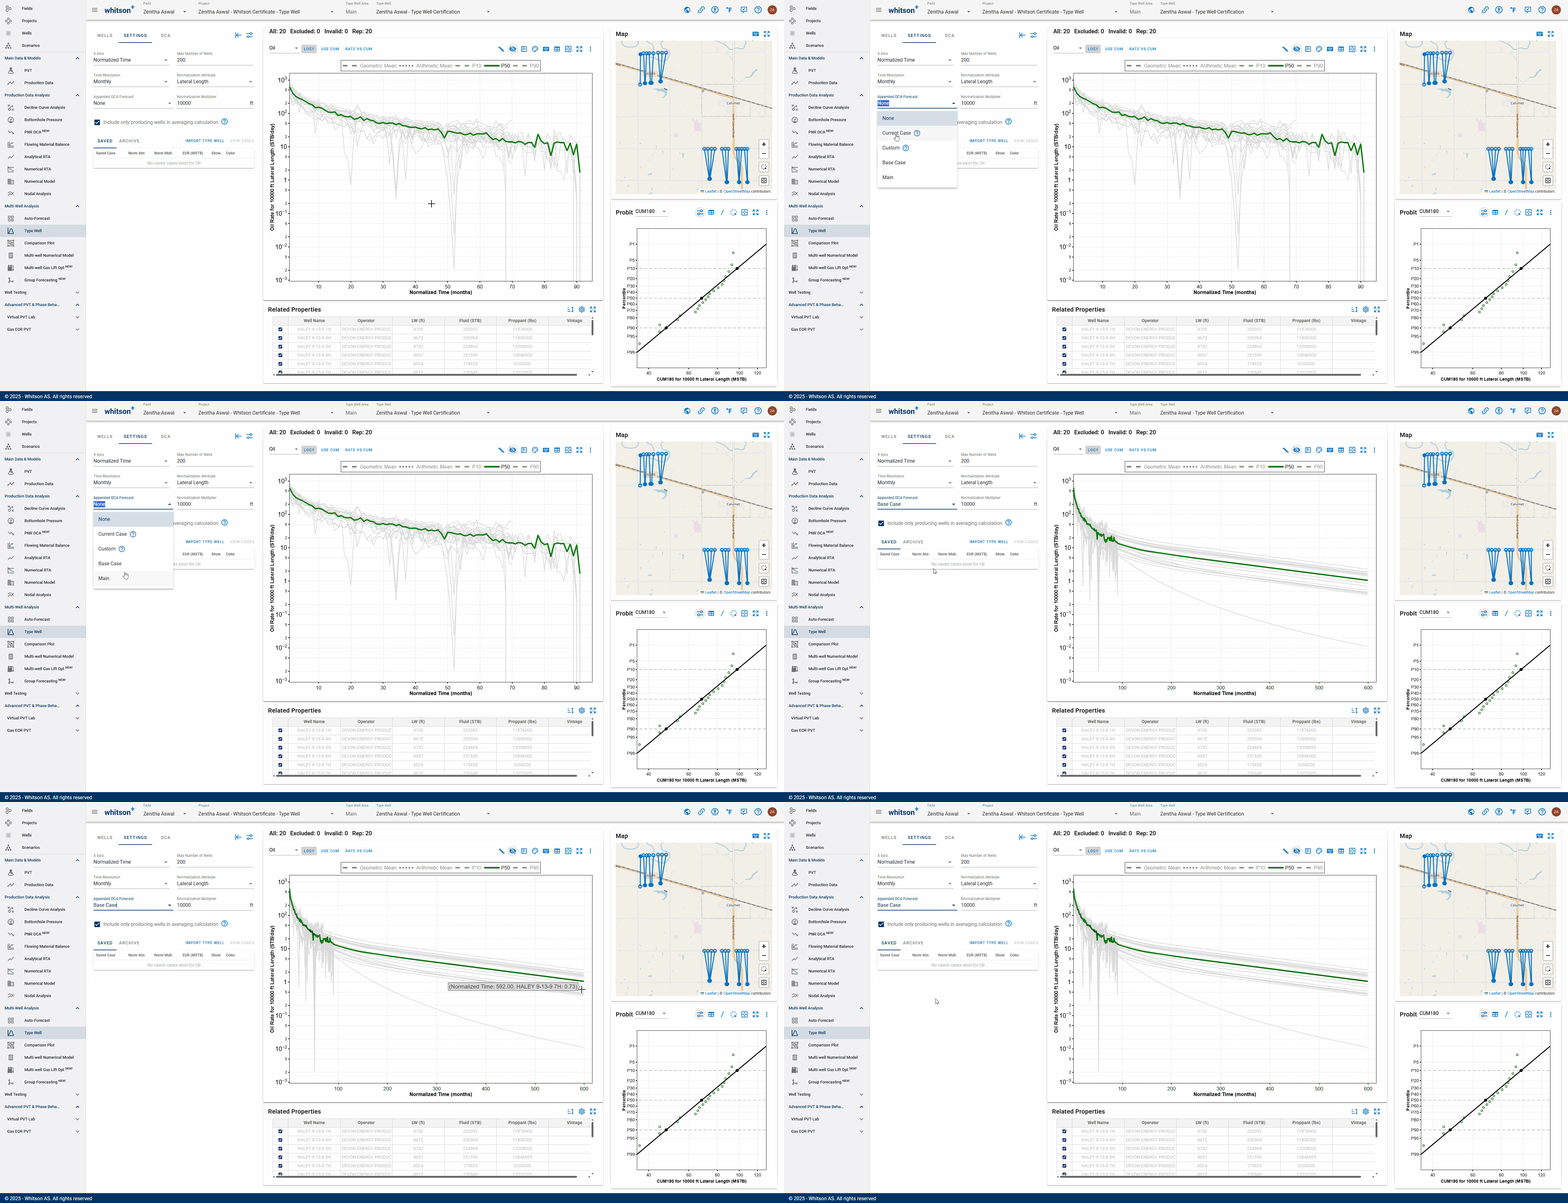
Append the forecast as shown in the .gif above (this is the saved forecast from Auto-Forecast).
For more information about Cumulative Calculation in Type Well vs DCA, see here
3.7. Probit Plot
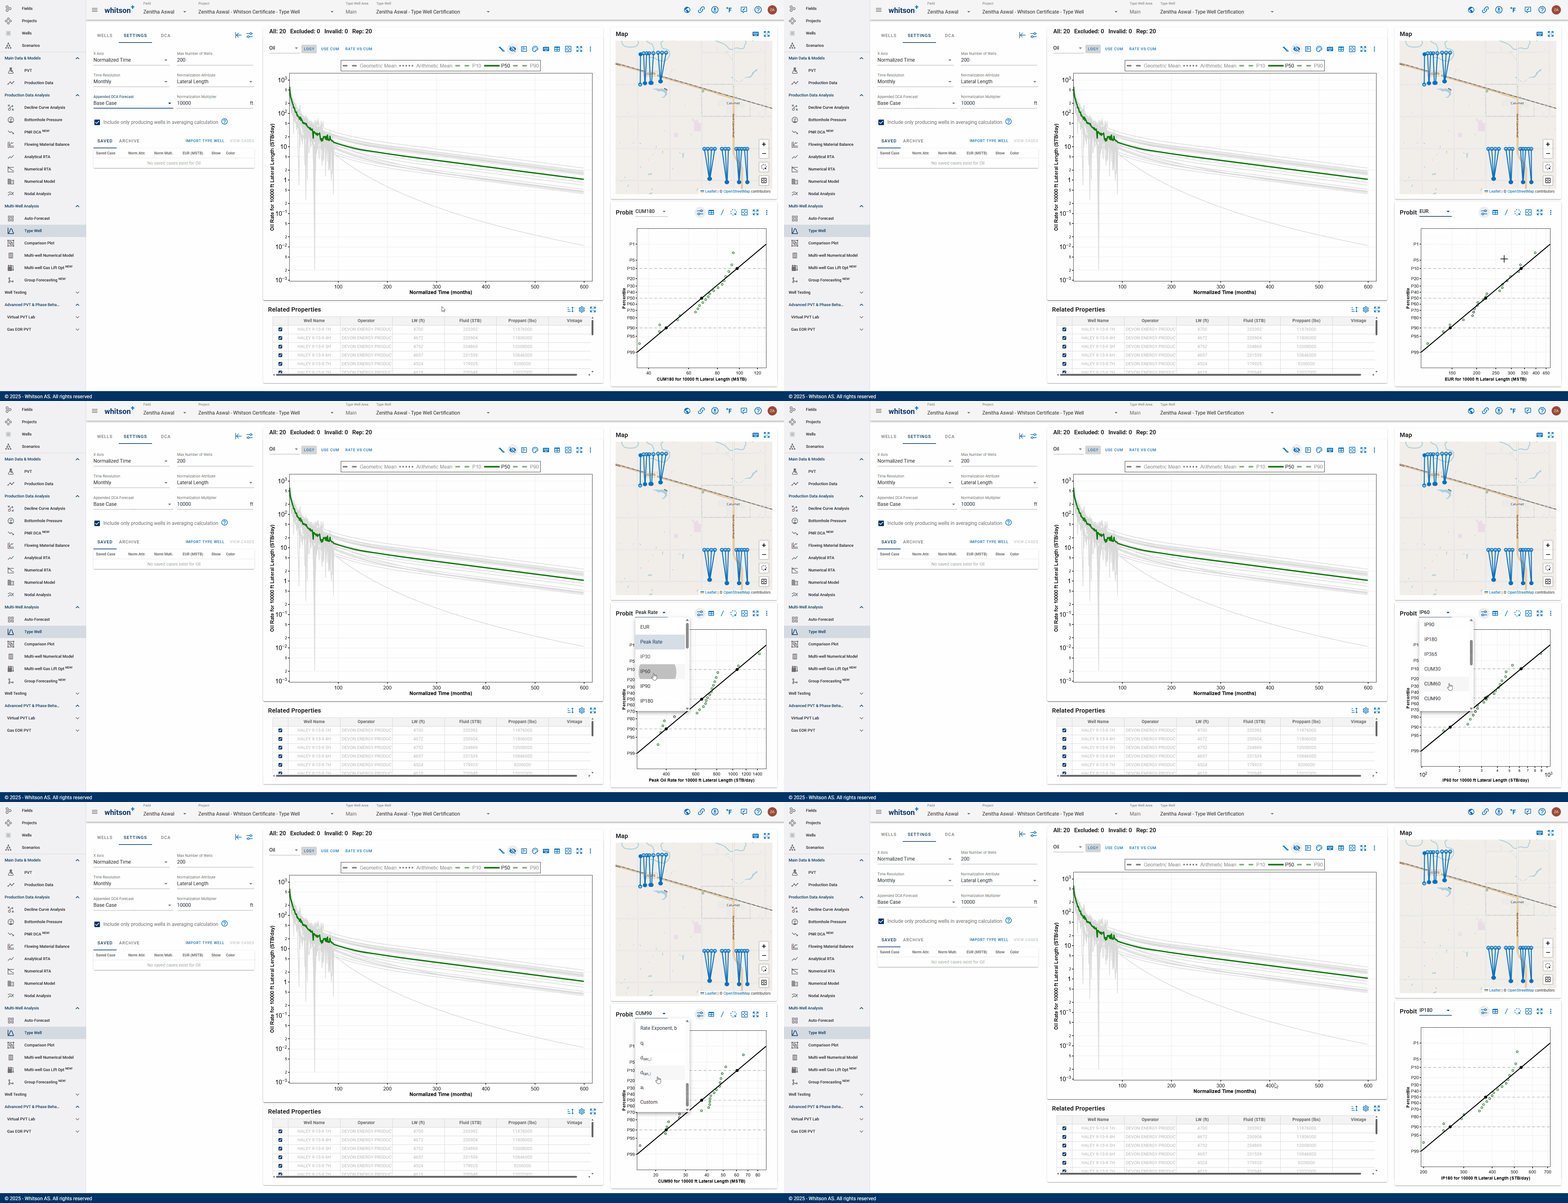
-
Represent the statistical distribution of something (e.g. EUR, IP60, physical parameter) at a point in time.
-
The shape can help to determine if the results trend towards a lognormal distribution.
-
A “probit best fit” regression can yield statistical insights including a measure of uncertainty (e.g. P10/P90 ratio)
3.8. Fit Type Well
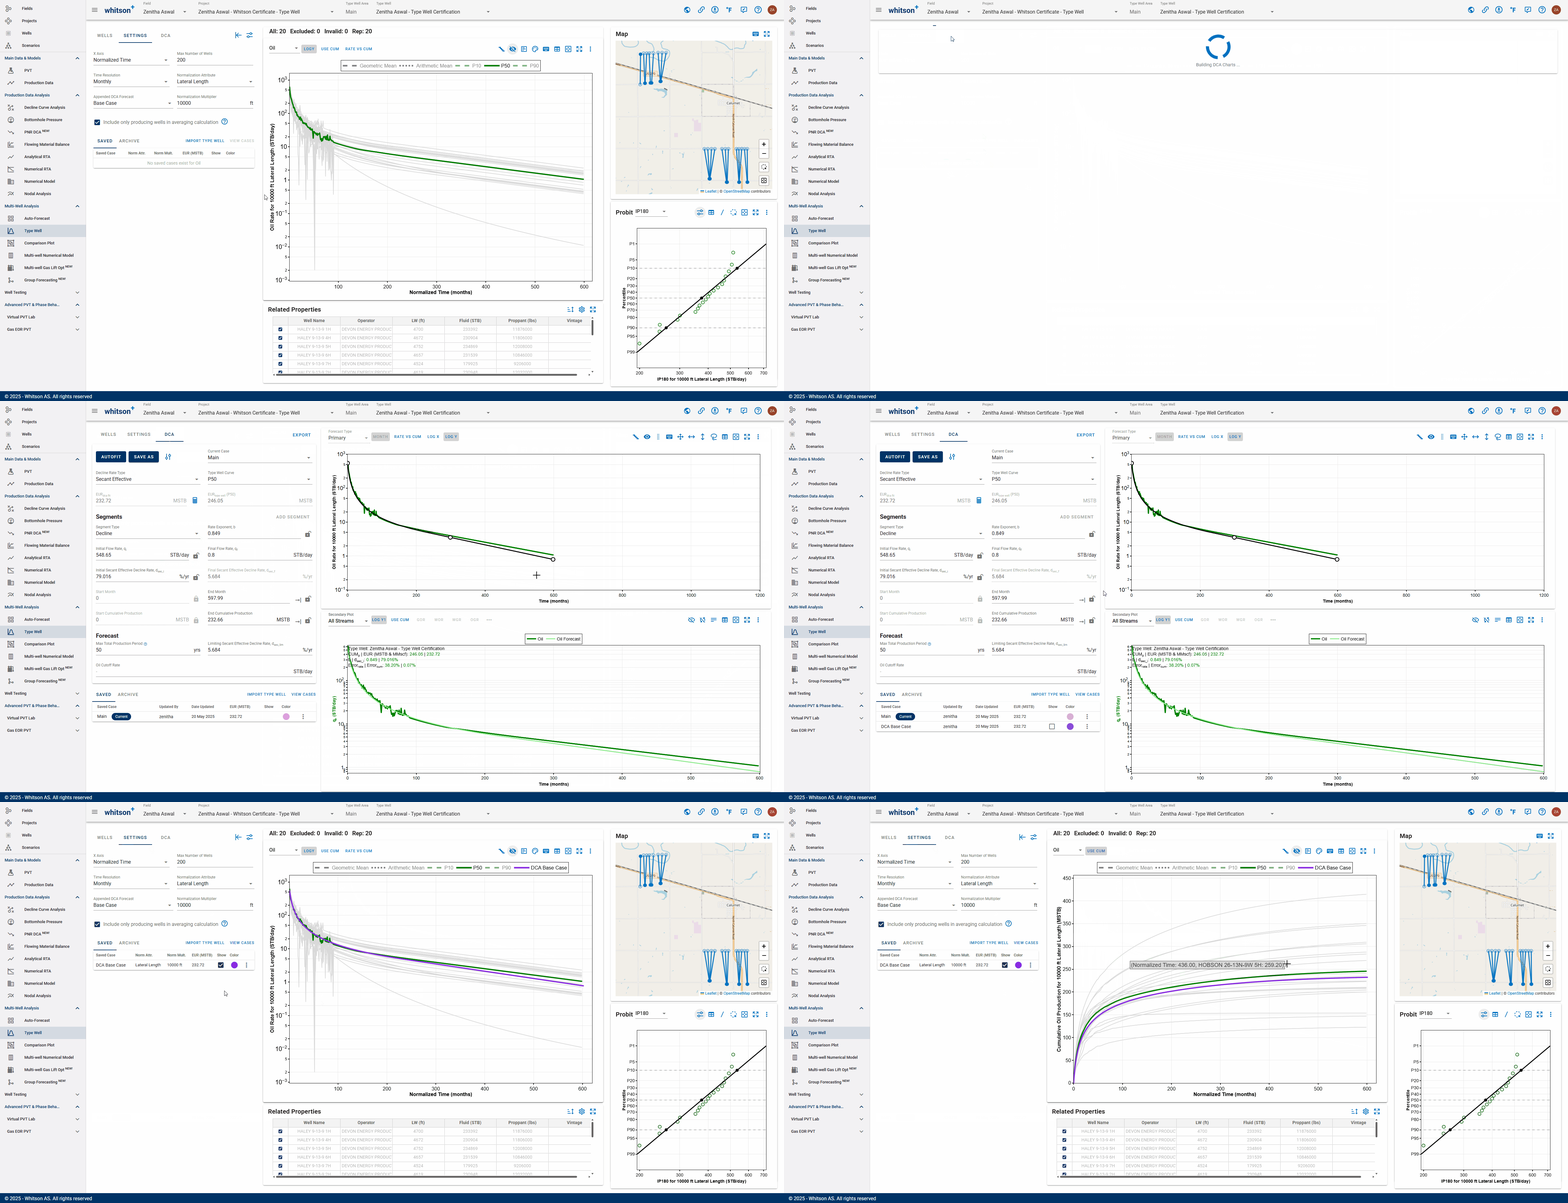
- Click DCA tab from the top left .
- Run AUTOFIT.
- Click SAVE CASE and give a name, for example "DCA Base Case".
- Go back to SETTINGS.
- Check the saved case and the Type Well DCA fit will be plotted.
3.9. Want to Learn More?
Schedule a Type Well session with one of our engineers. Contact support@whitson.com.
Done?
When you are done with your Type Well please:
- Send an e-mail to certification@whitson.com
- Make the subject: "whitson+ Type Well certificate: [YOUR NAME HERE]".
- Include the link to your project.
- If you have any notes, comments, or observations related to the well, feel free to share them with us. Also feedback on the user friendliness of the software is always appreciated.
After that we'll provide some feedback on your evaluation and issue your whitson+ certificate if all looks good.
Want to Learn More?
Read more about the following here:
- →→ Decline Curve Analysis (DCA) ←←
- →→ Auto-Forecast ←←
- →→ Type Well Generation ←←